Showing posts with label TRX. Show all posts

Wednesday, 15 July 2015

6 Exercises for a Stronger Core

Your core consists of the muscles that stabilize the spine and hips, and includes all the muscles of the abdomen, back, glutes and upper legs. A strong core helps protect the entire midsection, and enhances both mobility and stability, which, in turn, improves movement efficiency and keeps the muscles functioning in coordination with one another. This, of course, helps improve balance, posture and strength.
A common misconception is that doing exercises while lying supine automatically increases core strength. While these exercises can help improve abdominal strength, the entire core must be challenged to help improve total-body function. A better approach is to use a variety of stances, such as single-leg, supine and prone, to incorporate a wide range of movements. Here are a few of the best exercises to challenge the entire core.

Glute Bridges
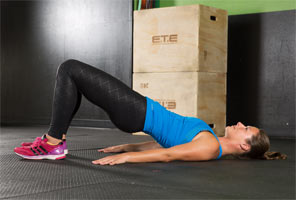

While many consider the abdominal muscles to be the most important for increasing stabilization, strong glutes are essential as well. Many injuries and faulty movement patterns are a result of underactive glutes and overactive quads and hip flexors. To combat this, activate and fire those glutes before workouts to make sure they are turned on and ready to work.
Lie supine on the floor with knees bent and both feet flat on the floor. Keep the head relaxed and slowly push through the heels to raise the hips as high as possible. The knees, hips and shoulders should be in one straight line. This exercise activates the glutes and hamstrings, and stretches the hip flexors, which are often overactive and tight. Hold the top position for three seconds and slowly lower. Do eight to 10 reps per side. To progress this exercise, try one leg at a time or place the feet on the round side of a BOSU.

Medicine Ball Single-leg Reach
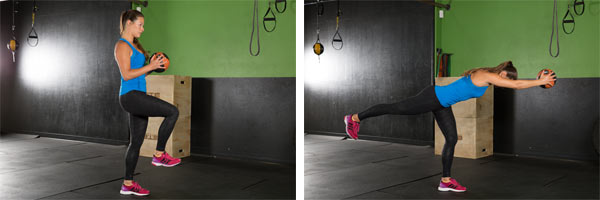

Disguised as a leg workout, this move is great for the glutes, hips, back and abs. Grab a 5- to 10-pound medicine ball and stand on the right leg. Slowly reach forward while hinging at the hips (not the back). Simultaneously lever the back leg out behind the body. Reach as far as possible—work toward bringing the arms, torso, and left leg horizontal to the floor. As the core gets stronger, increase the weight of the medicine ball. Perform two to three sets of eight to 10 repetitions per leg.

BOSU Plank Variations
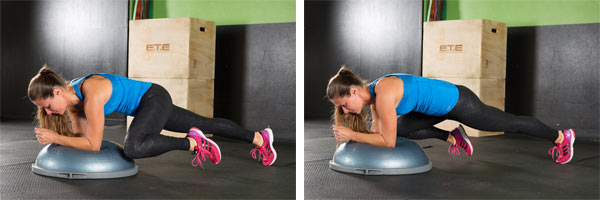

Before attempting planks on the BOSU, make sure your client has impeccable plank form and can hold it for at least 30 seconds on the floor before attempting advanced variations. Planks are meant to strengthen the core, so if your client’s form wavers too much (back sinks, arches or bends), have him or her practice a little longer before advancing.
Start with the elbows on the round top of the BOSU. This creates an element of instability that must be controlled throughout the exercise. Perform a plank for 30 seconds. Begin adding small, alternating single-leg lifts, focusing on lifting the leg with the glutes and not shifting the hips at all. Next, try bringing one leg out about 45 degrees to the side, tapping the toe to the ground and returning to plank position. Perform five repetitions on each leg. Finally, try bringing the left knee out to the side, and tapping it to the BOSU just outside the left elbow. Repeat five times per leg. To regress these variations, perform them on the floor or on a flat bench before moving to the BOSU

Medicine Ball Single-leg Woodchop
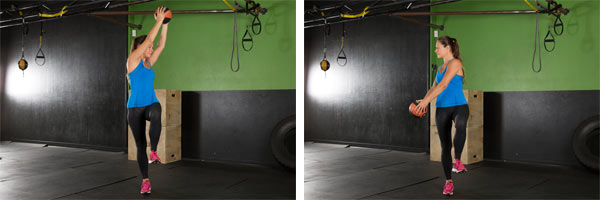

Grab a 5- to 10-pound medicine ball and stand on the right leg. Raise the medicine ball overhead, slightly over the left shoulder. Swing it down quickly, but with control, to the outside of the right leg. Try to keep the torso upright, with a constant slight bend in the right leg. Slowly bring it back up to starting position and repeat eight to 10 times. To regress this exercise, start on two legs and gradually progress to standing on one leg.

TRX Pike


Place the toes in the foot cradles and lie prone on the floor, ready to plank. Push up into a high plank on the hands, establishing perfect form. Keeping the legs straight, push the hips straight up into the air while simultaneously pulling the TRX toward the hands. Slowly lower back down to finish in plank position. Complete eight reps to start, gradually increasing to 15 reps as core strength improves. To regress this exercise, bend the knees to pull the TRX toward the hands.

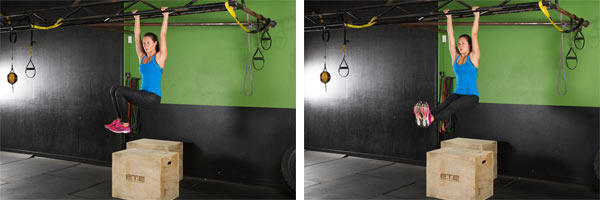
Hanging Leg Lowers
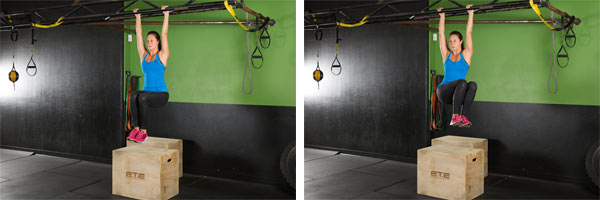


Exercises in which the legs are unsupported are a great way to work the deep abdominal muscles and the hip stabilizers. However, these exercises are not recommended for individuals with diagnosed lower-back pain.

If your client is a beginner, start this exercise using a Captain’s Chair. Once the client has developed a good strength base, progress to ab straps or hanging from the hands. Start with the knees bent, and lift them slowly as high possible, pulling the knees to the chest. Instead of focusing exclusively on the upward movement, think about the slow downward movement. Take about five seconds to slowly lower the legs back down to the starting position. This eccentrically works the deep abdominals, providing control and stabilization, while also preventing swinging. Repeat eight to 10 times. To progress this exercise, slightly twist the knees to the left and right to challenge the obliques. Additionally, try keeping the legs straight but only raise them as high as possible while maintaining straight knees. Again, focus on the slow lowering motion.

Source

Friday, 5 December 2014

Improve Your Strength and Mobility With These TRX Moves

To have longevity in movement (being able to play and do what you love for a very long time), mobility has to be addressed in your fitness routine. Let’s first take a look at what mobility is so we can apply this principle to how we are training. Mitch Hauschildt, the Prevention, Rehab and Physical Coordinator at Missouri State University and Founder/President of Maximum Training Solutions, explains mobility like this:
“Mobility can be defined as the ability to maintain a biomechanically advantageous position throughout a full range of motion. It is necessary for truly authentic movement. Research tells us that poor mobility is the number-one detriment to athletic performance [and] performance in general. If you are not taking the time to address each client’s mobility restrictions, you are not only setting them up for pain, but you are limiting their ability to reach their athletic, weight loss, strength or fitness goals.”
Ideally, you want to incorporate movement patterns that address and enhance mobility, while also challenging strength.
Most of us who have been training or participating in sports for any amount of time know that mobility can be our best friend or our worst enemy. Staying focused can be a challenge for me, so going into a class and rolling around or heading to a station designed just for mobility makes me want to poke my eyes out. I want to feel mentally stimulated while I work on my mobility issues, so I designed some exercises that will do just that. These exercises also challenge strength and stability in all planes of motion, so you can get more done in less time.
These strength and mobility exercises using the TRX Suspension Trainer can help you or your clients maximize training time and goals. They are designed so you can break them down and perfect each part, grooving correct movement patterns as your mobility and strength increase. These exercises take practice, so perform each one as long as you can maintain quality movement patterns and continue practicing until the complete patterns can be achieved.
Hip Extension to Bridge
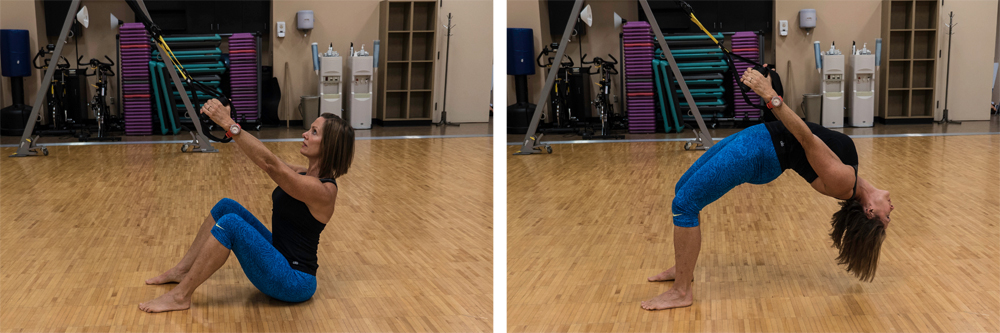
Hip extension to bridge
Adjust the straps to mid-length. Sit on the ground with feet hip-width apart, facing the anchor point. With arms extended, grab the handles and keep the shoulders retracted (as if you are holding $100 bill under your armpit). Slowly press up from the heels, squeezing your glutes and extending your hips while bracing your core (pulling ribs toward hips) to a bridge position. Hold for a couple of beats. With the feet planted, begin to extend your thoracic spine, steering the crest of your head toward the floor. Hold this position and continue to breathe and deepen into the position, keeping the hips strongly engaged. Carefully return to bridge position, hold, and then flex at the hips to return to the starting position. 
Crossing Lunge to Touch
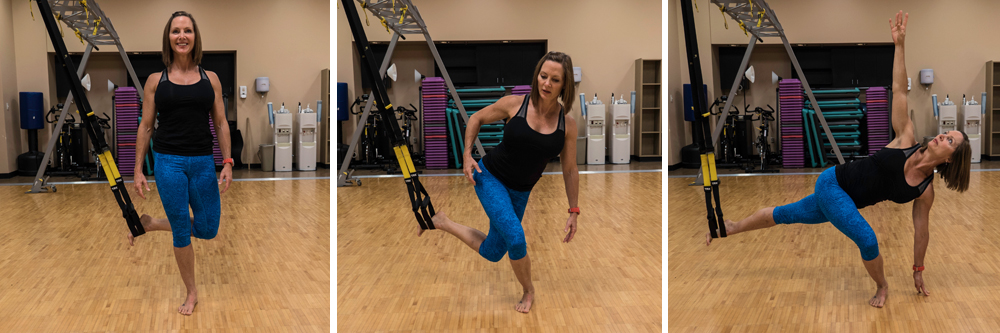
Crossing lunge to touch
Adjust straps to mid-calf, single-handle mode. Stand sideways to the anchor point, with the hip in line with the anchor and the outside foot in the foot cradle; externally rotate the hip. Keep thet core engaged, the spine tall, the lower tailbone toward the floor and the shoulders retracted,  continue lowering until the outside arm touches floor. To progress the movement, extend the leg that is in the straps as you lower toward the floor. Try to prevent the chest and shoulders from collapsing as you touch down. Work toward opening the chest when you touch down. Drive the heel and big toe into the ground as you come to full extension of the standing leg.
Oblique Crunch to Hold
Oblique crunch to hold
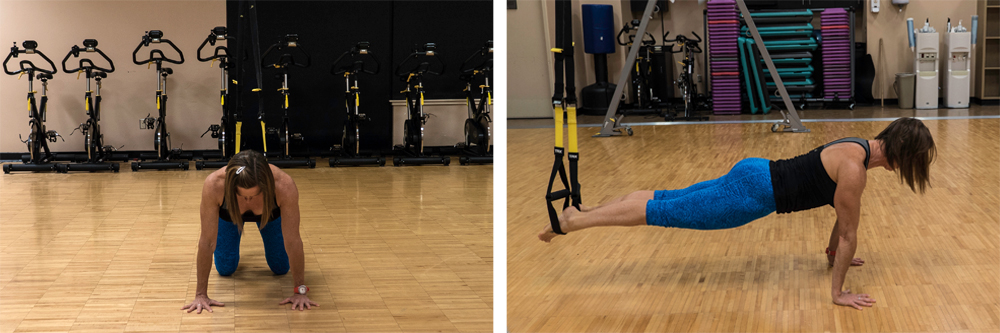
Adjust straps to mid-calf and, with your body facing away from the anchor point, place the toes in the foot cradle. Position your knees on the ground, hands under the shoulders with fingers spread wide; engage the lats and retract the shoulders. Brace the core, squeeze the glutes and press the feet in to the foot cradles to rise up into plank position. Keep the ears, shoulders, hips, knees and ankles all in one line. Slowing bring both feet toward the back of one arm, hold and slowly count to four before returning to plank; hold and move to the other side and repeat.
Half-kneeling Lift to Side
half kneeling lift to side
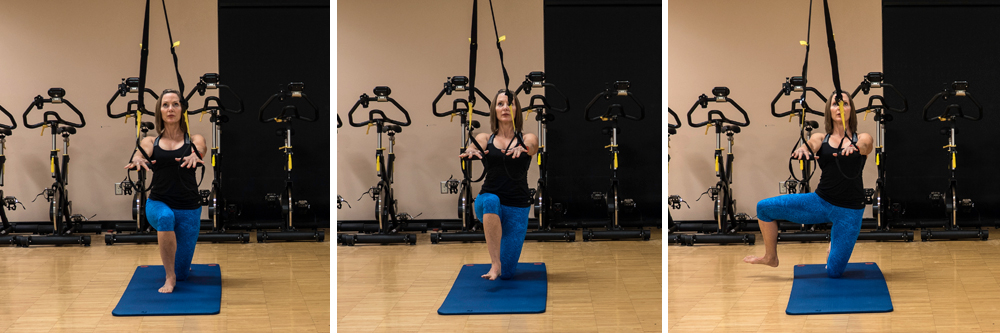
Adjust straps to mid-length. Center your body to the anchor point in a half-kneeling position, with your front foot lined up with the back knee (as much as possible). This position requires more stability. Flex the back toes and press in to the floor. Bring the handles to rib height, firmly pressing into the handles with open hands to engage the core. Slowly lift the front foot (keeping the foot flexed) and hover over the floor about an inch or two; hold for a few breaths. While keeping hips engaged and square to the anchor, slowly move the leg to the side and hold. Return the leg to the starting position, hold and extend the leg while keeping the foot above the floor. Hold and then flex the knee and return to the half-kneeling position. Repeat this pattern on the  other side.
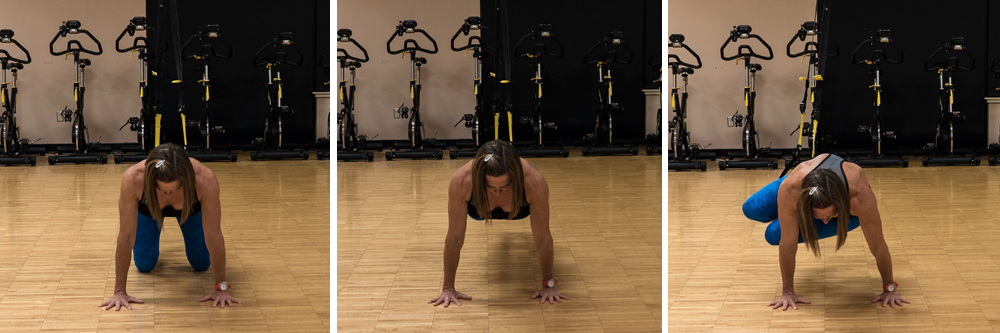
Abducted Plank to Push-up
abducted plank to push-up
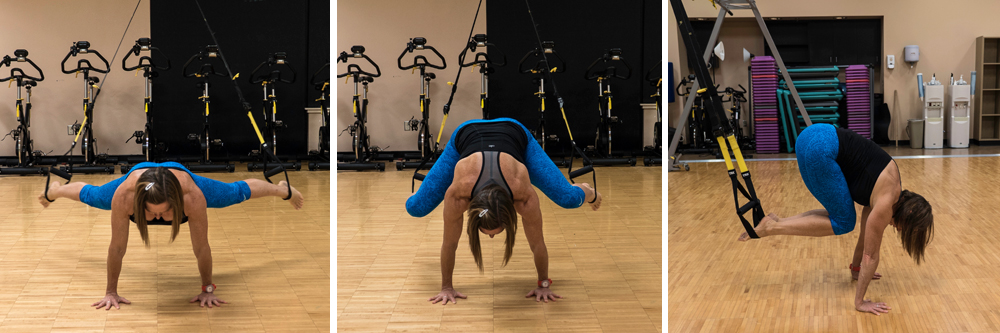
Adjust straps to mid-calf and, with your body facing away from the anchor point, place the toes in the foot cradle. Position the knees on the ground and the hands under the shoulders with fingers spread wide; engage the lats and retract the shoulders. Brace the core, squeeze the glutes and press the feet in to the foot cradles to rise up into plank position. Keep the ears, shoulders, hips, knees and ankles all in one line. Press in to the foot cradles, spread the legs as wide as you can, and bring the knees toward the elbows and circle in to the chest; hold for a beat. Extend back to a solid plank (no sagging) and add a push up. Complete as many repetitions as you can while maintaining excellent form.

Source