Showing posts with label improve balance. Show all posts

Tuesday, 8 December 2015

Reasons Why Plank Exercises Are Great

Some of the best exercises are the least complicated, and plank exercises I think fall into that category. These have recently become an important part of my exercise routine because they are great for core conditioning. In fact, they may look too easy to be beneficial, but especially if you have irritation in the lower back this exercise might be your answer. But it also gives the hamstrings, glutes and shoulders a good workout, and will support proper posture and improved balance.
It should be noted, however that there are some common mistakes made when people do planks, and perhaps even more so than most exercises doing improperly could lead to injury. These exercises will tax the upper and lower regions of the spine. If these areas are weak it will normally cause the spine to sway. This can put compression pressure in the vertebrae and can cause back injuries. It is important especially when starting out, to know just where your limits are and not to exceed them. If you feel any pain in the back area, don't push it, but work your time up little by little.

Besides trying to hold the position for too long, other common faults are placing the hands too close together, allowing the hips and head to drop, and holding your breath. And what should your goal be? You are considered to be fairly fit in the core area if you can hold the abdominal plank position for at least two minutes. But again, you should build up to that point slowly.

That said, here are some reasons why you should be looking to plank exercises as part of your fitness program
1. Posture and balance improvement. By merely staying in the plank position for the period of time requires you to work on your balance. This can be enhanced further by doing planks on a BOSU ball, or by doing side planks. If we do lose our balance and posture position as we age, it is normally because of the weakening in the core area. Planks are great for this.

2. Alleviates back pain. Whatever you do to strengthen your core area is probably going to make your lower back stronger. The reason is because plank exercises require minimal movement while contracting all the layers of the abdominals.
 
3. Tones the stomach region. These exercises will be in our core muscles of the belly area. This is the foundation of the outer abdominals, or six-pack abs. This will be helped further by pulling in the area of your belly button, which will contract those deep inner transverse abdominal muscles.

4. Builds flexibility. The first time get into the plank position you will probably feel how the body becomes stretched. Not only in your posterior muscles but also in the shoulder area, the hamstrings and even the arches of your feet down to your toes. Plank exercises are a natural for stretching the body.

5. Mood enhancement. All of the above reasons for doing planks will help to improve a person's mood. Stretching and releasing the tension from muscles throughout the body are going to invigorate anyone who does these wonderful exercise routines.
 
Where you carry your weight has a lot to do with your overall health, as it is a  marker for issues having to do with the kidneys and liver. Read more about how to put on good weight through diet and exercise on our website  http://muscle4weightloss.com/. Rich Carroll is a writer and avid health advocate now living in Chicago.

Tuesday, 1 December 2015

The Benefits of Using a Foam Roller Pre/Post Workout

Foam rollers are effective for increasing flexibility, but when are they best utilized? The answer to that question isn’t necessarily limited to when it’s most beneficial to use a foam roller. It’s rather a matter of how. According to National Academy of Sports Medicine CEO and founder Mike Clark (h/t OutsideOnline.com), practically everyone fails to properly utilize foam rollers. Correctly using a foam roller before strenuous exercise can decrease your chances of contracting an injury and improve your workout.

Tension release from problem areas
Your basic instinct to gently roll back-and-forth consistently won’t yield optimal results from using a foam roller. Instead, it’s important to apply pressure on problem areas of your body, such as the hip flexors and glutes. Hip flexor strain is a common outcome of daily physical activity, like sitting upright in a desk chair during an eight-hour workday. It’s also a primary point of concentration for mild lower back pain. You can effectively release the tension in your hip flexors, and other problem areas of the body, by rolling your hips on a foam roller for approximately one to two minutes before a workout.

Optimized range of motion
Stretching is widely conceived as an important element of pre-workout activity, but conventional stretching technique does not directly target muscle receptors and tendons. While it’s entirely possible to warm-up each major muscle group through stretching, using a foam roller can help prepare tendons for strenuous activity and also decrease muscular-tension imbalances. Foam rolling can help increase your body’s overall range of motion and enable you to perform explosive weightlifting exercises with greater authority.
 
Decreased muscular imbalance
Muscular imbalances refer to certain muscle groups within the body being stronger than others. Over time, it’s likely that you’ve noticed peculiar variations in how your body reacts to strenuous exercise. For example, it’s possible you’ve realized your quadriceps are able to handle more weight in the squat rack than your chest can tolerate on the bench press. While this is relatively common among active gym-goers, it could be an outcome of muscular imbalance. Clark emphasizes that foam rollers activate the Golgi tendon organ, which effectively allows conventional stretching to activate muscle receptors. This process helps create balance within the body, thus enabling you to exercise at optimal capacity.

Increased strength and flexibility
According to research published in the Journal of Strength and Conditioning Research, a dynamic warm-up model will increase strength in the quadriceps and flexibility in the hamstrings. A conventional warm-up period typically consists of moderate stretching activity and low-intensity exercise. However, combining the use of a foam roller with a regular stretching regimen, and performing five minutes of moderately intense cardiovascular activity, such as spinning, has the potential to enhance your body’s ability to execute strenuous exercises. Although research regarding foam rolling and its correlative effect on exercise remains limited, experts like Clark tout foam rollers ability to stimulate muscle receptors, which aid the process of lengthening muscle fibers.
 
Enhanced effectiveness of stretching
The ultimate benefit of utilizing a foam roller both before and after a workout is that it enhances the effectiveness of conventional stretching methods. Foam rollers apply deep pressure to problem areas, especially those in the pelvic region. This consequently activates muscle receptors, which increases your overall range of motion, decreases muscular imbalance, and helps maximize your strength and flexibility.

John Shea is a team sports fanatic and fitness aficionado. His work has been published across a wide platform of online audiences in the realm of health and fitness. His passion for fitness is exemplified in his writing, as he aims to help readers improve their overall well-being.

Source

Thursday, 17 September 2015

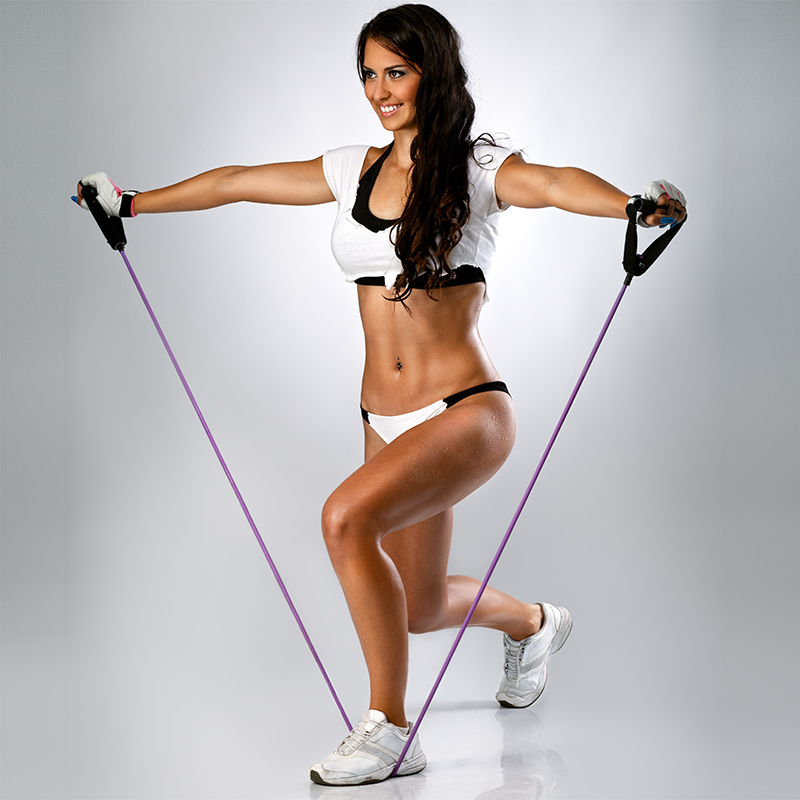
Resistance Band Guide

Resistance bands, also called resistance tubing, are an exercise accessory made of rubber. Common exercises can be maximized with resistance bands, as the bands increase the load requirement put on your muscles. Because of their versatility, exercise bands are an appropriate exercise tool for people of all fitness levels. Talk with your doctor before starting a new exercise routine, particularly if you have an existing health condition or injury.

Types

The thicker your resistance band is, the more resistance it will provide. Lighter colors are generally for lighter resistance levels, and as the thickness increases, the colors of tubing get darker. You should use a resistance band that you’re able to stretch, but that is still challenging for you. When stretching your band is no longer demanding, you should advance to the next level of thickness. The varying muscles in your body have different levels of strength, so buy a variety of bands so you’ll be prepared for different exercises. Resistance bands with padded handles are usually more comfortable than non-padded, interchangeable ones.

Usage

Resistance bands are used to gain strength, flexibility and balance. Depending on the exercise, the band can either be fastened to an object such as a door knob, or you can use the band while holding onto the handles. Muscle strengthening exercises such as hamstring curls, bicep curls, squats and reverse crunches are enhanced when a resistance band is incorporated because of the force you exert when attempting to pull the band. You should perform eight to 12 reps of each exercise and two to three sets of each rep.


Benefits

Resistance bands are inexpensive, lightweight and easy to pack into luggage or a gym bag. You can use them with most calisthenic-type exercises, and their versatility will help you concentrate on your targeted muscle groups. For example, if your goal is to strengthen your hamstrings, use your resistance band around both ankles and perform single leg butt kicks while holding on to a secure surface. The resistance from the band will increase the work done by your hamstrings.

Precautions

If a resistance band is joined together at the ends to make one continuous band, the bond where it is joined can be faulty and break, leading to injury while exercising. Choose a band that is a continuous piece of rubber. When performing an exercise that requires the band to be attached to an object, be sure it is fastened securely to avoid slippage. If the rubber on your resistance band shows sign of wear, aging or weather damage, replace it with a new one. If you experience sudden or sever pain while working out with resistance bands, seek medical help immediately.
Source : Susan Presley has been a health care journalist since 2006. Her articles have been published by "Current Health" and the "American Journal of Nursing." With a Bachelor of Arts in communication from Truman State University, she is pursuing a Master of Divinity at Louisville Seminary in Kentucky.


Tuesday, 28 July 2015

Monday, 27 July 2015

The Benefits of TRX Suspension Training

To the untrained eye TRX suspension straps may look like a limited form of training. However, in the right hands (or ankles, arms......) they become an all over body workout! The TRX works via gravity assisted moves and gravity resistive moves - with the only weights involved be that of your body. There are hundreds of different exercises which can be performed using the straps, ranging from those suitable for beginners through to the most elite of athlete.

Below are just a few of the many benefits TRX suspension training can offer:
a) TRX suspension training can take place virtually anywhere, is extremely portable and requires only limited space.
You don't need a fancy gym or fitness centre to train with TRX. All that is required is a beam or other suitable prop for attaching the suspension traps to. That makes TRX ideal for outdoor training, and given it's lightweight and size it is an easy piece of equipment to take on your travels - giving you no excuse for your training to suffer! It is also very fast to set-up in any location.
b) TRX suspension training is an effective total body workout.
There are numerous suspension exercises and workouts which target all the body parts to varying degrees of intensity. Many of the exercises stimulate multi-muscle groups at different levels, making quick but effective workouts possible.
c) TRX is suitable for people of all age, sex or fitness level.
TRX suspension training is for everyone and anyone. From people in their 80's to teens, the difficulty, intensity and weight exerted can be tailored around the user via the thousands of exercises.
d) The equipment is relatively inexpensive.
To recreate the range of movements and muscles worked using traditional gym equipment would be very costly. The suspension straps can be used to work every muscle group meaning they are an all -in- one fitness solution. Each TRX comes with a DVD demonstrating some of the very best exercises, along with numerous extras.
e) Combine cardio and strength training into one workout / exercise.
Given the nature of TRX suspension training it can be utilized to combine strength training and cardio in the same exercise. This has benefits in regards to time saving, and means that even a short workout can have a bigger impact.
f) Increase Sports Performance.

TRX can be used to generate and build superb muscular balance, mobility, joint stability, and core strength - which will most certainly help you perform better in all sports and physical activities.
If you haven't tried TRX suspension training yet, maybe it's time you do!

Monday, 13 July 2015

How to balance indulgences and fitness


Indulge and Get Fit
The key to a healthy and happy life lies in finding balance, not in denying yourself life’s basic pleasures like comfort food and TV. Provided you can balance things out with exercise and healthier food choices, you can and, arguably, should indulge yourself.
The basic principle of it is familiar because we’ve all had it drummed in us when we were growing up: if you worked for it – you can have it. It’s all about whether you deserve to have an extra hour of playing a video game or eating a chocolate or not. And it works, if you pay for it, first.
Food Indulgence
Food indulgences are tricky since you can’t let yourself have something nice and comforting after every training session otherwise you’ll cancel all out all of your hard work. It really comes down to using a simple formula correctly. If your body is getting the extra food = energy to burn in, it has no reason to dig into your reserves. So it’s not a good idea to have a chocolate after each run unless you have run over 10K and will have a calorific deficit even after a mars bar, for example. You can, however, make your “payment” in installments over several training sessions. So three full training sessions earn you a meal of your choosing or a treat. It doesn’t mean you can have a bucket of ice-cream, of course, but it does mean that in moderation you can have anything you want.
Food indulgences are important for keeping your spirit strong. If you have something to look forward to, it’ll be easier to put up with your training regime and you’ll feel happier and not deprived all the time. I suppose you could say that by doing it this way you can have your cake and eat it - sort of.
TV & Video games
These are fun, especially good quality series and good quality games not something you watch and play out of boredom. The TV or games aren’t the problem, the constant sitting down and idleness is. Our bodies are designed to work and are their happiest when they have been exercised. This is indeed the situation of “use it or lose it”. And most of us spend a lot of time sitting down all day so we need a lot of extra activity to compensate for that already.
There is a good way to fix that, get fit in the process and still indulge in viewing and playing: pay in exercise in advance. As a matter of fact, make a price list for yourself consisting of basic routines that you have to perform before you get to have your fun. So to watch one episode of your favorite series you have to first do 20 burpees or you can’t play a game until you do 40 squats. Every fun, but idle activity has to have a pricetag on it so that all of the sitting down is accounted for.
It's all in the balance
Eventually you get used to the daily exercise and won’t even think about it twice. It’ll become as normal as brushing your teeth; and to be fair it should be just as much part of your life as that for you to get and stay fit.
It’s all in the balance and in being accountable for everything you do. Eating lots of sweets and fries and then promising to be good “on Monday” doesn’t work because come Monday, you’ll be saying “I meant next Monday”. What’s better? To promise be better tomorrow, eat fries and feel good for five minutes or work for your fries first and then feel good long-term? And if everything else fails and things get out of hand, you can always use Scarlett o’Hara’s wise words “I’ll eat it tomorrow” (yes, I am pretty sure that’s what she said).
Earn your play time and you’ll never feel guilty about it ever again.

Source

Thursday, 11 June 2015

10 Yoga Poses for Weight Loss: 5 Basic Poses and 5 Poses for Weight Loss


Yoga is an excellent technique to relax the body and raise flexibility. It’s also great for toning muscles, and increasing strength and balance. If you’re looking for some beginner information about yoga for weight loss, this blog will give you five basic positions and five positions for weight loss. Beginners of yoga should use a yoga mat or carpeted area for their poses. Also, remember to breathe.

Five Basic Positions

1. The Mountain Pose


Stand with feet slightly apart, shoulders relaxed and your arms at your side. Breathe in and lift your arms up and over your head. Your palms should be facing each other, and your arms should be straight. Reach up toward the sky with your fingertips. Exhale as you lower your arms to your sides once more. Your movements should be fluid and easy. Don’t overextend yourself, or you’ll hurt your muscles. This move is great as a warm-up to stretch your muscles.

2. The Child’s Pose

Sit back on your heels with your shins to the floor. Draw your chest forward and rest your forehead on the mat or carpet before you. Lower yourself as close to your knees as you can, and extend your arms out in front of you. Inhale and exhale as you hold this pose. Like the pose above, this is a great warm-up, or you can use it as a cool-down after your workout.

3. The Downward Dog Pose

You start in this position on all fours, hands directly beneath your shoulders and knees directly under your hips. Move your hands forward a few inches and spread your fingers apart. Press your palms into the mat or carpet, and bring your hips upward into an upside down V position. Your knees should be slightly bent to avoid locking them and cutting off circulation. Hold this position as you inhale and exhale three times.

4. The Cobra Pose


You will begin this pose by lying facedown on the ground with your thumbs beneath your shoulders and the tops of your feet against the floor. Pushing your hands into the floor, lift your chest off of the floor so your back is curved. Remember, don’t push yourself too hard. Return to the floor, and repeat the position.

5. The Warrior I Pose


warrior1pose
You will begin this pose by standing with your arms at your sides, like the mountain pose. Step forward with your left foot so your feet are about three to four feet apart. Turn your left foot inward slightly and your right foot ninety degrees. Bend your left knee ninety degrees, and straighten your right leg, and raise your arms up over your head. Hold this pose for one minute, or as long as you can manage, then switch sides and repeat.

Five Weight Loss Positions

1. The Warrior II Pose (Works the abs, hips, and thighs)


This move is similar to the Warrior I pose. Like the Warrior I pose, you will begin by standing with your arms at your sides. You will step forward with your left foot, again separating your feet by about three or four feet. You will turn your left foot slightly inward and your right foot ninety degrees. Bend your left knee ninety degrees, and straighten your right leg. This time, instead of raising your arms up over your head, you will spread your left arm parallel to your left leg, and your right arm will be parallel to the floor and above your right leg. Looking out over your left arm, you will hold this pose for one minute, switch sides, and repeat.

2. The Tree Pose (Works the sides of the abs)


treepose (1)
In this pose, you will begin by standing with your arms at your sides. Place the bottom of your left foot in the side of your right thigh with your knee bent to the side. Lift your arms and press your hands palms together in front of your chest. Inhale and exhale two times then lift your arms above your head as you inhale a third time, palms still facing inward and fingers stretched toward the ceiling. Exhale then inhale and bend your torso to the left. Inhale, and straighten your toros. Repeat this move three to five times then switch sides. Please note that this move requires some balance so please be careful as you do this move.

3. The Rocking Boat Pose (Works the abs and back)

rockingboatpose
Sit on the mat or carpet with your knees bent and your feet flat on the floor. Your hands should be on your thighs with your torso and head straight. Lean back 45 degrees, and lift your legs so your feet point up toward the ceiling about 45 degrees off the ground making a V shape with your body. Extend your arms so they’re parallel to the floor. Repeat three to five times.

4. The Bow Pose (Works the arms, legs, and abs)


bowpose
Lie on your stomach on the mat or carpet. Bend your knees and bring your feet toward your head. Reach around with your arms, and grasp your ankles. Lift your shoulders from the floor as you pull on your ankles. Hold as you breath in and out then release.

5. The Side-Stretch Pose (Works the abs, arms, and legs)


sidestretchpose
Stand and separate your feet a little wider than your hips. Turn your chest and your feet to the right, and bend forward. Keep your legs straight as you bend over your right leg until your chest is parallel to the ground. Reach toward the floor with your hands, bending down more each time you exhale. Repeat the move toward the left.

Things to Remember

Although yoga doesn’t seem as hard of a workout as walking or running, you still have to remember to stay hydrated and breathe. Also, if you’re more of a visual learner, you might want to consider taking a yoga class.

Sunday, 1 March 2015

Five Creative Ways to Use a Stability Ball

The stability ball is a great tool for strengthening the core, but there are so many other exercises you can do with it. Here are five fun exercises that you can use to work the entire body using this incredibly versatile piece of equipment.
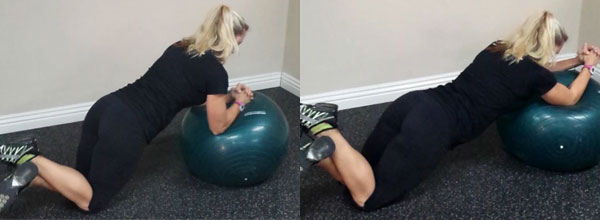
The Exercise: Rollouts
Rollouts
Targeted Muscles: Abs, back, chest and ats
The Movement: Bend your elbows at 90 degrees and place them on the top of a stability ball. Place your knees on the floor so that your knees, hips and shoulders are in a straight line. Engage your abs and open your shoulders, pushing the ball forward away from your body. Roll the ball out as far as you can without breaking the straight line between your knees and shoulders. Engage your abs and upper body, and then roll the ball back toward your body.
Challenge: For an added challenge, place your feet on the floor instead of your knees.
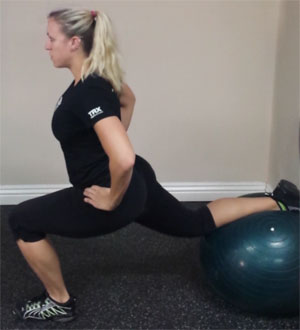
The Exercise: Bulgarian Split Squat
Bulgarian Split Squat
Targeted Muscles: Glutes and hamstrings
The Movement: Place the ball against a wall. Stand facing away, about 2 to 3 feet from the ball. Place the top of your left foot on the ball, so that you feel a slight stretch in your left hip flexor. Keep your shoulders square and chest up, and engage your core. Once balance is established, bend your right knee, keeping your right knee directly over your foot so that your shin remains vertical. Go as low as you can. Push through your right heel and stand back up. Repeat 10 to 15 times, and then switch legs.
Modification: To modify the exercise, start with a half squat, just to establish balance. You can also place the ball in a corner to prevent lateral shifting of the ball.
Challenge: If you have great balance and want an extra challenge, try this exercise without a wall behind the ball. As you lower, push the ball back with your foot, and then as you stand back up, pull it back in to starting position. You can also try holding on to dumbbells for more glute/hamstring activation.
The Exercise: Plank Variations
Targeted Muscles: All muscles depending on variation, but especially the abs, glutes, lower back and hips
The Movement: Set up is similar to the rollouts. Place your elbows on the ball and your feet behind you on the floor; maintain a straight line from ankles to hips to shoulders. Do not allow your upper body to collapse onto your elbows; rather, keep an open angle between your arms and torso, and keep your visual focus on your hands. Start by holding a plank. Once you can hold a plank for 30 seconds without breaking form, progress to plank variations.
The Variations: Lift alternating legs while maintaining a tight plank. Try lifting one leg up and then out to the side 1 to 2 feet while holding the plank. Try lifting one arm out to the front, and then out to the side. Alternately bring one knee in to touch the ball just below your chest. Alternately bring one knee out to the side and then forward to touch the ball on the outside of your elbow. Try a side plank by propping yourself on your right elbow, with your left hand on your hip, and then switch sides.
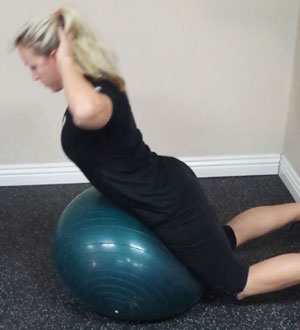
The Exercise: Glute/Ham/Low Back Extensions
Stability Ball Exercise
Targeted Muscles: Upper and lower back, glutes and hamstrings
The Movement: Lie prone (facedown) with the stability ball positioned under your hips and your feet pressed flat against a wall. Bend your knees so you “hug” the ball between your torso and knees. Place your hands behind your head and lift your torso, hinging at the hips, by pressing your feet against the wall. Keep your back straight throughout the exercise. Finish with your knees, hips and shoulders in a straight line at about a 45-degree angle from the wall. Be careful not to overarch your back. Bend at the hips and lower back down until your stomach contacts the ball again.
Challenge:  Hold a 5-pound medicine ball at your chest while completing the movement. Alternatively, hold 5-pound dumbbells in each hand and perform a reverse fly as you lift.
The Exercise: Push-ups
Targeted Muscles: Chest, triceps, abs, core, glutes and back
The Movement: Place your shins on the stability ball and your hands on the floor so you are in push-up position. Bend your elbows and lower yourself to the ground. Finish with your chest between your hands, keeping a tight, straight back during the whole movement. Squeeze your abs to keep the ball from rolling laterally.
Modification: To make this exercise a little easier, start with the ball closer to your torso, on your thighs or knees. As you get stronger, try to roll the ball back a little more each time, until you can eventually do push-ups with your feet on the ball.
Challenge: To make ball push-ups harder, engage your abs by adding a knee tuck after each rep—bend your knees and roll the ball to your chest. Straighten your legs back out and repeat the next push-up. You can also lift one leg about 6 inches above the ball while performing the push-up. To activate more upper-body stabilizer muscles, place your feet on the floor and put your hands on the ball to do your push-ups.

Source 

Friday, 30 January 2015

TRX suspension training review


As a runner, I consider myself to be in pretty good shape. So, when a friend told me I had to try TRX (total body resistance) suspension training, I wasn’t exactly quick to register for a class. Not because I was scared. Rather because I didn’t want to “waste” an hour of my precious time if I wasn’t going to get a good workout.
Well, I didn’t get a good workout from TRX – I got a great workout.
As soon as I walked into the studio I saw these long straps with two handles hanging from the ceiling. The instructor told me to grab onto the handles and face the “anchor point”. I didn’t know what an anchor point was, I started off holding the handles incorrectly, and as soon as we started our warm-up sequence, my muscles screamed. I was totally out of my element and had no idea how I’d survive an entire class. I loved every minute of it!
TRX basics
TRX suspension training is a form of strength training using suspended nylon ropes that allow you to work against your own body weight. TRX was developed by Navy Seals in 1990s who were looking to get a total body workout in a small space.
The TRX is a long piece of rope with two moveable handles on the end. The middle of the rope is securely attached to a structure so it doesn’t move – this is called the anchor point. To do the workout, you engage your core and do traditional strength training moves – like squats, rows, and planks – while holding onto the handles in different positions to target specific body parts. You increase and decrease the resistance by moving your body closer to and further away from the anchor point.
TRX can be done at home (using an at-home TRX kit similar to this one) or through a class at a gym or fitness studio taught by a certified instructor. The workout is completely customizable. There are specific classes for runners, baseball players, and seniors, just to name a few.
The benefits
Doing TRX regularly can strengthen your muscles, increase flexibility, improve balance, aid in weight loss, and boost your running performance. The workout is especially beneficial for the abs and back because all movements require the core muscles to be engaged. TRX training can also help ward off injuries by evening out muscle imbalances that occur from running.
Perhaps best of all, TRX training stops your body from plateauing. There are hundreds of exercises you can do, and you can take the intensity level up or down based on your fitness level – so your body is always guessing.
For instance, in my class, we started with a regular squat. Then we moved on to one-legged squats and eventually a one-legged squat with a jump (I could only make it through a handful of reps of the latter – talk about tough). We also did planks with our feet secured in the handles. At first, we faced away from the anchor point – and the planks were challenging but doable. But then we turned towards our anchor point, and I couldn’t even hold the plank for more than a couple of seconds.
Any TRX fans out there? I’ll definitely be back – I was sore for three days after my first class!


Source