Showing posts with label glutes. Show all posts

Wednesday, 15 July 2015

6 Exercises for a Stronger Core

Your core consists of the muscles that stabilize the spine and hips, and includes all the muscles of the abdomen, back, glutes and upper legs. A strong core helps protect the entire midsection, and enhances both mobility and stability, which, in turn, improves movement efficiency and keeps the muscles functioning in coordination with one another. This, of course, helps improve balance, posture and strength.
A common misconception is that doing exercises while lying supine automatically increases core strength. While these exercises can help improve abdominal strength, the entire core must be challenged to help improve total-body function. A better approach is to use a variety of stances, such as single-leg, supine and prone, to incorporate a wide range of movements. Here are a few of the best exercises to challenge the entire core.

Glute Bridges

While many consider the abdominal muscles to be the most important for increasing stabilization, strong glutes are essential as well. Many injuries and faulty movement patterns are a result of underactive glutes and overactive quads and hip flexors. To combat this, activate and fire those glutes before workouts to make sure they are turned on and ready to work.
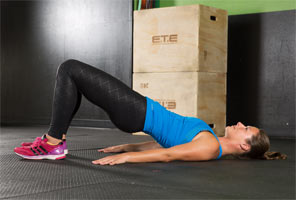
Lie supine on the floor with knees bent and both feet flat on the floor. Keep the head relaxed and slowly push through the heels to raise the hips as high as possible. The knees, hips and shoulders should be in one straight line. This exercise activates the glutes and hamstrings, and stretches the hip flexors, which are often overactive and tight. Hold the top position for three seconds and slowly lower. Do eight to 10 reps per side. To progress this exercise, try one leg at a time or place the feet on the round side of a BOSU.

Medicine Ball Single-leg Reach
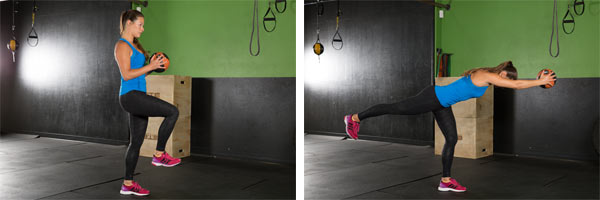

Disguised as a leg workout, this move is great for the glutes, hips, back and abs. Grab a 5- to 10-pound medicine ball and stand on the right leg. Slowly reach forward while hinging at the hips (not the back). Simultaneously lever the back leg out behind the body. Reach as far as possible—work toward bringing the arms, torso, and left leg horizontal to the floor. As the core gets stronger, increase the weight of the medicine ball. Perform two to three sets of eight to 10 repetitions per leg.

BOSU Plank Variations
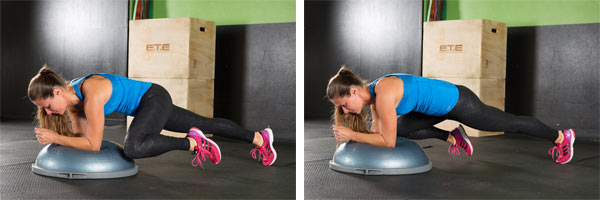

Before attempting planks on the BOSU, make sure your client has impeccable plank form and can hold it for at least 30 seconds on the floor before attempting advanced variations. Planks are meant to strengthen the core, so if your client’s form wavers too much (back sinks, arches or bends), have him or her practice a little longer before advancing.
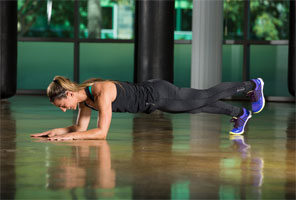
Start with the elbows on the round top of the BOSU. This creates an element of instability that must be controlled throughout the exercise. Perform a plank for 30 seconds. Begin adding small, alternating single-leg lifts, focusing on lifting the leg with the glutes and not shifting the hips at all. Next, try bringing one leg out about 45 degrees to the side, tapping the toe to the ground and returning to plank position. Perform five repetitions on each leg. Finally, try bringing the left knee out to the side, and tapping it to the BOSU just outside the left elbow. Repeat five times per leg. To regress these variations, perform them on the floor or on a flat bench before moving to the BOSU

Medicine Ball Single-leg Woodchop
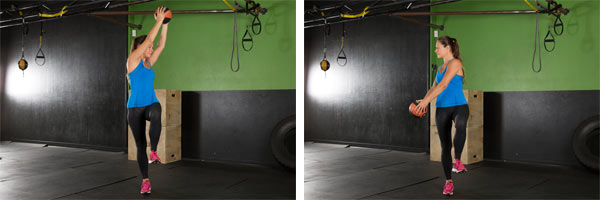

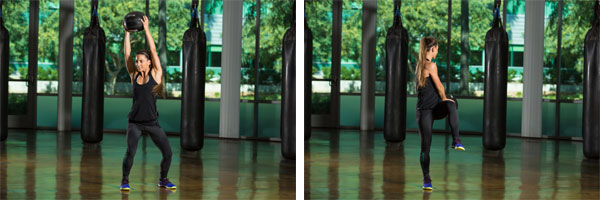
Grab a 5- to 10-pound medicine ball and stand on the right leg. Raise the medicine ball overhead, slightly over the left shoulder. Swing it down quickly, but with control, to the outside of the right leg. Try to keep the torso upright, with a constant slight bend in the right leg. Slowly bring it back up to starting position and repeat eight to 10 times. To regress this exercise, start on two legs and gradually progress to standing on one leg.

TRX Pike


Place the toes in the foot cradles and lie prone on the floor, ready to plank. Push up into a high plank on the hands, establishing perfect form. Keeping the legs straight, push the hips straight up into the air while simultaneously pulling the TRX toward the hands. Slowly lower back down to finish in plank position. Complete eight reps to start, gradually increasing to 15 reps as core strength improves. To regress this exercise, bend the knees to pull the TRX toward the hands.

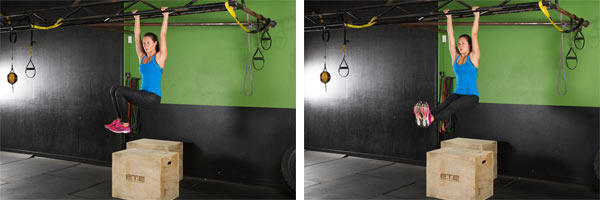
Hanging Leg Lowers
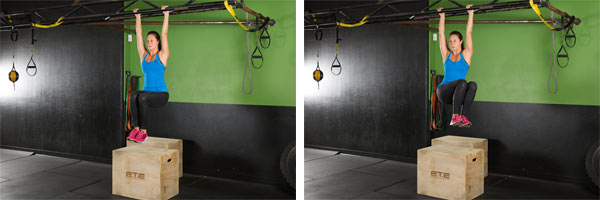


Exercises in which the legs are unsupported are a great way to work the deep abdominal muscles and the hip stabilizers. However, these exercises are not recommended for individuals with diagnosed lower-back pain.

If your client is a beginner, start this exercise using a Captain’s Chair. Once the client has developed a good strength base, progress to ab straps or hanging from the hands. Start with the knees bent, and lift them slowly as high possible, pulling the knees to the chest. Instead of focusing exclusively on the upward movement, think about the slow downward movement. Take about five seconds to slowly lower the legs back down to the starting position. This eccentrically works the deep abdominals, providing control and stabilization, while also preventing swinging. Repeat eight to 10 times. To progress this exercise, slightly twist the knees to the left and right to challenge the obliques. Additionally, try keeping the legs straight but only raise them as high as possible while maintaining straight knees. Again, focus on the slow lowering motion.

Source

Friday, 9 January 2015

6 Steps to Booty Perfection


Who doesn't want that perfect rear? The problem with a beautiful booty is that it's a lot of work, which is why many give up before starting. Resist that temptation and work on your derriere! Here are six steps to help you get a rear that rap artists will want to write songs about.

12_PerfectBottom.jpg


1. Step Forward

If you want to sculpt that rear, the front lunge is your best friend. It will give you the bubble shape that so many covet and will strengthen your hips as well.

To do the front lunge, simply stand with your feet spread shoulder-width apart and place your hands on your hips. Step forward and dip into the lunge until your knee is bent at a 90-degree angle. Squeeze your butt as you push up and step back.

Reps: 15 to 20 per leg

2. Step Back

The rear lunge focuses a bit more on the thighs than the hamstrings/glutes, but it's great for giving your legs a defined look that will help your butt stand out.

Assume the lunge position--feet spread shoulder width apart, hands on hips--but this time step backwards. Dip until the front leg has reached the 90-degree angle, and push the back foot forward to return to your starting position.

Reps: 15 to 20 per leg

3. Step to the Side

This exercise is a bit tougher, but it will sculpt your behind one cheek at a time. Once you get accustomed to it, it's much easier to stay balanced.

Assume the lunge position, but step forward and to the right to dip into the lunge. Feel the burn on the right cheek as you push back to your original position. Repeat with the left leg for an even workout.

Reps: 15 to 20 per leg

4. Step Up

Weighted step-ups will shred your glutes with each step up, and hit those thigh muscles as you step back down.

Grab a pair of dumbbells or a barbell to add extra weight. You can do the exercise on a staircase or a special platform. Simply step up with one foot first, bring the other to the platform and step back down with the original foot. Repeat with both feet.

Reps: 15 to 20 per leg

5. Step to the Wall

Wall squats are a static exercise that will have your legs quivering in no time. It's much easier on your knees than regular squats, but no less punishing for your muscles.

Stand with your back against the wall, your feet spread to shoulder width in front of you. Slide down the wall until your legs are bent to a 90-degree angle. The deeper you go into your squat, the more strain you place on your hamstrings and glutes.

Time: 45 to 60 seconds

6. Step onto the Elliptical

The elliptical machine is the slightly less annoying cousin of the StairMaster, and you can use it to target your glutes for an excellent booty-sculpting workout.

Step onto the machine and adjust the incline to the highest setting possible. You will have to lift those knees to keep walking, and it will give your bottom the workout it needs.

Time: 30 minutes (do this after the other exercises)


Source 

Wednesday, 26 November 2014

Balance Training for the Glutes and Abs

Targeting the gluteals and abdominals in a training session is a popular goal for many fitness seekers, but what about training for balance? Do you regularly seek out strategies for improving balance in your exercise routines? Considering that balance training has been shown to reduce the risk of falls (especially in older adults) and improve dynamic balance in both athletes and non-athletes, incorporating this type of training could be a wise choice. In addition, many of the exercises used to train balance call upon the muscles of the hips and trunk to provide stability. This means you get the added benefit of strengthening the glutes and abs while you’re working to become more balance savvy. Plus, the various single-leg exercises that target the glutes in balance-training programs are beneficial for knee health because they promote proper alignment between the hip, knee and ankle.
To experience these benefits, add one set of the following exercises at the beginning of your workouts, twice a week for at least six weeks (in other words, perform these balance exercises 12 times over the course of six weeks). To check your progress, take the single-leg balance test* (for both legs) during the first week. Retake the test again after the sixth  week of training to see if there is a difference in your score.
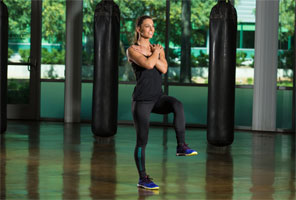
*Single-leg Balance Test:
single leg balance
Grab a stopwatch and stand with your feet directly underneath the hips.
Cross your arms over the chest.
Lift one leg off the floor, making sure your legs do not touch each other.
Start the timer the instant your foot leaves the floor. Stop the timer when your foot touches back down, or if your body starts flailing to regain balance. The test should be performed with minimal bodily movement.
Record your score for each leg. The longer the time spent standing on one leg, the better your balance.
There are no norms for comparison, only your own score. The goal is to increase the time you are able to stand on one leg from pretest to post-test.
Note: It is up to you whether or not you wear shoes during this test. It makes sense that if you train in shoes, you should also test your balance wearing shoes. Clearly, this is not a scientific assessment, but making the pre- and post-tests factors the same, and the training variables the same as during testing (e.g., wearing shoes versus going barefoot), will give you a more realistic result.
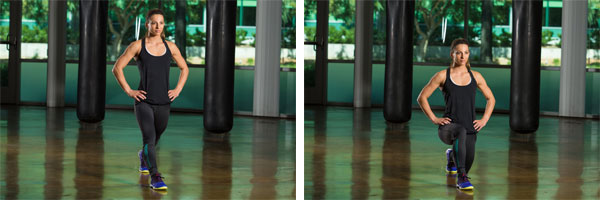
1. Split Lunge
split lunge
Adopt a split-stance position with one leg in front of the other and your feet hip-width apart (i.e., your feet should not be directly in line with each other). Your front foot should be far enough forward so that the front shin remains vertical upon descent. Keep your front foot flat on the floor, while balancing on the ball of the back foot. Lower and raise your body by bending both knees and keeping your back heel off the floor. Go as low as you comfortably can without compromising balance. Perform 10 repetitions on each side.
For more challenge, try adding a small jump on the way up. Be very careful that the front knee stays in line with the toes and does not cave inward.
For less challenge, try holding the position (without raising or lowering) for 30 seconds on each side.
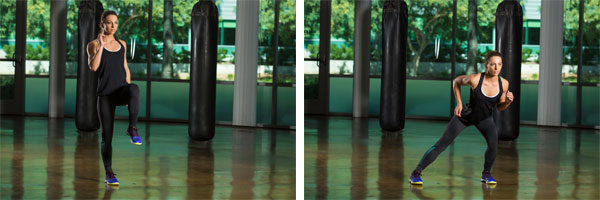
2. Side Shift Into Single-leg Balance
single leg lunge
To start, stand with your feet together. Take a long step out to the side, as if you are performing a side lunge. Quickly push off the floor and return the leg, but instead of placing the foot beside the other one, raise your knee up toward the chest and hold for a count of 2. Essentially, you’re performing a quick side lunge directly into a single-leg balance without letting the foot touch the floor upon the return. Perform 10 repetitions on each side.
For more challenge, hold a dumbbell in the same-side hand as the lunge leg.
For less challenge, return the lunge foot to the starting position beside the other foot, instead of lifting the knee.
3. Standing Cross-body Rotation
standing cross body rotation
To start, stand in a wide squat. Pull one knee up toward the opposite shoulder, while driving the opposite elbow to the outside of the knee, essentially creating an across-the-body rotation with opposing limbs in a single-leg stance. Keep your torso as vertical as possible as you rotate through the trunk. Perform 10 repetitions on each side.
For more challenge, hold a dumbbell or small medicine ball with both hands. Lift the weight up on a diagonal and then drive the weight to the outside of the knee that is lifted.
For less challenge, bring the foot in to tap the floor beside the other foot, instead of lifting the knee.
4. Elbow Plank Leg Raise
plank leg raise
Adopt a plank position on your elbows and toes. Be sure to engage the abdominals to prevent the hips from rocking side to side. Squeeze the same-side glutes to lift up one leg at a time. As you lift the leg, the movement should be controlled by the glutes. Keeping the knee very straight while you lift will help prevent the hamstrings from contributing more than they should. Perform 20 repetitions (10 on each side).
For more challenge, place your elbows on a BOSU trainer or other unstable surface.
For less challenge, tap one knee to the floor at a time, instead of lifting the leg.
Putting It All Together
As noted earlier, perform your balance work early in your exercise session. This will help you avoid the risk of neuromuscular fatigue, which could occur if you wait until the end of your workout. Interestingly, available research shows that a multicomponent exercise program that consists of strength, endurance and balance training appears to be the best strategy for improving balance (Cadore et al., 2013; Zech et al., 2010). Hence, for the most benefit, balance exercises should be included as part of a comprehensive training program.
Source