Showing posts with label plank workout. Show all posts

Tuesday, 8 December 2015

Reasons Why Plank Exercises Are Great

Some of the best exercises are the least complicated, and plank exercises I think fall into that category. These have recently become an important part of my exercise routine because they are great for core conditioning. In fact, they may look too easy to be beneficial, but especially if you have irritation in the lower back this exercise might be your answer. But it also gives the hamstrings, glutes and shoulders a good workout, and will support proper posture and improved balance.
It should be noted, however that there are some common mistakes made when people do planks, and perhaps even more so than most exercises doing improperly could lead to injury. These exercises will tax the upper and lower regions of the spine. If these areas are weak it will normally cause the spine to sway. This can put compression pressure in the vertebrae and can cause back injuries. It is important especially when starting out, to know just where your limits are and not to exceed them. If you feel any pain in the back area, don't push it, but work your time up little by little.

Besides trying to hold the position for too long, other common faults are placing the hands too close together, allowing the hips and head to drop, and holding your breath. And what should your goal be? You are considered to be fairly fit in the core area if you can hold the abdominal plank position for at least two minutes. But again, you should build up to that point slowly.

That said, here are some reasons why you should be looking to plank exercises as part of your fitness program
1. Posture and balance improvement. By merely staying in the plank position for the period of time requires you to work on your balance. This can be enhanced further by doing planks on a BOSU ball, or by doing side planks. If we do lose our balance and posture position as we age, it is normally because of the weakening in the core area. Planks are great for this.

2. Alleviates back pain. Whatever you do to strengthen your core area is probably going to make your lower back stronger. The reason is because plank exercises require minimal movement while contracting all the layers of the abdominals.
 
3. Tones the stomach region. These exercises will be in our core muscles of the belly area. This is the foundation of the outer abdominals, or six-pack abs. This will be helped further by pulling in the area of your belly button, which will contract those deep inner transverse abdominal muscles.

4. Builds flexibility. The first time get into the plank position you will probably feel how the body becomes stretched. Not only in your posterior muscles but also in the shoulder area, the hamstrings and even the arches of your feet down to your toes. Plank exercises are a natural for stretching the body.

5. Mood enhancement. All of the above reasons for doing planks will help to improve a person's mood. Stretching and releasing the tension from muscles throughout the body are going to invigorate anyone who does these wonderful exercise routines.
 
Where you carry your weight has a lot to do with your overall health, as it is a  marker for issues having to do with the kidneys and liver. Read more about how to put on good weight through diet and exercise on our website  http://muscle4weightloss.com/. Rich Carroll is a writer and avid health advocate now living in Chicago.

Monday, 14 September 2015

TRX Workout for beginners

This TRX workout is designed for beginners. One of the things I hear most often when I talk about TRX, including in response to my TRX beginner tips, is that people want to try it, but aren’t sure what to do and don’t want to look silly . My goal with this workout is to introduce you to some basic moves and give you something you can pull up on your phone at the gym so you know what to do. This workout is an interval workout, which is very common for TRX. Each move is performed for 30 seconds. Move as quickly as you can from one move to the next. They are staggered to focus on upper body, lower body, and core so you shouldn’t need to rest in between (but of course, if you do need a rest, take it). As you advance, feel free to increase the interval. I typically do 30-60 second intervals depending on what I’m doing. The exercises are split into two mini circuits and you’ll repeat each circuit three times. Form notes for the exercise appear below the graphic.


Form Notes:
Most of these notes reference the non-TRX version of the exercise (squat, lunge, plank, etc) and they assume you are familiar with the proper form for those exercises. If you are not familiar with the non-TRX version, please please please make sure you understand the proper form before you attempt the TRX versions.
  • Chest press - For me, the easiest way to think about this move is to think of it as a push-up with your hands in the straps. Your elbows should come along your sides at roughly a 45 degree angle. The straps should be outside your arms. Keep your wrists straight.
  • Squat - The form here is almost identical to a normal squat but your weight is further in your heels since you have the TRX for support. Make sure you are using your legs, not pulling with your arms.
  • Rows - Keep your wrists straight. When your arms are extended, your palms should be facing the ground. As you pull your bodyweight up, rotate your hands so that at the top of the movement, your palms are facing inward. Keep your elbows in so they are shaving along your ribs.
  • Plank - This is just like a normal forearm plank, but your feet are in the straps. If you’re anchored to a wall, make sure your feet aren’t touching the wall (that’s cheating).
  • Reverse lunges - Again, this is similar to a reverse lunge. However, you aren’t really stepping back on your back leg, you are floating it back. When you first start, tap your back toe to the ground as lightly as possible. Work up to the full version where you hover the back leg without touching the ground. Remember to use your legs, the straps are just for balance. Do 30 seconds on your right leg first, then switch to your left.
  • Bicep curls - Hold the straps with your arms extended out in front of you, palms up. As you perform the bicep curl, keep the 90 degree angle between your upper arms and your torso (this is harder than it sounds). Control the movement as you lower back down, don’t just drop.
  • Hamstring curls - With your heels in the straps and your toes pressing against the handles, press up into a reverse plank with your shoulders on the ground. Your body should be in one long line from your shoulders, through your hips and legs, to your feet. From this position, pull your heels in towards your butt without changing the position of your torso.
  • Tricep press - Face away from the anchor point holding the straps above your head and your palms facing forward. The motion is similar to a normal overhead tricep press. Keep your elbows just at the edge of your peripheral vision. Your upper arms should not be moving, your elbows should be anchored in place, the only motion should be your forearms
  • Knee tucks - Start in plank position, top of a push-up, shoulders over wrists, feet in the loops. Pull your knees in toward your chest, return to start, repeat.
 Source : http://busy-bod.com

Wednesday, 19 August 2015

Heart-pumping Plyometrics Workout

It is widely accepted that two of the most efficient ways to burn fat and get lean are strength training and high-intensity interval training. Plyometrics, a form of strength training that requires jumping and repetition, is really a combination of the two. It increases heart rate and therefore often results in a high-intensity interval.
Plyometric training uses explosive movements to build strength and to condition the muscles and heart. The exercises are typically jumping movements—both feet need to leave the ground at the same time. During each landing the muscles get a stretch, which allows the exerciser to jump with even more power on the next one. The continual stretching and contracting of the muscles quickly whips muscles into shape.
At one time, plyometrics were primarily used by athletes to improve power for their sports, but now they are solid part of the fabric of the fitness world. Fitness professionals and enthusiasts everywhere use plyometrics as either a stand-alone workout or in parts of other workout regimens. Plyometrics boost muscle power, strength, balance and agility.

How Often Should My Clients Do Plyometrics?

Plyometrics should not be performed every day because muscles need a break from all that high impact. Similar to other types of strength training, a 48-hour rest between intense plyometric sessions is recommended. For beginning clients, help them work on building a solid foundation of fitness before adding plyometric moves to their programs.

Can I Modify With Low-impact Moves?

While it is possible to modify high-impact activities to make them low-impact, this takes away the benefits of plyometric activity. In other words, you might be doing a great exercise, but it won’t be a plyometric workout. That being said, don’t hesitate to modify your clients’ workouts—it’s better to start slowly and take more recovery time as needed.

Are Plyometrics Primarily Strength or Cardio?

Plyometrics are used primarily to build strength, but they also are a great way to introduce anaerobic interval training to your clients’ programs. Anaerobic intervals increase cardiovascular capacity and will get your clients into shape quickly.
Here is a 15-minute plyometric workout to use with your clients. Perform each exercise for 30 seconds with a 30-second rest in between. Have clients perform the series of five exercises, rest for two minutes and then repeat the series a second time. Don’t forget to have your clients cool down and stretch at the end of the workout.
Begin with one minute of light jogging and stationary squats to warm up.

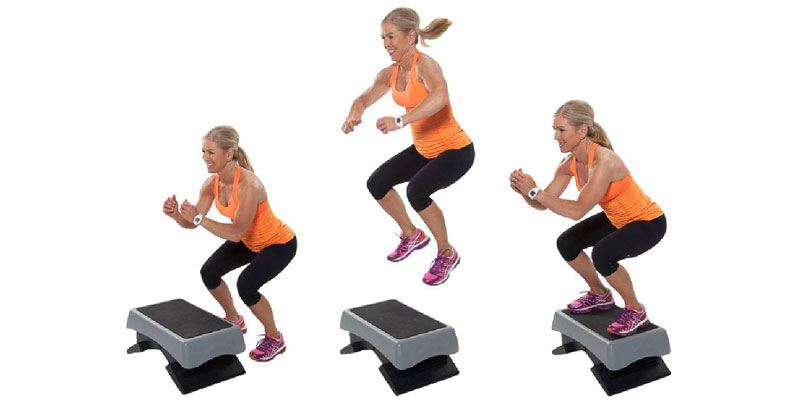
BOX OR STEP JUMPS


Begin in a deep squat position with a step or sturdy platform or box in front and arms bent next to the sides of the body.
Swing the arms and jump as high as possible, landing quietly and with control in a squat position on the step. Both feet should land at the same time and weight should stay in the heels.
Jump down, landing in start position and repeat quickly. Do as many as possible for 30 seconds.
Rest for 30 seconds.

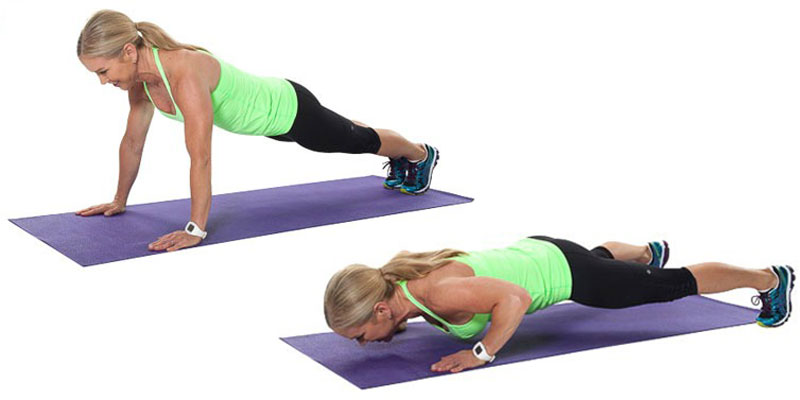
PUSH-UP JACKS


Begin in a plank position with the shoulders over the wrists, feet together, and the body in a straight line.
Lower to a push-up while jumping the feet to a wide position. Keep the abdominals tight and land with the spine straight and chest close to the floor.
Jump the feet back together while straightening the arms to push up to the starting position. Repeat as many times as possible for 30 seconds.
Rest for 30 seconds.

SPLIT JUMPS

Start in a stationary lunge position, with the right foot in front and the left foot behind resting on ball of foot. Both legs should be bent at a 90-degree angle at the bottom of the lunge.
Swing the arms and jump as high as possible, switching foot positions while in the air. When landing, the left foot will be in front. Land in a bent-knee lunge. Note: Be sure that the feet leave and land at the same time.
Repeat quickly but get a full range of motion each time. Do as many as possible in 30 seconds.
Rest for 30 seconds.

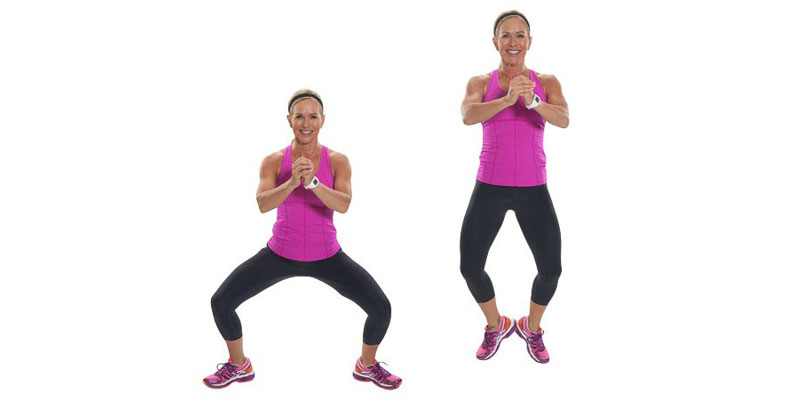
DIAMOND JACKS


Start with the legs wider than shoulder-distance apart. Turn the toes slightly out and bend the knees in a wide pliƩ position; hold the hands in front of the chest.
Using the lower-body muscles, jump up as high as possible and touch the heels together before landing in the starting starting position. Repeat quickly and perform as many as possible in 30 seconds.
Rest for 30 seconds.

CORE BODY HOPS


Begin in a plank position with the shoulders over the wrists, feet together and the body in a straight line.
From this position, bend the knees and hop both feet up to the left hand while keeping the feet together. Hop back to the starting position and repeat to the right.
Perform as many as possible in 30 seconds. Be sure to keep the core tight and don’t let the back sag.
Rest for two minutes and repeat from the entire series from the beginning.

Source 

Thursday, 5 February 2015

Plank You Very Much Workout


Tired of the ole’ Plank? No problem, we’ve got your covered!

Here is a workout with advanced plank variations to get your full body in blast!


For maximum results: Pair this with the 30 Minute Living Room Workout!

60 Second Elbow Plank
Start off on a yoga mat in the pushup position. Starting with the pushup position is the easiest way to get into the plank.
Lower both your forearms to the ground so that both your elbows and fists are flat to the ground. Your palms should be balled up, and directly underneath your shoulders.
Curl your toes under and engage your abs by tilting your pelvis and pulling your belly button toward your spine.
Straighten your body but keep your neck and spine neutral. Imagine that you’re a plank of wood, and that you’re straight as an arrow.
Flex your abdominals and squeeze your glutes. These are the two major muscle groups you’ll be working out in this exercise.
Hold this position, also known as the plank, until after the burning begins. Keep your eyes on the floor in front of you. Avoid raising your behind. Your body should make a straight line from your heels to the back of your head.


60 Second Side Plank
Lie on your right side with your legs straight.
Prop yourself up with your right forearm so your body forms a diagonal line.
Rest your left hand on your hip.
Brace your abs and hold for 60 seconds.
If you can’t make it to 60 seconds, hold for 5 to 10 seconds and rest for 5; continue for 1 minute. Be sure your hips and knees stay off the floor.


30 Plank Walks
Get into a plank position. Your legs should be straight out behind you and you are resting on your arms.
Then move your right arm so you move into a push up position, with your weight being supported by your hand.
Then move your left arm into the same position, so you are now in the push up position.
Bring your right hand down to the original plank position.
Repeat with the left arm.


30 Plank Jacks
Begin in plank position, with your shoulders over your wrists, your body in one straight line, and your feet together.
Like the motion of a jumping jack, jump your legs wide and then back together. Jump as quickly as you want, but keep your pelvis steady and don’t let your booty rise toward the ceiling.
Do a total of 30 jumping jacks, which counts as one set. Then complete two more sets.


60 Second Two Point Plank
Prop up onto your elbows, making sure to keep them lined up under your shoulders.
Feet should be about shoulder-width apart with toes on the ground.
Lift your hips off the floor and try to keep your shoulders, hips, and legs aligned.
Concentrate on pressing the navel into the spine while maintaining a relaxed breathing pattern.
From this position, lift one foot off the ground while picking up the opposite arm.
Your hips may rise as you decrease the stability so try to keep your hips flat and look outward rather than downward during the exercise.
Alternate arms and legs every 10 seconds or so for a total of one minute or 60 seconds.


10 Planks with Donkey Kicks
Begin in an elbow plank with elbows directly under shoulders, abs engaged toward the spine. Don’t let the pelvis sag down or pop up.
Lift right leg off the ground, bending your knee so the sole of your foot is toward the ceiling. Keep pelvis square to the floor. Don’t let your pelvis twist.
Press your right heel toward the ceiling as high as you can without moving your pelvis or lower back. The motion will not be huge but rather concentrated on the booty and hamstring.
Lower the bent leg slightly, and repeat for a total 10 repetitions. Then switch sides.
Do two sets on each leg.


60 Second Plank with Leg Raise
Get into a modified pushup position with your weight resting on your forearms and toes, elbows directly beneath your shoulders.
Your body should form a straight line from your neck to your ankles.
From that position, brace your core and lift one foot off the floor.
You can hold that position for the entire set—60 to 90 seconds—and then do the second set with the other leg raised, or switch legs halfway through each set.


60 Second Plank Punches

1. Begin in high plank position. Your shoulders, arms and wrists should be in line with one another and make sure your back is flat. Focus on engaging your core and glutes.

2. Raise your left arm and punch forward, extending your arm straight out as you punch. Motion is slow and controlled; core is to remain engaged throughout the entire exercise, as this will also assist in maintaining your balance (it will minimise tipping as you extend your arms for each punch).

3. Lower your left arm to the starting position, arms and wrists in line with one another again. Raise your right arm and punch forward as you did with your left.

4. Repeat, alternating between right- and left-arm punches. Make sure core is tight throughout the entire exercise. Alternate arms for 30 to 60 seconds. Rest and repeat for two more sets.


Source