This workout was designed with Summer in mind — specifically swimsuit time and the body-baring bikini! All the exercises target the trouble zones while keeping your heart rate up to burn fat. Press play and we will warm you up, work you out, and quickly cool you down. Then you can hit the beach feeling strong and confident.

Showing posts with label summer shape-up. Show all posts
Showing posts with label summer shape-up. Show all posts
Sunday, 13 September 2015

Sunday, 23 November 2014
20-Minute At-home Bodyweight Circuit
For many trainers, the holidays can be a frustrating time. While
there’s nothing better than going home for the holidays and spending
time with loved ones, this time of year can put a wrench in your
clients’ workout routines. Many of you have spent a significant amount
of time helping your clients work toward their health and fitness goals,
and when they travel for the holidays, it can be hard for them to
maintain the same amount of dedication and self-control as they do the
rest of the year. The solution? A circuit workout.
Share this workout with your clients before the holiday season to help them burn off those extra calories while getting a total-body challenge. All that is needed for this 20-minute at-home body-weight circuit is a little space in the family room, basement or hotel room.
How-to: Perform each of the following exercises for one minute, resting for 30 seconds in between each exercise. Once you complete each exercise once, take one minute to drink some water and catch your breath. Then go through the entire set once more for a total of 20 minutes.
Warm-up: Begin by jogging lightly for one minute.
1. Pass-through Lunge
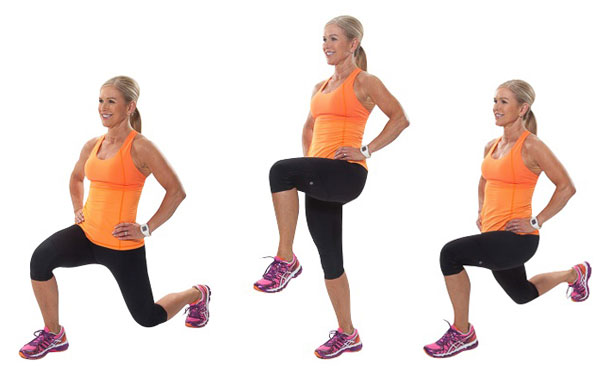
A. Stand with feet hip-distance apart. Step the right foot behind and lower slowly to a lunge until both legs are at a 90-degree angle.
B. Lift the right leg up and let it float slowly to the front, lowering again to 90-degrees.
C. Push the right foot up again and float it behind you as you did the first time.
Perform for one minute—30 seconds with the right leg, 30 seconds with the left leg; rest for 30 seconds.
2. Globe Hops
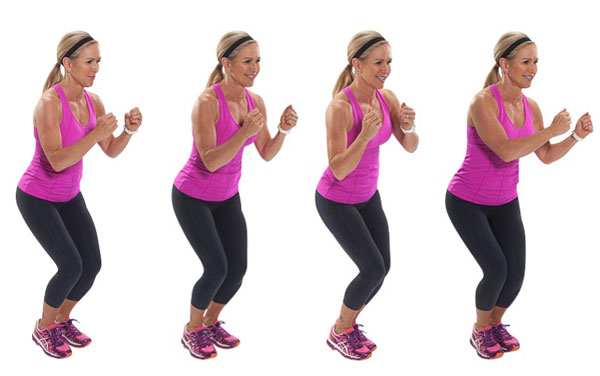
A. Start standing with feet a few inches apart, arms in guard position at the chest and knees slightly bent.
B. Jump forward, back, right and then left (like the directions on a globe: north, south, east, west). Continue jumping NSEW for 30 seconds and then switch directions to NSWE or front, back, left, right for the next 30 seconds.
Jump for one minute and then rest for 30 seconds.
3. Shoulder Tap Push-up
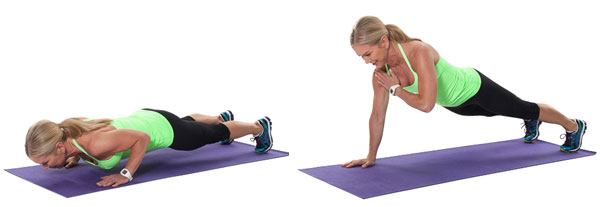
A. Begin in a plank position with the hands directly under the shoulders and feet hip-width apart. Keep the abdominals and legs tight as you slowly lower the chest toward the ground with the elbows bending and pointing behind you.
B. Exhale as you push back up to lengthen the arms into high-plank position. Lift the right hand to tap your left shoulder at the top and then repeat with the other arm.
Do as many repetitions as you can for one minute and then rest for 30 seconds.
4. Burpees
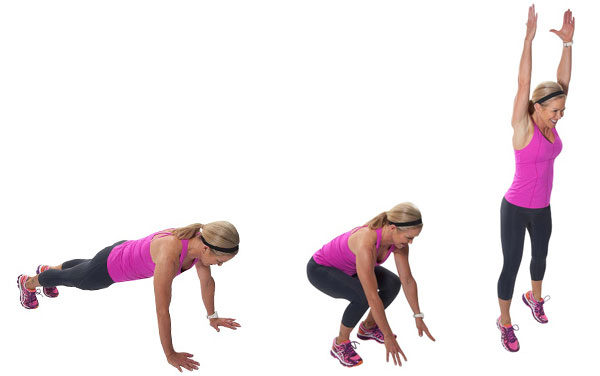
A. Start in a plank position with arms and legs long, and hands shoulder-distance apart.
B. Walk or jump both feet between your hands, coming into a low squat position. Jump straight up as high as possible, land, and come back to your plank position.
Do as many burpees as you can for one minute and then rest for 30 seconds.
5. Side Squat
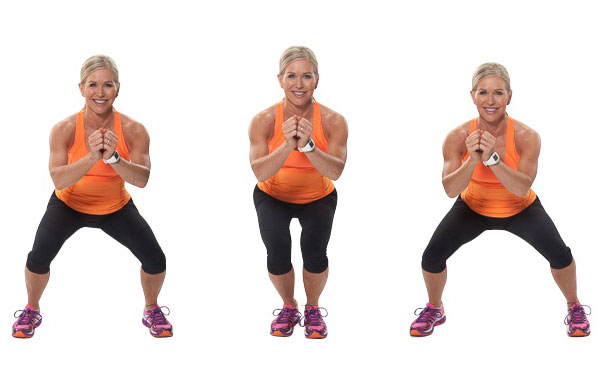
A. Start standing with feet hip-distance apart and sit back into a squat position by bending the knees.
B. Keep your abs tight and back straight. Step to one side, staying in your squat position. Return to your starting position and then side squat in the other direction, using all your lower-body muscles.
Perform for one minute and then rest for 30 seconds.
6. Army Crawl Plank
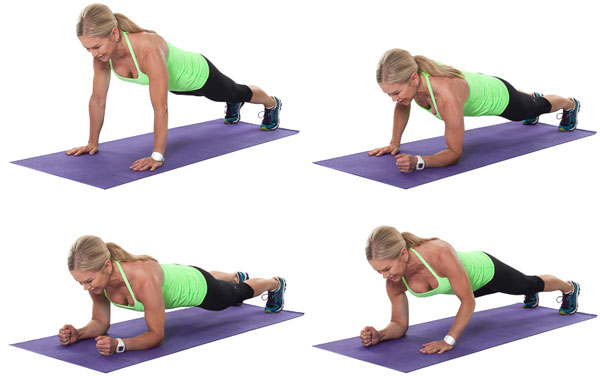
A. Begin in a plank position with your shoulders over your wrists, feet together and your body in a straight line.
B. Bend your left arm and then your right to assume forearm plank position.
C. Lift your left hand and place it on the mat directly below your shoulder as you push through your palm to lift back up into plank position.
D. As you reach the top, place your right palm on the floor under your right shoulder and push back into a full plank. Repeat, leading with the right arm.
Perform for one minute, leading first with the left arm for 30 seconds and then with the right for the remaining 30 seconds. Rest for 30 seconds.
Source
Share this workout with your clients before the holiday season to help them burn off those extra calories while getting a total-body challenge. All that is needed for this 20-minute at-home body-weight circuit is a little space in the family room, basement or hotel room.
How-to: Perform each of the following exercises for one minute, resting for 30 seconds in between each exercise. Once you complete each exercise once, take one minute to drink some water and catch your breath. Then go through the entire set once more for a total of 20 minutes.
Warm-up: Begin by jogging lightly for one minute.
1. Pass-through Lunge
A. Stand with feet hip-distance apart. Step the right foot behind and lower slowly to a lunge until both legs are at a 90-degree angle.
B. Lift the right leg up and let it float slowly to the front, lowering again to 90-degrees.
C. Push the right foot up again and float it behind you as you did the first time.
Perform for one minute—30 seconds with the right leg, 30 seconds with the left leg; rest for 30 seconds.
2. Globe Hops
A. Start standing with feet a few inches apart, arms in guard position at the chest and knees slightly bent.
B. Jump forward, back, right and then left (like the directions on a globe: north, south, east, west). Continue jumping NSEW for 30 seconds and then switch directions to NSWE or front, back, left, right for the next 30 seconds.
Jump for one minute and then rest for 30 seconds.
3. Shoulder Tap Push-up
A. Begin in a plank position with the hands directly under the shoulders and feet hip-width apart. Keep the abdominals and legs tight as you slowly lower the chest toward the ground with the elbows bending and pointing behind you.
B. Exhale as you push back up to lengthen the arms into high-plank position. Lift the right hand to tap your left shoulder at the top and then repeat with the other arm.
Do as many repetitions as you can for one minute and then rest for 30 seconds.
4. Burpees
A. Start in a plank position with arms and legs long, and hands shoulder-distance apart.
B. Walk or jump both feet between your hands, coming into a low squat position. Jump straight up as high as possible, land, and come back to your plank position.
Do as many burpees as you can for one minute and then rest for 30 seconds.
5. Side Squat
A. Start standing with feet hip-distance apart and sit back into a squat position by bending the knees.
B. Keep your abs tight and back straight. Step to one side, staying in your squat position. Return to your starting position and then side squat in the other direction, using all your lower-body muscles.
Perform for one minute and then rest for 30 seconds.
6. Army Crawl Plank
A. Begin in a plank position with your shoulders over your wrists, feet together and your body in a straight line.
B. Bend your left arm and then your right to assume forearm plank position.
C. Lift your left hand and place it on the mat directly below your shoulder as you push through your palm to lift back up into plank position.
D. As you reach the top, place your right palm on the floor under your right shoulder and push back into a full plank. Repeat, leading with the right arm.
Perform for one minute, leading first with the left arm for 30 seconds and then with the right for the remaining 30 seconds. Rest for 30 seconds.
Source
Preparing for Your First Bikini Competition
Soy will have to wait.

My bestie and I were catching up over peppermint tea and dark chocolate (we were chatting on facebook, but a girl can dream) when she mentioned that she wanted to compete in her first bikini competition and asked me to help her out, I gladly agreed. So, I put my metaphorical internet surfing goggles on, cracked my knuckles, and started typing.
As I started collecting information to give to my friend, my good decisions birdie popped up in my head and suggested I make a blog post about preparing for competition. That way, I get to help not just a friend out, but hopefully other people too!
So, without further ado, here it is! The Bikini Competition Guide – A Compilation of Other Peoples Information
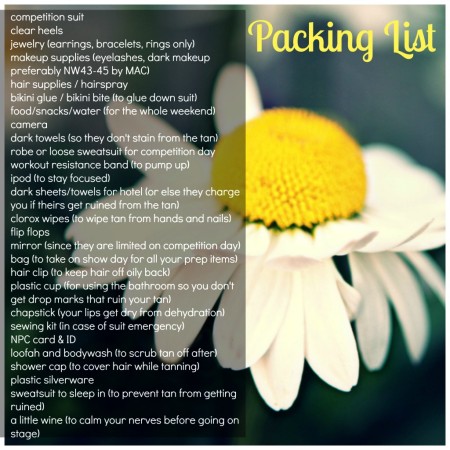
Things you’ll need to buy:
I’m not trying to scare you out of competing, I am trying to get you to be realistic. And you don’t need to have it all together at the start. Competition prep is a learning process, and those qualities that will help you succeed are developed just like your muscles are. So, let’s get started then!
Candice Perfect, with a very appropriate last name, was featured on Fitbodyhype, and her suggestions for new competitors were to practice posing and walking in your heels, pay the extra money to have a professional apply your spray tan, and get a custom bikini that fits your body.
Natalia Muntean has a great competition prep guide on her website that is definitely worth checking out. In this guide, she said this, regarding the look that bikini competitors need to aim for: “Nice and round shoulders, toned arms, flat stomach with 4-pack showing, no hard abs muscles, very firm glutes and sculpted legs. That being said, you still need to maintain a very feminine figure. Therefore – no dry veiny skin, no dehydrated look and no exhaustion on your face.
So, in summary:
Stephanie’s prep timeline looks like this:
Bikini competitors need to be muscular while keeping their femininity. But, when you begin to cut your calories and diet down as competition day draws near, you need to make sure you have enough muscle on you so that you can afford to lose some to diet and cardio.
As you start to get closer to competition day, increase to 12-15 reps, and 15-20 reps. You want to focus on building lean and long muscles once you have a good base from your lower rep workouts. Keep up with your supersets, drop-sets, tri-sets. To really burn fat, you can incorporate active rest into your workouts. For example, instead of resting the traditional way between sets, do 30 seconds of jumping jacks, mountain climbers, or rope skipping between each set instead. This will keep your heart rate up and increase your calorie burn.
At 12 weeks out, you want to start doing cardio at least 4 days per week. Keep doing your HIIT workouts and steady state workouts, and increase the duration to at least 30 minutes per session. When you start to cut (4-6 weeks out), increase your cardio to 50-75 minutes per day. You can do a combination of HIIT and steady state cardio to keep it less boring. Try doing AM/PM workouts as well if you don’t want to spend a lot of time at the gym. Incline walking, sprints on the bike or treadmill, and plyometrics workouts, are all great forms of cardio for fat loss.
So, in summary:
Before 12 weeks out, if you are bulking to build muscle, you need to eat more calories than you need to maintain your weight. Check out an awesome formula for calculating your daily needs here. Once you’ve calculated your daily needs, add 500 calories to that. That is how many calories you will be eating while bulking.
At 12 weeks out, you want to start to diet down. Decrease your calories by 100 or so every couple of days until you eventually get to a level that is 500 calories less than your calculated daily needs. At 4 weeks out, you are going to really start to diet down. I would suggest carb cycling during this time for best results: 1 day high carb, 3 days low carb, repeat. As mentioned earlier by Stephanie from Beautiful to the Core, during 4 weeks, fish and veggies are going to be a staple in your diet, along with egg whites, whey protein, and peanut butter.
Check out this website for some great bikini competition diet tips.
And that’s all she wrote, folks! Seriously, its 12:30 AM, I need to go to bed. Competing for the first time can be scary, but it is well worth it. Stick to your guns, stay motivated any what that you can, and don’t be afraid to lean on others when you are struggling. And most importantly, don’t forget to enjoy yourself and be proud of all that you have accomplished. Good luck!
Source
My bestie and I were catching up over peppermint tea and dark chocolate (we were chatting on facebook, but a girl can dream) when she mentioned that she wanted to compete in her first bikini competition and asked me to help her out, I gladly agreed. So, I put my metaphorical internet surfing goggles on, cracked my knuckles, and started typing.
As I started collecting information to give to my friend, my good decisions birdie popped up in my head and suggested I make a blog post about preparing for competition. That way, I get to help not just a friend out, but hopefully other people too!
So, without further ado, here it is! The Bikini Competition Guide – A Compilation of Other Peoples Information
Are You Ready for the Prep?
First things first, before you decide to begin your journey to the
stage, you need to consider all of the things that go into competing:
cost, time, energy, sacrifice, and much more.Things you’ll need to buy:
- Bikini
- Hair and makeup on competition day
- Spray tan
- Nails
- Shoes
- Registration and competition fees
- Travel/lodging fees
I’m not trying to scare you out of competing, I am trying to get you to be realistic. And you don’t need to have it all together at the start. Competition prep is a learning process, and those qualities that will help you succeed are developed just like your muscles are. So, let’s get started then!
The Basics
Here are a list of the basic tips that will make your prep and time on stage go more smoothly. Dualfit.com
strongly urged paying the extra money to get a coach. They have
experience, will help to keep you accountable, and will help you if the
road gets bumpy.Candice Perfect, with a very appropriate last name, was featured on Fitbodyhype, and her suggestions for new competitors were to practice posing and walking in your heels, pay the extra money to have a professional apply your spray tan, and get a custom bikini that fits your body.
Natalia Muntean has a great competition prep guide on her website that is definitely worth checking out. In this guide, she said this, regarding the look that bikini competitors need to aim for: “Nice and round shoulders, toned arms, flat stomach with 4-pack showing, no hard abs muscles, very firm glutes and sculpted legs. That being said, you still need to maintain a very feminine figure. Therefore – no dry veiny skin, no dehydrated look and no exhaustion on your face.
So, in summary:
- Pay the extra price for a coach.
- Practice your posing and walking – be confident on stage.
- Get a custom bikini and professional spray tan.
- Aim for a muscular, feminine look that is not dehydrated or tired.
The Timeline
Stephanie, from Beautiful to the Core
posted a great bikini competition prep guide, which was very
informative. If you have the time, you should check out her blog and see
all of her great advice!Stephanie’s prep timeline looks like this:
- 12 weeks out (W/O): No more cheat meals, intense training begins, drink 2 gallons of water per day.
- 8 W/O: Begin to practice posing and start tanning 2x per week.
- 4 W/O: Cut diet down, reduce carbs and consume lots of greens and fish, schedule hair and makeup, and a photo shoot if you want to document your sick bod.
- 2 W/O: whiten teeth, cut diet if needed
- 6 days out: Get your nails done, increase sodium for days 6/5/4, decrease carbs, and have your last leg workout.
- 3 days out: Cut to 1.5 gallons water, go back to a normal sodium intake, exfoliate, get a bikini wax, and nair your entire body (arms too!).
- 2 days out: Cut to 1 gallon water, lower sodium, and REST!
- The day before: Cut to 1/2 gallon water, cut all sodium, carb load, deep condition hair, exfoliate, shave before your spray tan, DON’T use deodorant, and get first round of spray tan.
- Competition day: No deodorant, touch up spray tan, glue suit after meeting, pump up 15 minutes before stage, only take sips of water as needed, have a few sips of wine before heading on stage.
The Training
Training comes second in competition prep only to diet. I am sure I
do not have to lecture you on the importance of your workouts, so I will
skip that and get right to the good stuff.Bikini competitors need to be muscular while keeping their femininity. But, when you begin to cut your calories and diet down as competition day draws near, you need to make sure you have enough muscle on you so that you can afford to lose some to diet and cardio.
The Weights:
If you are starting at 12 weeks out and are already in relatively
good shape, build muscle with 8 to 10 reps. Drop sets are great for
developing muscle and definition, along with supersets and triple sets.
If you are starting well before 12 weeks out, at 20-24 weeks for
example, you can afford to drop the reps down a bit more to build more
muscle mass. Try 5-8 reps for your big muscle movements, squat,
deadlift, bench press, and overhead press, and 8-10 reps for your
accessory exercises.As you start to get closer to competition day, increase to 12-15 reps, and 15-20 reps. You want to focus on building lean and long muscles once you have a good base from your lower rep workouts. Keep up with your supersets, drop-sets, tri-sets. To really burn fat, you can incorporate active rest into your workouts. For example, instead of resting the traditional way between sets, do 30 seconds of jumping jacks, mountain climbers, or rope skipping between each set instead. This will keep your heart rate up and increase your calorie burn.
The Cardio:
Cardio is a crucial tool in your fat loss tool box. Before you reach
12 weeks out, do 20-30 minutes of steady state cardio 2-3 times per
week. Experiment with HIIT (high intensity interval training) so that
when the time comes, you will be able to do it multiple days per week
without trouble. For your HIIT, start with a 1/2 work/rest ratio, like
this: 30 seconds sprinting, 1 minute rest. Repeat for 20 minutes. When
this gets easy, lower your work/rest ratio as you like, and increase the
duration of the workout.At 12 weeks out, you want to start doing cardio at least 4 days per week. Keep doing your HIIT workouts and steady state workouts, and increase the duration to at least 30 minutes per session. When you start to cut (4-6 weeks out), increase your cardio to 50-75 minutes per day. You can do a combination of HIIT and steady state cardio to keep it less boring. Try doing AM/PM workouts as well if you don’t want to spend a lot of time at the gym. Incline walking, sprints on the bike or treadmill, and plyometrics workouts, are all great forms of cardio for fat loss.
So, in summary:
- Before 12 weeks out: 5-8 reps for large muscle group exercises (deadlift, squat, bench press, overhead press), 8-10 reps for accessory exercises. Cardio 2-3 days per week, begin to do HIIT for 20 minutes a few days per week to get used to it.
- 12 weeks out: 8-10 reps and 10-12 reps for large muscle group exercises and accessory exercises, respectively. Experiment with drop-sets, supersets, and tri-sets. Increase cardio to 30 minutes, 3-5 times per week. Increase intensity and frequency of HIIT.
- 6 weeks out: 12-15 reps and 15-20 reps for large muscle group exercises and accessory exercises, respectively. Focus on building lean and long muscles, and stay flexible. Increase cardio to 50-60 minutes per day. Increase frequency of HIIT and decrease frequency of steady state cardio.
- 4 weeks out: 15-20 reps. Increase cardio to 60-75 minutes per day, half HIIT and half steady state cardio like incline treadmill walking.
- 6 days out: light upper body work, last leg workout before show.
- The day of: use light dumbbells 5-10 lbs to pump muscles 15-20 minutes before you step on stage.
The Diet
Diet is the most important determinant in your success on stage in
terms of your body. Good training is nothing without good diet. Before
you start to cut, the diet is simple: clean. Make sure you are getting
adequate fat (0.5xbodyweight in pounds), protein (1-1.5xbodyweight in
pounds), and carbs (1-1.2xbodyweight in pounds).Before 12 weeks out, if you are bulking to build muscle, you need to eat more calories than you need to maintain your weight. Check out an awesome formula for calculating your daily needs here. Once you’ve calculated your daily needs, add 500 calories to that. That is how many calories you will be eating while bulking.
At 12 weeks out, you want to start to diet down. Decrease your calories by 100 or so every couple of days until you eventually get to a level that is 500 calories less than your calculated daily needs. At 4 weeks out, you are going to really start to diet down. I would suggest carb cycling during this time for best results: 1 day high carb, 3 days low carb, repeat. As mentioned earlier by Stephanie from Beautiful to the Core, during 4 weeks, fish and veggies are going to be a staple in your diet, along with egg whites, whey protein, and peanut butter.
Check out this website for some great bikini competition diet tips.
And that’s all she wrote, folks! Seriously, its 12:30 AM, I need to go to bed. Competing for the first time can be scary, but it is well worth it. Stick to your guns, stay motivated any what that you can, and don’t be afraid to lean on others when you are struggling. And most importantly, don’t forget to enjoy yourself and be proud of all that you have accomplished. Good luck!
Source
Wednesday, 19 November 2014
BeFiT GO | Beach Body- 40 Minute Fat-Burning HIIT Workout
Hi girls, summer is nearly here. What do you think about this 40 min workout?
Tuesday, 18 November 2014
8 Benefits of High-Intensity Interval Training (HIIT)
And why it needs to be part of your regular workout routine
High-intensity interval training (HIIT)
describes any workout that alternates between intense bursts of
activity and fixed periods of less-intense activity or even complete
rest. For example, a good starter workout is running as fast as you can
for 1 minute and then walking for 2 minutes. Repeat that 3-minute
interval five times for a 15-minute, fat-blasting workout. It sounds too simple to be effective, but science doesn't stretch the truth. Read on for eight proven benefits of HIIT:
 Super-efficient
HIIT is the ideal workout for a busy schedule—whether you want to
squeeze in a workout during your lunch break or to get in shape for a
fast-approaching event. Research shows you can achieve more progress in a
mere 15 minutes of interval training (done three times a week) than the
girl jogging on the treadmill for an hour. (Watch and try this video of a 10-minute fat-blasting cardio routine
that burns more calories than a half hour on the treadmill!) And
according to a 2011 study presented at the American College of Sports
Medicine Annual Meeting, just 2 weeks of high-intensity intervals
improves your aerobic capacity as much as 6 to 8 weeks of endurance
training.
Super-efficient
HIIT is the ideal workout for a busy schedule—whether you want to
squeeze in a workout during your lunch break or to get in shape for a
fast-approaching event. Research shows you can achieve more progress in a
mere 15 minutes of interval training (done three times a week) than the
girl jogging on the treadmill for an hour. (Watch and try this video of a 10-minute fat-blasting cardio routine
that burns more calories than a half hour on the treadmill!) And
according to a 2011 study presented at the American College of Sports
Medicine Annual Meeting, just 2 weeks of high-intensity intervals
improves your aerobic capacity as much as 6 to 8 weeks of endurance
training.
That's not even the best part! Using the Tabata training method, you can complete an effective HIIT workout in just 4 minutes.
 Burn More Fat
Not only do you burn more calories during a HIIT workout,
but the effect of all that intense exertion kicks your body's repair
cycle into hyperdrive. That means you burn more fat and calories in the
24 hours after a HIIT workout than you do after, say, a steady-pace run.


Most people
aren't used to pushing into the anaerobic zone (that lovely place where
you can't breathe and you feel like your heart is trying to jump out of
your chest). But in this case, extreme training produces extreme
results. One 2006 study found
that after 8 weeks of doing HIIT workouts, subjects could bicycle twice
as long as they could before the study, while maintaining the same
pace.


 You can do it in
a boat, you can do it with a goat. You can do it here or there, you can
do it anywhere! Dr. Seuss would have loved HIIT. Since it's such a
simple concept—go at maximum effort for a short period of time followed
by a recovery period and repeat—you can adapt it to whatever time and
space constraints you have.
You can do it in
a boat, you can do it with a goat. You can do it here or there, you can
do it anywhere! Dr. Seuss would have loved HIIT. Since it's such a
simple concept—go at maximum effort for a short period of time followed
by a recovery period and repeat—you can adapt it to whatever time and
space constraints you have.
Challenging
This is not a workout you can do while reading a magazine or chatting with your friend. Because it's so short, you will be working hard the whole time. The trade-off is this format offers seasoned exercisers a new challenge and new exercisers a quick way to see results. You may be in pain, you may be sucking wind, but you definitely won't be bored!


 You can do it in
a boat, you can do it with a goat. You can do it here or there, you can
do it anywhere! Dr. Seuss would have loved HIIT. Since it's such a
simple concept—go at maximum effort for a short period of time followed
by a recovery period and repeat—you can adapt it to whatever time and
space constraints you have.
You can do it in
a boat, you can do it with a goat. You can do it here or there, you can
do it anywhere! Dr. Seuss would have loved HIIT. Since it's such a
simple concept—go at maximum effort for a short period of time followed
by a recovery period and repeat—you can adapt it to whatever time and
space constraints you have.Challenging
This is not a workout you can do while reading a magazine or chatting with your friend. Because it's so short, you will be working hard the whole time. The trade-off is this format offers seasoned exercisers a new challenge and new exercisers a quick way to see results. You may be in pain, you may be sucking wind, but you definitely won't be bored!
Wednesday, 12 November 2014
8 Essential Strength-Training Exercises You Need to Know
If you've been spending any time at the gym, you've probably seen (or done) more than a few sets of these strength-training moves. These exercises are trainer and fitness-buff favorites for balancing and strengthening the body; they are also effective when it comes to shaping, toning, and whittling. Learn how to do these eight essential exercises in time to add them to your holiday shape-up routine!
Bridge

The classic bridge targets the abs and butt while opening up the chest, which can need a stretch if you spend a lot of time at a desk. Add a yoga block or small ball between your knees and work your inner thighs too.
- Start by lying on your back with your knees bent and your feet planted on the floor hip-distance apart.
- As you contract your ab and butt muscles, push your pelvis upward, away from the floor. Keep your ribs aligned with your pelvis, and make sure your knees are directly above your heels.
- Lower your hips and pelvis to just above the floor and pause.
- This completes one rep. Raise your hips back to the high position and repeat. Do three sets of 10.
Deadlift

One of the most basic of weight-room moves, the deadlift is essential for correcting body imbalances and posture, as well as lifting the butt muscles.
- Stand, holding two dumbbells (or a barbell) in front of your thighs with knuckles pointed outward, keeping your arms straight and knees slightly bent.
- Slowly bend at your hip joint, not your waist, and lower the weights as far as possible without rounding your back, which should remain straight. Make sure you keep your spine neutral with a natural low-back arch, with shoulders down. Looking forward, not at the ground, will help you avoid rounding your back.
- Keep the weights or barbell close to your legs, almost touching them.
- Squeeze your glutes to pull yourself up at a quicker pace than it took to bend down (for example, beginners may want to take four seconds to bend down and two seconds to pull up). Don't use your back, and do not round your spine.
- Do three sets of 12-15 reps.
Lunge

Use lunges to increase flexibility and balance while strengthening lower-body muscles.
- Keep your upper body straight, with your shoulders back and relaxed and chin up (pick a point to stare at in front of you so you don't keep looking down). Always engage your core.
- Step forward with one leg, lowering your hips until both knees are bent at about a 90-degree angle. Make sure your front knee is directly above your ankle, not pushed out too far, and make sure your other knee doesn't touch the floor.
- Keep the weight in your heels as you push back up to the starting position.
Plank

The plank can do it all — besides sculpting arms, the move challenges your balance and engages the core muscles for an extremely effective (and deceptively difficult) gym basic.
- Start facing the floor, resting on your knees.
- Plant your palms on the mat by your head, shoulder-width apart. Your palms should be flat; spread your fingers out wide to help support your weight and take the strain out of your wrists. Step your legs out behind you one at a time, and rest on your toes.
- Contract your abs to prevent your butt from sticking up or sinking. Your spine should be parallel to the floor, with your abs pulling toward the ceiling.
- Hold for 30-60 seconds.
Push-Up

The push-up is an old favorite for strengthening the upper body, but improper form can do more harm than good. Be aware of these four things as you execute a push-up: body alignment, hands, abs, and breath.
- To start, get into a plank position (see above), making sure your shoulders are aligned over your wrists and your fingers and palms are spread wide, with pressure focused in your fingertips.
- Keep your belly button pulled in as you lower down, and keep your spine straight so your body is in a straight line. Bend your elbows outward to the sides.
- Make sure to connect your breath with your movements — inhale as you bend your elbows and lower yourself to the ground, and exhale as you raise back up into a plank.
- Aim for 10 or as many as you can do, and add reps as you become stronger.
Seated Russian Twist

Russian twists target the abs, especially obliques, and help with circulation and digestion while also giving your back and spine a little stretch.
- Sit on the ground with your knees bent and your heels about a foot from your butt.
- Lean slightly back without rounding your spine. It is really important, and difficult, to keep your back straight, so don't let it curve.
- Place your arms straight out in front of you with one hand on top of the other. Your hands should be level with the bottom of your rib cage.
- Pull your navel to your spine and twist slowly to the left. The movement is not large and comes from the ribs rotating, not from your arms swinging. Inhale through your center and rotate to the right. This completes one rep. Lift your feet off the ground or hold a medicine ball for a more advanced variation.
- Do 15-20 full rotations.
Squat

The squat is one of the best functional fitness moves you can master. From picking up a load of laundry to stabilizing yourself when you lose your balance, you'll use the squat in many areas of your life.
- Stand with your head facing forward and your chest held up and out.
- Place your feet shoulder-width apart or slightly wider. Extend your hands straight out in front of you to help keep your balance.
- Sit back and down like you're sitting into an imaginary chair. Keep your head facing forward as your upper body bends forward a bit. Rather than allowing your back to round, let your lower back arch slightly as you descend.
- Lower down so your thighs are as parallel to the floor as possible, with your knees over your ankles. Press your weight back into your heels.
- Keep your body tight, and push through your heels to bring yourself back to the starting position.
- Do three sets of 10-15.
Superman

The Superman targets your posterior muscles to correct body imbalances by strengthening often-neglected areas of your body.
- Lie facedown on your stomach with arms and legs extended. Keep your neck in a neutral position by looking at the ground in front of you without straining.
- Keeping your arms and legs straight (but not locked) and torso stationary, simultaneously lift your arms and legs up toward the ceiling to form an elongated "u" shape with your body, with your back arched and arms and legs several inches off the floor.
- Hold for two to five seconds and lower back down to complete one rep.
- Do three sets of 12.
Subscribe to:
Posts (Atom)