This 30 minute workout takes you through several basic yet challenging exercises on the TRX. Options for all levels!

Showing posts with label mobility. Show all posts
Showing posts with label mobility. Show all posts
Tuesday, 28 July 2015

Monday, 27 July 2015
The Benefits of TRX Suspension Training

Below are just a few of the many benefits TRX suspension training can offer:
 a) TRX suspension training can take place virtually anywhere, is extremely portable and requires only limited space.
You don't need a fancy gym or fitness centre to train with TRX. All that is required is a beam or other suitable prop for attaching the suspension traps to. That makes TRX ideal for outdoor training, and given it's lightweight and size it is an easy piece of equipment to take on your travels - giving you no excuse for your training to suffer! It is also very fast to set-up in any location.
b) TRX suspension training is an effective total body workout.
There are numerous suspension exercises and workouts which target all the body parts to varying degrees of intensity. Many of the exercises stimulate multi-muscle groups at different levels, making quick but effective workouts possible.
c) TRX is suitable for people of all age, sex or fitness level.
TRX suspension training is for everyone and anyone. From people in their 80's to teens, the difficulty, intensity and weight exerted can be tailored around the user via the thousands of exercises.
 d) The equipment is relatively inexpensive.
To recreate the range of movements and muscles worked using traditional gym equipment would be very costly. The suspension straps can be used to work every muscle group meaning they are an all -in- one fitness solution. Each TRX comes with a DVD demonstrating some of the very best exercises, along with numerous extras.
e) Combine cardio and strength training into one workout / exercise.
Given the nature of TRX suspension training it can be utilized to combine strength training and cardio in the same exercise. This has benefits in regards to time saving, and means that even a short workout can have a bigger impact.
f) Increase Sports Performance.
TRX can be used to generate and build superb muscular balance, mobility, joint stability, and core strength - which will most certainly help you perform better in all sports and physical activities.
If you haven't tried TRX suspension training yet, maybe it's time you do!
Wednesday, 15 July 2015
6 Exercises for a Stronger Core

A common misconception is that doing exercises while lying supine automatically increases core strength. While these exercises can help improve abdominal strength, the entire core must be challenged to help improve total-body function. A better approach is to use a variety of stances, such as single-leg, supine and prone, to incorporate a wide range of movements. Here are a few of the best exercises to challenge the entire core.
Glute Bridges
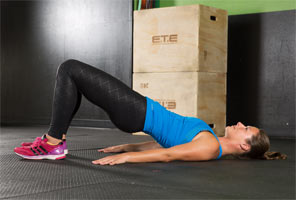
While many consider the abdominal muscles to be the most important for increasing stabilization, strong glutes are essential as well. Many injuries and faulty movement patterns are a result of underactive glutes and overactive quads and hip flexors. To combat this, activate and fire those glutes before workouts to make sure they are turned on and ready to work.
Lie supine on the floor with knees bent and both feet flat on the floor. Keep the head relaxed and slowly push through the heels to raise the hips as high as possible. The knees, hips and shoulders should be in one straight line. This exercise activates the glutes and hamstrings, and stretches the hip flexors, which are often overactive and tight. Hold the top position for three seconds and slowly lower. Do eight to 10 reps per side. To progress this exercise, try one leg at a time or place the feet on the round side of a BOSU.
Medicine Ball Single-leg Reach
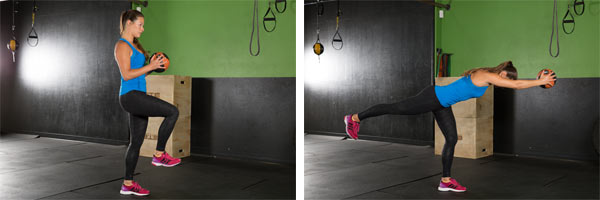
Disguised as a leg workout, this move is great for the glutes, hips, back and abs. Grab a 5- to 10-pound medicine ball and stand on the right leg. Slowly reach forward while hinging at the hips (not the back). Simultaneously lever the back leg out behind the body. Reach as far as possible—work toward bringing the arms, torso, and left leg horizontal to the floor. As the core gets stronger, increase the weight of the medicine ball. Perform two to three sets of eight to 10 repetitions per leg.
BOSU Plank Variations
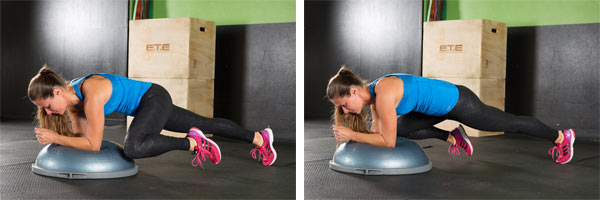
Before attempting planks on the BOSU, make sure your client has impeccable plank form and can hold it for at least 30 seconds on the floor before attempting advanced variations. Planks are meant to strengthen the core, so if your client’s form wavers too much (back sinks, arches or bends), have him or her practice a little longer before advancing.
Start with the elbows on the round top of the BOSU. This creates an element of instability that must be controlled throughout the exercise. Perform a plank for 30 seconds. Begin adding small, alternating single-leg lifts, focusing on lifting the leg with the glutes and not shifting the hips at all. Next, try bringing one leg out about 45 degrees to the side, tapping the toe to the ground and returning to plank position. Perform five repetitions on each leg. Finally, try bringing the left knee out to the side, and tapping it to the BOSU just outside the left elbow. Repeat five times per leg. To regress these variations, perform them on the floor or on a flat bench before moving to the BOSU
Medicine Ball Single-leg Woodchop
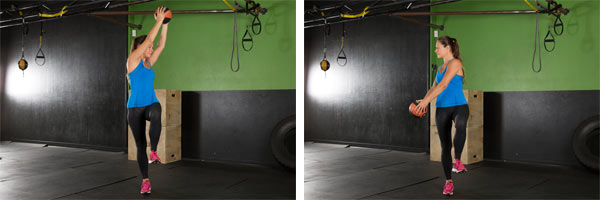
Grab a 5- to 10-pound medicine ball and stand on the right leg. Raise the medicine ball overhead, slightly over the left shoulder. Swing it down quickly, but with control, to the outside of the right leg. Try to keep the torso upright, with a constant slight bend in the right leg. Slowly bring it back up to starting position and repeat eight to 10 times. To regress this exercise, start on two legs and gradually progress to standing on one leg.
TRX Pike

Place the toes in the foot cradles and lie prone on the floor, ready to plank. Push up into a high plank on the hands, establishing perfect form. Keeping the legs straight, push the hips straight up into the air while simultaneously pulling the TRX toward the hands. Slowly lower back down to finish in plank position. Complete eight reps to start, gradually increasing to 15 reps as core strength improves. To regress this exercise, bend the knees to pull the TRX toward the hands.
Hanging Leg Lowers
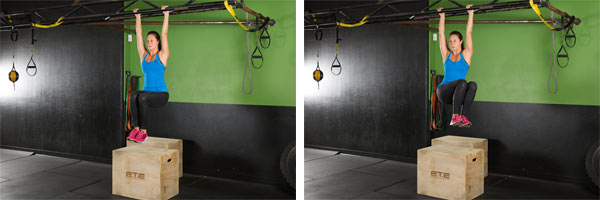
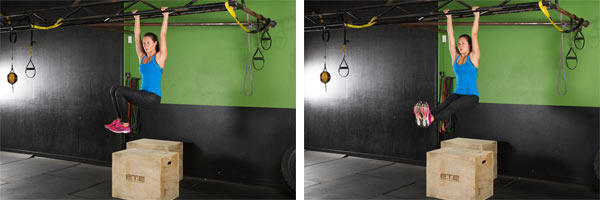
Exercises in which the legs are unsupported are a great way to work the deep abdominal muscles and the hip stabilizers. However, these exercises are not recommended for individuals with diagnosed lower-back pain.
If your client is a beginner, start this exercise using a Captain’s Chair. Once the client has developed a good strength base, progress to ab straps or hanging from the hands. Start with the knees bent, and lift them slowly as high possible, pulling the knees to the chest. Instead of focusing exclusively on the upward movement, think about the slow downward movement. Take about five seconds to slowly lower the legs back down to the starting position. This eccentrically works the deep abdominals, providing control and stabilization, while also preventing swinging. Repeat eight to 10 times. To progress this exercise, slightly twist the knees to the left and right to challenge the obliques. Additionally, try keeping the legs straight but only raise them as high as possible while maintaining straight knees. Again, focus on the slow lowering motion.
Source
Thursday, 19 February 2015
3 TRX Flows That Will Increase Your Flexibility, Strength and Mobility
Flow is a concept commonly associated with yoga, but have you ever
tried sequencing non-yoga-based strength, balance and flexibility moves
all together, without any breaks or pauses? The following flow routine
featuring the TRX Suspension Trainer
is a great way to harness the benefits of flow, with its balance
challenges and constant movement, while also targeting flexibility,
strength and mobility. Each of these movements is relatively simple, but
when performed slowly and with control, they combine to create a unique
and challenging workout that your clients and class participants are
sure to love.
Note: Each of these sequences requires thoughtful movement and great body awareness. Help your participants focus on what is happening to their bodies as they work through the flow. Does their core want to disengage because the strength of a single leg movement is too tough? Are they compensating a lift of the leg because of mobility and flexibility challenges? These types of questions will help your clients begin to notice how their bodies cheat movement. Until they feel it, they can’t make the appropriate adjustments. These flows can assist in exposing the areas where the body compensates for imbalances or weaknesses.
1. Core Flow
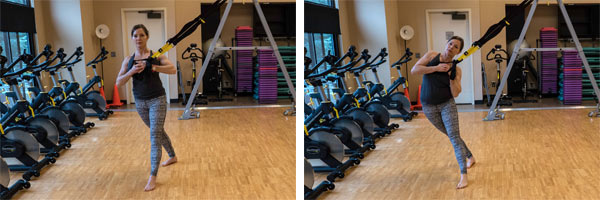
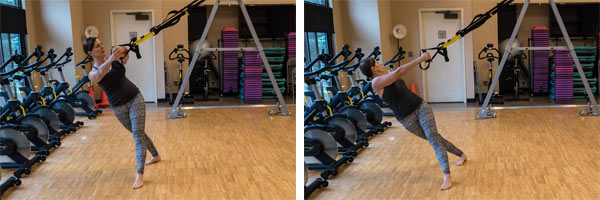
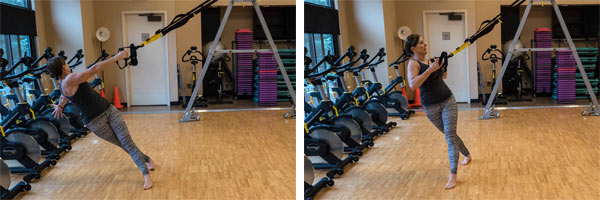
This sequence uses eccentric loading of the side body, core stabilization, rotation, thoracic opening, single-leg balance and strength.
Adjust the TRX Suspension Trainer to mid-length; stand sideways on the left side of the anchor. Stand in an off-set position, hip in line to anchor. Put the handles in single-handle mode and hold in front of the sternum. Maintain good posture, with shoulders down, ribs in, body in a straight line and eyes at the horizon. Lower to your edge and raise back up. Press the handle straight out from the sternum, maintaining tension on the straps and keeping the arms straight. Bring the arms toward the anchor, being sure to keep the body in plank position without any sagging. As you reach the center, release the right arm and reach toward the floor, opening the chest and maintaining strong hips and legs. Raise back up, grab the handle and pull the body into a row position, bringing the handles back to the sternum. Rotate back to sideways, extend the right leg in front and lower to a squat. Raise back up, holding on one leg with the right leg extended and straight, before lowering the leg back to the starting position. Repeat the entire sequence on the other side.
2. Crossing Lunge Flow
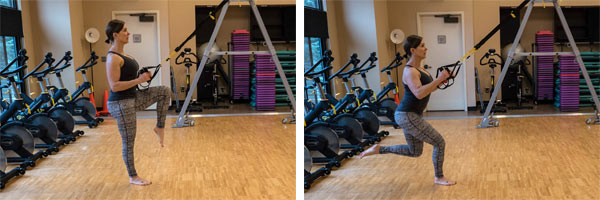
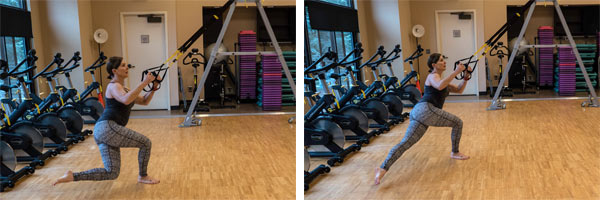
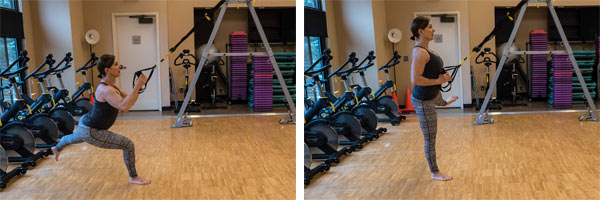
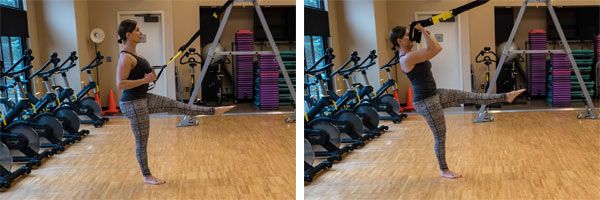
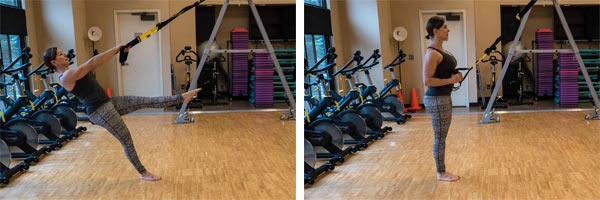
This flow challenges upper- and lower-body strength and mobility.
Adjust the TRX Suspension Trainer to mid-length. Stand facing the anchor point, holding the handles with palms facing each other and the elbows under the shoulders. Center the right leg to the anchor point and lift the left leg with the knee bent. Lower the tailbone toward the floor into a single-leg lunge position. Drive the knee behind the right leg, keeping a 90-degree bend in the knee. Extend the leg from this position and circle it behind the body and toward the left side of the body. Keep the leg straight and abducted, with the foot flexed and the toes and knee facing strength ahead. Extend the right leg to stand as you bring the left leg to the front. Be sure to keep the torso lifted and the core strong, being careful not to lean to the side or the back. Bring the arms up, elbows in line with the shoulders, and the palms facing away from your face. Extend the arms and curl back to the starting position.
3. Lunge to Stand Flow
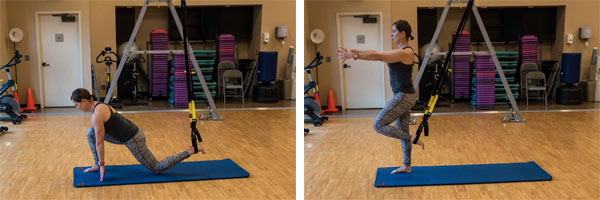
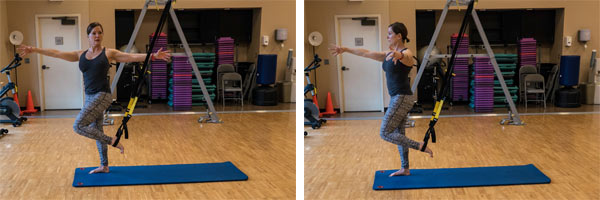
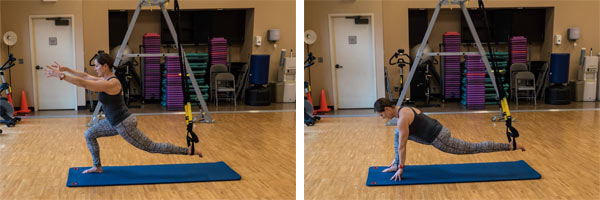
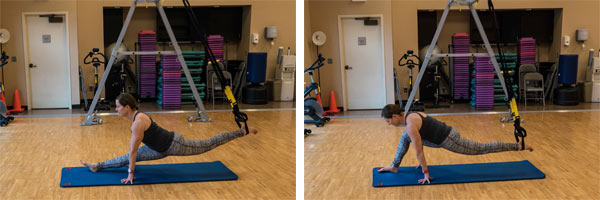
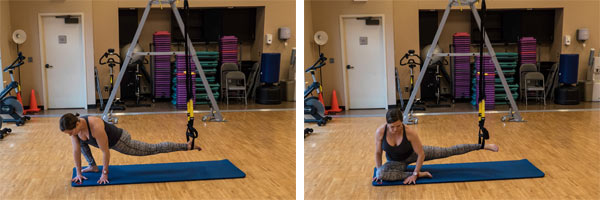
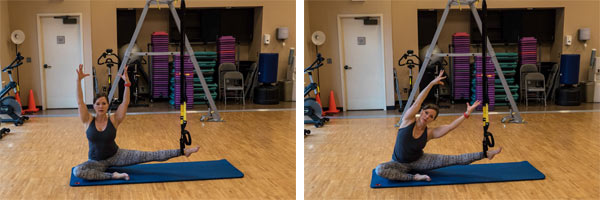
This sequence challenges flexibility, mobility and strength through hips, legs, ankles and thoracic spine.
Adjust the TRX Suspension Trainer to mid-calf. Face away from the anchor and place the left foot in the foot cradle and assume a runner’s lunge position. Keep the chest lifted, spine tall and the left glute engaged. Hinge the hips back, keeping the right leg straight and the spine long. Using your right leg, pull forward and then press up to stand. Maintain tension on the straps by keeping the left leg weighted in the straps. As you come to stand, extend the arms out from the chest to about shoulder-width apart. Keep the shoulders down and the ribs in while maintaining strong arms and core. Keep the right arm straight as you begin to move the left arm toward the back wall, rotating toward the left and following your arm with your eyes. Your arms should be in a T formation. Bring the left arm back to the front and extend the left leg behind you. With the spine tall, lower the knee toward the floor. Once you reach 90 degrees, reach the arms toward the floor to extend the back. Keep the right heel in place as you continue pressing the body back until both legs are straight in a split. Pull the body forward, using fingertips, if needed. Lift the right foot and pivot the body, while bending the knee to face the left side of the anchor. Extend arms overhead and reach toward the anchor and bring the torso back to an upright position. Repeat on the other side.
Note: Each of these sequences requires thoughtful movement and great body awareness. Help your participants focus on what is happening to their bodies as they work through the flow. Does their core want to disengage because the strength of a single leg movement is too tough? Are they compensating a lift of the leg because of mobility and flexibility challenges? These types of questions will help your clients begin to notice how their bodies cheat movement. Until they feel it, they can’t make the appropriate adjustments. These flows can assist in exposing the areas where the body compensates for imbalances or weaknesses.
1. Core Flow
This sequence uses eccentric loading of the side body, core stabilization, rotation, thoracic opening, single-leg balance and strength.
Adjust the TRX Suspension Trainer to mid-length; stand sideways on the left side of the anchor. Stand in an off-set position, hip in line to anchor. Put the handles in single-handle mode and hold in front of the sternum. Maintain good posture, with shoulders down, ribs in, body in a straight line and eyes at the horizon. Lower to your edge and raise back up. Press the handle straight out from the sternum, maintaining tension on the straps and keeping the arms straight. Bring the arms toward the anchor, being sure to keep the body in plank position without any sagging. As you reach the center, release the right arm and reach toward the floor, opening the chest and maintaining strong hips and legs. Raise back up, grab the handle and pull the body into a row position, bringing the handles back to the sternum. Rotate back to sideways, extend the right leg in front and lower to a squat. Raise back up, holding on one leg with the right leg extended and straight, before lowering the leg back to the starting position. Repeat the entire sequence on the other side.
2. Crossing Lunge Flow
This flow challenges upper- and lower-body strength and mobility.
Adjust the TRX Suspension Trainer to mid-length. Stand facing the anchor point, holding the handles with palms facing each other and the elbows under the shoulders. Center the right leg to the anchor point and lift the left leg with the knee bent. Lower the tailbone toward the floor into a single-leg lunge position. Drive the knee behind the right leg, keeping a 90-degree bend in the knee. Extend the leg from this position and circle it behind the body and toward the left side of the body. Keep the leg straight and abducted, with the foot flexed and the toes and knee facing strength ahead. Extend the right leg to stand as you bring the left leg to the front. Be sure to keep the torso lifted and the core strong, being careful not to lean to the side or the back. Bring the arms up, elbows in line with the shoulders, and the palms facing away from your face. Extend the arms and curl back to the starting position.
3. Lunge to Stand Flow
This sequence challenges flexibility, mobility and strength through hips, legs, ankles and thoracic spine.
Adjust the TRX Suspension Trainer to mid-calf. Face away from the anchor and place the left foot in the foot cradle and assume a runner’s lunge position. Keep the chest lifted, spine tall and the left glute engaged. Hinge the hips back, keeping the right leg straight and the spine long. Using your right leg, pull forward and then press up to stand. Maintain tension on the straps by keeping the left leg weighted in the straps. As you come to stand, extend the arms out from the chest to about shoulder-width apart. Keep the shoulders down and the ribs in while maintaining strong arms and core. Keep the right arm straight as you begin to move the left arm toward the back wall, rotating toward the left and following your arm with your eyes. Your arms should be in a T formation. Bring the left arm back to the front and extend the left leg behind you. With the spine tall, lower the knee toward the floor. Once you reach 90 degrees, reach the arms toward the floor to extend the back. Keep the right heel in place as you continue pressing the body back until both legs are straight in a split. Pull the body forward, using fingertips, if needed. Lift the right foot and pivot the body, while bending the knee to face the left side of the anchor. Extend arms overhead and reach toward the anchor and bring the torso back to an upright position. Repeat on the other side.
Subscribe to:
Posts (Atom)