
The stability ball is a great tool for strengthening the core, but
there are so many other exercises you can do with it. Here are five fun
exercises that you can use to work the entire body using this incredibly
versatile piece of equipment.
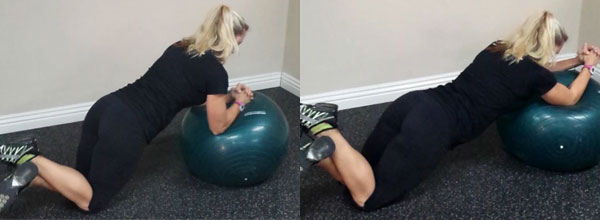
Targeted Muscles: Abs, back, chest and ats
The Movement: Bend your elbows at 90 degrees and place them on the top of a stability ball. Place your knees on the floor so that your knees, hips and shoulders are in a straight line. Engage your abs and open your shoulders, pushing the ball forward away from your body. Roll the ball out as far as you can without breaking the straight line between your knees and shoulders. Engage your abs and upper body, and then roll the ball back toward your body.
Challenge: For an added challenge, place your feet on the floor instead of your knees.
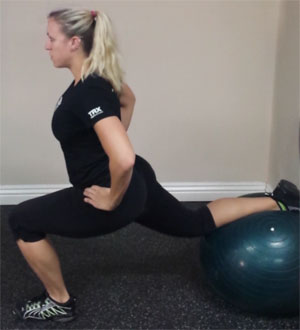
Targeted Muscles: Glutes and hamstrings
The Movement: Place the ball against a wall. Stand facing away, about 2 to 3 feet from the ball. Place the top of your left foot on the ball, so that you feel a slight stretch in your left hip flexor. Keep your shoulders square and chest up, and engage your core. Once balance is established, bend your right knee, keeping your right knee directly over your foot so that your shin remains vertical. Go as low as you can. Push through your right heel and stand back up. Repeat 10 to 15 times, and then switch legs.
Modification: To modify the exercise, start with a half squat, just to establish balance. You can also place the ball in a corner to prevent lateral shifting of the ball.
Challenge: If you have great balance and want an extra challenge, try this exercise without a wall behind the ball. As you lower, push the ball back with your foot, and then as you stand back up, pull it back in to starting position. You can also try holding on to dumbbells for more glute/hamstring activation.
The Movement: Set up is similar to the rollouts. Place your elbows on the ball and your feet behind you on the floor; maintain a straight line from ankles to hips to shoulders. Do not allow your upper body to collapse onto your elbows; rather, keep an open angle between your arms and torso, and keep your visual focus on your hands. Start by holding a plank. Once you can hold a plank for 30 seconds without breaking form, progress to plank variations.
The Variations: Lift alternating legs while maintaining a tight plank. Try lifting one leg up and then out to the side 1 to 2 feet while holding the plank. Try lifting one arm out to the front, and then out to the side. Alternately bring one knee in to touch the ball just below your chest. Alternately bring one knee out to the side and then forward to touch the ball on the outside of your elbow. Try a side plank by propping yourself on your right elbow, with your left hand on your hip, and then switch sides.
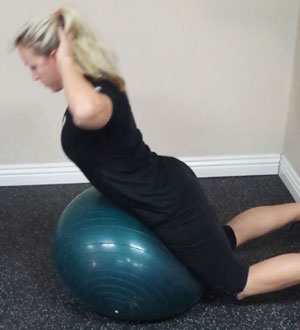
Targeted Muscles: Upper and lower back, glutes and hamstrings
The Movement: Lie prone (facedown) with the stability ball positioned under your hips and your feet pressed flat against a wall. Bend your knees so you “hug” the ball between your torso and knees. Place your hands behind your head and lift your torso, hinging at the hips, by pressing your feet against the wall. Keep your back straight throughout the exercise. Finish with your knees, hips and shoulders in a straight line at about a 45-degree angle from the wall. Be careful not to overarch your back. Bend at the hips and lower back down until your stomach contacts the ball again.
Challenge: Hold a 5-pound medicine ball at your chest while completing the movement. Alternatively, hold 5-pound dumbbells in each hand and perform a reverse fly as you lift.
The Movement: Place your shins on the stability ball and your hands on the floor so you are in push-up position. Bend your elbows and lower yourself to the ground. Finish with your chest between your hands, keeping a tight, straight back during the whole movement. Squeeze your abs to keep the ball from rolling laterally.
Modification: To make this exercise a little easier, start with the ball closer to your torso, on your thighs or knees. As you get stronger, try to roll the ball back a little more each time, until you can eventually do push-ups with your feet on the ball.
Challenge: To make ball push-ups harder, engage your abs by adding a knee tuck after each rep—bend your knees and roll the ball to your chest. Straighten your legs back out and repeat the next push-up. You can also lift one leg about 6 inches above the ball while performing the push-up. To activate more upper-body stabilizer muscles, place your feet on the floor and put your hands on the ball to do your push-ups.
Source
The Exercise: Rollouts
Targeted Muscles: Abs, back, chest and ats
The Movement: Bend your elbows at 90 degrees and place them on the top of a stability ball. Place your knees on the floor so that your knees, hips and shoulders are in a straight line. Engage your abs and open your shoulders, pushing the ball forward away from your body. Roll the ball out as far as you can without breaking the straight line between your knees and shoulders. Engage your abs and upper body, and then roll the ball back toward your body.
Challenge: For an added challenge, place your feet on the floor instead of your knees.
The Exercise: Bulgarian Split Squat
Targeted Muscles: Glutes and hamstrings
The Movement: Place the ball against a wall. Stand facing away, about 2 to 3 feet from the ball. Place the top of your left foot on the ball, so that you feel a slight stretch in your left hip flexor. Keep your shoulders square and chest up, and engage your core. Once balance is established, bend your right knee, keeping your right knee directly over your foot so that your shin remains vertical. Go as low as you can. Push through your right heel and stand back up. Repeat 10 to 15 times, and then switch legs.
Modification: To modify the exercise, start with a half squat, just to establish balance. You can also place the ball in a corner to prevent lateral shifting of the ball.
Challenge: If you have great balance and want an extra challenge, try this exercise without a wall behind the ball. As you lower, push the ball back with your foot, and then as you stand back up, pull it back in to starting position. You can also try holding on to dumbbells for more glute/hamstring activation.
The Exercise: Plank Variations
Targeted Muscles: All muscles depending on variation, but especially the abs, glutes, lower back and hipsThe Movement: Set up is similar to the rollouts. Place your elbows on the ball and your feet behind you on the floor; maintain a straight line from ankles to hips to shoulders. Do not allow your upper body to collapse onto your elbows; rather, keep an open angle between your arms and torso, and keep your visual focus on your hands. Start by holding a plank. Once you can hold a plank for 30 seconds without breaking form, progress to plank variations.
The Variations: Lift alternating legs while maintaining a tight plank. Try lifting one leg up and then out to the side 1 to 2 feet while holding the plank. Try lifting one arm out to the front, and then out to the side. Alternately bring one knee in to touch the ball just below your chest. Alternately bring one knee out to the side and then forward to touch the ball on the outside of your elbow. Try a side plank by propping yourself on your right elbow, with your left hand on your hip, and then switch sides.
The Exercise: Glute/Ham/Low Back Extensions
Targeted Muscles: Upper and lower back, glutes and hamstrings
The Movement: Lie prone (facedown) with the stability ball positioned under your hips and your feet pressed flat against a wall. Bend your knees so you “hug” the ball between your torso and knees. Place your hands behind your head and lift your torso, hinging at the hips, by pressing your feet against the wall. Keep your back straight throughout the exercise. Finish with your knees, hips and shoulders in a straight line at about a 45-degree angle from the wall. Be careful not to overarch your back. Bend at the hips and lower back down until your stomach contacts the ball again.
Challenge: Hold a 5-pound medicine ball at your chest while completing the movement. Alternatively, hold 5-pound dumbbells in each hand and perform a reverse fly as you lift.
The Exercise: Push-ups
Targeted Muscles: Chest, triceps, abs, core, glutes and backThe Movement: Place your shins on the stability ball and your hands on the floor so you are in push-up position. Bend your elbows and lower yourself to the ground. Finish with your chest between your hands, keeping a tight, straight back during the whole movement. Squeeze your abs to keep the ball from rolling laterally.
Modification: To make this exercise a little easier, start with the ball closer to your torso, on your thighs or knees. As you get stronger, try to roll the ball back a little more each time, until you can eventually do push-ups with your feet on the ball.
Challenge: To make ball push-ups harder, engage your abs by adding a knee tuck after each rep—bend your knees and roll the ball to your chest. Straighten your legs back out and repeat the next push-up. You can also lift one leg about 6 inches above the ball while performing the push-up. To activate more upper-body stabilizer muscles, place your feet on the floor and put your hands on the ball to do your push-ups.
Source


