Showing posts with label abdominal muscle. Show all posts

Tuesday, 8 December 2015

Reasons Why Plank Exercises Are Great

Some of the best exercises are the least complicated, and plank exercises I think fall into that category. These have recently become an important part of my exercise routine because they are great for core conditioning. In fact, they may look too easy to be beneficial, but especially if you have irritation in the lower back this exercise might be your answer. But it also gives the hamstrings, glutes and shoulders a good workout, and will support proper posture and improved balance.
It should be noted, however that there are some common mistakes made when people do planks, and perhaps even more so than most exercises doing improperly could lead to injury. These exercises will tax the upper and lower regions of the spine. If these areas are weak it will normally cause the spine to sway. This can put compression pressure in the vertebrae and can cause back injuries. It is important especially when starting out, to know just where your limits are and not to exceed them. If you feel any pain in the back area, don't push it, but work your time up little by little.

Besides trying to hold the position for too long, other common faults are placing the hands too close together, allowing the hips and head to drop, and holding your breath. And what should your goal be? You are considered to be fairly fit in the core area if you can hold the abdominal plank position for at least two minutes. But again, you should build up to that point slowly.

That said, here are some reasons why you should be looking to plank exercises as part of your fitness program
1. Posture and balance improvement. By merely staying in the plank position for the period of time requires you to work on your balance. This can be enhanced further by doing planks on a BOSU ball, or by doing side planks. If we do lose our balance and posture position as we age, it is normally because of the weakening in the core area. Planks are great for this.

2. Alleviates back pain. Whatever you do to strengthen your core area is probably going to make your lower back stronger. The reason is because plank exercises require minimal movement while contracting all the layers of the abdominals.
 
3. Tones the stomach region. These exercises will be in our core muscles of the belly area. This is the foundation of the outer abdominals, or six-pack abs. This will be helped further by pulling in the area of your belly button, which will contract those deep inner transverse abdominal muscles.

4. Builds flexibility. The first time get into the plank position you will probably feel how the body becomes stretched. Not only in your posterior muscles but also in the shoulder area, the hamstrings and even the arches of your feet down to your toes. Plank exercises are a natural for stretching the body.

5. Mood enhancement. All of the above reasons for doing planks will help to improve a person's mood. Stretching and releasing the tension from muscles throughout the body are going to invigorate anyone who does these wonderful exercise routines.
 
Where you carry your weight has a lot to do with your overall health, as it is a  marker for issues having to do with the kidneys and liver. Read more about how to put on good weight through diet and exercise on our website  http://muscle4weightloss.com/. Rich Carroll is a writer and avid health advocate now living in Chicago.

Sunday, 31 May 2015

A Fitness Routine for Six Pak Abs

by Brigi G | Fitness Inspired Formula

The goal of six pack abs mainly depends upon losing weight by completing exercises that focus on the muscles in the abdominal area. There are literally dozens of such exercises including many that are meant for other major muscle groups, but that can be modified to include a workout for your abdominal muscles. Here are just a few of the major abdominal emphasis exercises.

CRUNCHES

Crunches are done by lying on the floor either on a mat or not, with your arms crossed in front of your chest. Many people do crunches with the hands behind the head, but this can create lower back problems because of the pull on the head and neck. A slightly different position has the finger tips placed behind the ears, rather than crossed on the chest. It is important not to pull on the neck or on the ears for assistance in rising off the floor. Instead, suck the abdomen back toward the spine and inhale through the nose at the same time. Raise the shoulders toward the knees using only the muscles in the abdomen. The entire back should not be lifted from the floor, as this is likely to create back strain. No additional benefit to the abdomen is gained by raising the entire torso. The key part of the crunch is the initial flexing of the abdominal muscles as the shoulders are lifted off the floor. As the shoulders clear the floor, exhale through your mouth. Complete the exhalation with a gasp to expel the last of the air from the lungs as your shoulders stay clear of the floor. Lower the shoulders back to the point where the shoulder blade touches the ground while inhaling. It is important to maintain the proper breathing control and muscle flexing to get maximum benefit from crunches.

SIT UPS

Once again start in a position on the floor with your feet flat and your knees bent. The fingers should be placed behind the ears, or you can cross your arms on your chest. Slowly raise the entire back off the floor while inhaling deeply and exhale as you reverse the move. This exercise can be made more challenging in several ways. For instance, you can do sit ups from an incline with your head lower than your lower body. You can then add weights on the chest to lift while you are sitting up. Weights can become heavier on an incline bench. The next difficult step can be attained by holding the feet off the ground while doing sit ups or making a bicycle peddling motion while doing sit ups with your legs. These exercises may not be easy, but are very beneficial to the abdominal area.

LEG LIFTS

Leg lifts begin with the legs straight and the hands at your sides while lying on the floor. Lift both legs up at the same time without bending the knees until the legs are at a ninety degree angle or a close as possible. Not everyone is flexible enough to reach the ninety degree angle. Lower the legs as close as possible to the floor without actually touching and repeat several times. Increase the challenge of this exercise by adding weights to the legs while lifting them. Another challenging exercise for improving definition and musculature in the abdomen is to hang from a pull up bar while lifting both legs to a ninety-degree position. As with most other exercises, try to stay conscious of breathing while slowly doing the routines.

JACKKNIFE SIT UPS

This exercise begins by lying flat on the floor with the hands at your sides in order to provide better balance. At the same time you raise your knees, bring your torso up slowly till the face and knees meet. Return slowly to the original position while in full control of the movement. The jackknife name comes from the natural tendency of the legs to bend at the knee with the feet dropping to the hips presenting the shape of a jackknife. The difficulty level of this position can be increased by holding a weight between the feet while performing the sit ups.

V UPS

This exercise begins with you on your back on the floor with the arms extended over your head. Bring both legs and torso up at the same time without bending the knees or the arms. Keep the pace slow and steady and reach for your feet with your extended hands at the top of the arc. If possible, try to touch your feet, but this move can be tricky until your level of flexibility increases. As with other exercises, adding weight between the feet increases the difficulty level.


Sunday, 26 April 2015

The Difference in Female Bodybuilding, Figure Competitions, Bikini Contests, and Women's Physique

If you are new to the sport of figure competitions and women's physique contests you may have seen those glamorous figure models on the cover of magazines and on websites.
If you ever had the desire or goal to look like one of these figure models and sport the look of fabulous and sexy muscle, then here are a few quick and easy tips and guidelines to help you decide on your new fitness journey.

Female Bodybuilding - The whole women's fitness movement began with female bodybuilding contests, the first legit one starting in 1978. From then on the women became more and more competitive, working harder to gain more muscle and decrease body fat. Female bodybuilders had perfected the sport by the late 1990's and competition was so great that only the best of the best could survive on stage with a chance of going pro.
 

 Figure Competitions - The popular figure competition is a spawn off of female bodybuilding. It was introduced in 2001 to allow women to compete who didn't want to obtain a great amount of muscle. Figure competitions opened the door so that almost any woman can compete with a chance at placing. However, as the years passed, the figure competitors, too, became more competitive, getting more and more muscular and defined. This division also became somewhat secluded where only the best of the best could place well and become pro.

Bikini Contests - As the figure competitions grew in popularity, so did the competitors muscle, which opened a door to another new division to allows more women to compete on stage without having to build muscle. This new category is the bikini contest. The bikini competitors don't need to display any muscle or definition. They simply have to look good in a bikini and pose according to the guidelines.
 

 Women's Physique Contest - The women's physique contest was introduced in 2010, another new division for women. Basically, the women's physique contest is a lighter version of female bodybuilding. While the women are allowed to have muscle, NPC guidelines state that they can't have striated in muscle detail. Also, there is no lat spread, front and back biceps poses are executed with open hands, and feet must be placed to the side on the front and back poses rather than flat-footed. Also, the side chest pose is executed with arms extended.

To decide with fitness category you would like to compete in it is a good idea to read more on each and attend a competition so you can see the classes and how the women look on stage.


Source Karen Sessions Ezine

Tuesday, 9 December 2014

Core-strengthening Stability Ball Workout

The stability ball was originally used as a physical therapy aid for postural re-education and orthopedic rehabilitation. Today, you can find these large, air-filled balls in a variety of sizes in just about any fitness setting. They are used by exercise professionals in personal training and group fitness as a way to add interest and fun to core and stability-based workouts. Although stability-ball exercises appear to activate about as much deep abdominal muscle as similar movements on the floor without a ball (Martuscello et al., 2013), they can add value to a training session when you’re looking for variety and whole-body integration while working the core.


The following workout circuit on a stability ball adds a new twist to your ab routine. Perform 10 to 15 repetitions of each exercise, and do the circuit more than once if you want more challenge. Choose a ball size that allows you to sit comfortably on top with your feet flat on the floor, thighs parallel to the floor, and both hips and knees bent at 90 degrees. Keep in mind that to work the entire mid-section, it’s important to challenge the torso from various directions. That is, there is more to a balanced core program than just performing crunches or sit-ups. The following routine features movements that address the entire functionality of the trunk muscles—flexion, extension, side bending and rotation.
Note: Only attempt this workout if you have had previous experience using a stability ball and feel confident moving on the ball in all of the positions shown.
1. Ab Crunch With Diagonal Press
ab crunch with diagonal press
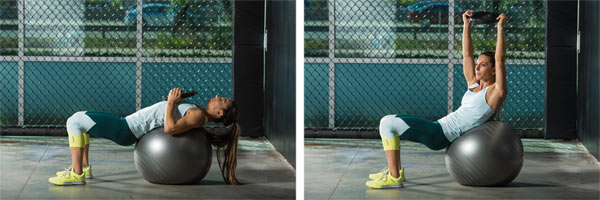
Grasp one, small weight (e.g., a 5-, 8- or 10-pound dumbbell, plate weight or medicine ball) with both hands. Sit on top of the ball and walk the feet forward until your back is supported by the ball. Start with the weight on the chest. As you come up into an ab crunch, straighten the elbows and push the weight at a diagonal away from you toward the ceiling. As you return to the start position, bend the elbows and bring the weight back down to the chest.
2. Back Extension Over Ball
back extension over ball


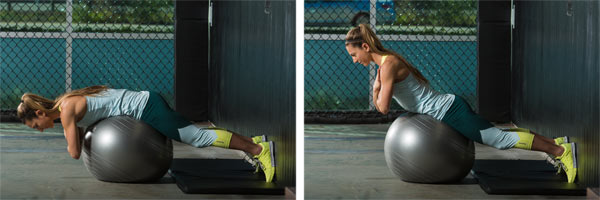
On an exercise mat, kneel with your back to a wall and position your feet against the wall. Lean over the ball and position it underneath your abdomen. Slowly straighten your knees as you lean over the ball, which will effectively put the ball under your hips. You should be leaning over the ball with the upper half of your body unsupported, while your hips and thighs are supported by the ball and your feet are support by the wall. Keep your abdominals contracted and your glutes tight and cross your arms over your chest. Slowly lower and lift your torso to work the trunk extensor muscles.
3. Pike on Ball
pike on ball

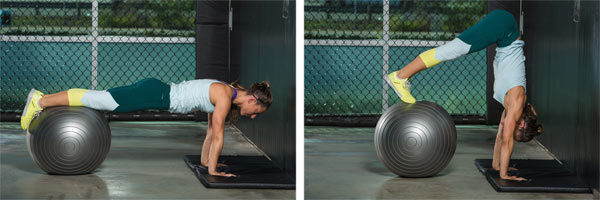
Adopt a plank position with your hands on the floor aligned underneath the shoulders and your thighs on top of the ball. Position yourself with your head toward a wall that is strong enough to hold your weight in case you lose your balance and need back support from the wall (this will prevent you from rolling forward into a summersault). Slowly roll the ball toward your body as you lift the hips upward into a pike position. If you feel comfortable in a handstand, align the hips above the head in the end position so that you are essentially upside down. However, if you are unsure of your ability, only bring the hips upward as high as you feel confident and stable. Slowly roll the ball back out to the start position.
4. Supine Twist on Ball
supine twist on ball

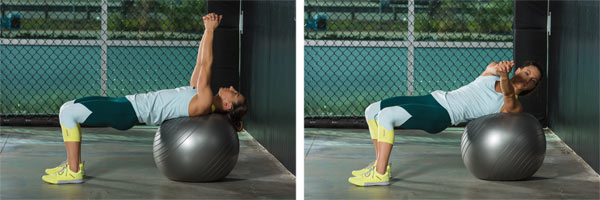
Sit on top of the ball and walk the feet forward until your back and head are supported by the ball. Clasp your hands together and straighten your arms up toward the ceiling. Keep the feet hip-width apart and the head, neck and hips in a straight line from your head to your knees. Slowly rotate your upper trunk to one side and then the other while keeping the pelvis in place.
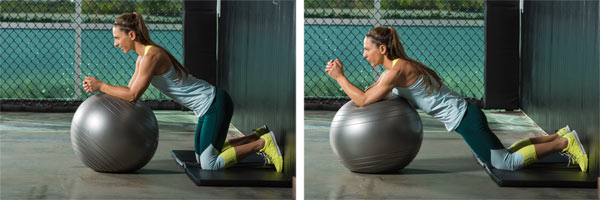
5. Kneeling Plank Roll-out
kneeling plank roll out

On an exercise mat, kneel in front of the ball with your knees about 12 inches from the ball and lean on your forearms so that your shoulders are directly above your elbows. Gently contract the abdominals and slowly straighten your arms as you push down into the ball to move it forward. Roll out the ball as far forward as you can, but stop if your hips start to sag. Return to the starting position, keeping the abdominals engaged throughout the exercise.
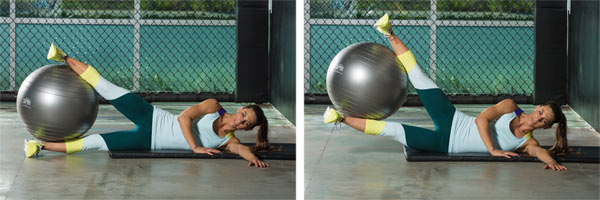
6. Side-lying Leg Lift
side-lying leg lift

On an exercise mat, lie on one side with your bottom arm outstretched in front of your chest and your palm facing the floor for support. Trap the ball between your feet and shins. Slowly lift the bottom leg off of the floor while keeping your torso stable and on the floor. Return to the start position with the leg on the floor. Complete all of the repetitions on one side before moving on to the next.

Source