Showing posts with label training. Show all posts

Friday, 11 September 2015

Seven Habits of Highly Successful Athletes

They say a habit takes 21 days to form. That’s three weeks of constant, recurrent, focused activity – or inactivity. The differences between good and bad habits lie in the details, but they both exist as an end to the same means: repetition.
“We are what we repeatedly do,” Aristotle said, once upon a time. Essentially, we are our habits. For  athletes, those habits determine their game, their success, their production, their relevance. Elite athletes carefully develop the habits that define them well past the 21-day qualifying point.
Most of us aren’t built to be elite athletes, at least not genetically, but our choices are within our control, and can elevate our game at any level. Choosing to adopt these seven habits of successful athletes is a sure-fire way to find success for yourself. If you can’t beat ‘em, join ‘em.

THE LIST:

1. They set attainable goals and track them

Tim HippsAs athletes, we all have ambitious goals. We want to win that 3-on-3 tournament next month. We want to compete in that triathlon at the end of the year. We want to hoist that trophy at the end the season. That victorious moment is a driving force we all share.
Successful athletes have those goals, but they also create their own moments of victory in parallel to their pursuit of the endgame. While they’re training for that championship, they’re simultaneously working toward attainable goals to check off their list.  While they’re training for that marathon, they’re also working toward that six-minute mile. While they’re pursuing that Gold medal, they’re also locking down tournament MVPs.
Achieving a goal, no matter the size of the prize, is a powerful incentive. It’s a reminder that following through pays off.


2. They discipline and reward themselves


It’s a simple concept, just a matter of application.
Motivation is all about incentive. What’s the payoff? What’s the punishment? Successful athletes make it a point to take themselves seriously, and that means calling themselves out and holding themselves accountable.
Didn’t get out of bed this morning for that run? Skipped breakfast? That’s ok, but yeah, you’re grounded. Ran an extra mile at the end of practice today? Grounding revoked.


3. They sleep

An even simpler concept. Successful athletes make sure to clock at least seven hours of sleep every night to aid in rest and recovery. For optimal performance, sleep is crucial in maintaining energy and endurance.


4. They feed their competitive nature

Sir MervsAverage isn’t okay for elite athletes. The successful ones go out there and compete every time, no matter who they’re with, what they’re doing or where they are. Competition is fuel to athletic fire, and the best in the game are out there burning it up every day.
Successful athletes are constantly pushing to be better than the guy next to them, better than they were yesterday, better than the standard. Pushing forward with intensity and a competitive drive keeps you on your toes and dynamic as an athlete.
Too many people mistake competition for comparison. Successful athletes know the difference. One will make you, one will break you.


5. They take instruction and criticism constructively 


Successful athletes can take advice and apply it usefully to their game. Coaching is crucial in sports, but absorbing the information they provide is even more important.
The best athletes are willing to make adjustments and set their pride aside to better themselves and their teammates.


6. They let things go

They follow the 24-hour rule. 24 hours after a failure, the misstep has long since moved into nonexistence. Bye-bye blunder.
Holding onto negativity can be detrimental to athletes. Mentally, it’s crippling. It gives pitchers the yips, it turns a basketball into a brick, it makes a wide receiver’s fingers all buttery.
The successful ones take 24 hours to reflect on what went wrong and then they let go of that heavy weight and move on without flinching.

7. They aren’t afraid to fail

The most distinctive habit of a successful athlete is their ability to stare a challenge in the eye and attack it without hesitation. The fear of failure builds the walls of that box you’re supposed to be thinking outside of and seals you up inside. When you’re scared of failing, the best option is to avoid trying at all – right?
Chicken.
Fearing failure is a mental state successful athletes don’t acknowledge. Everyone will fail at one point or another – it’s inevitable. The best athletes are fully aware of this, but attach no value to it. They fall and they get up. The ends outweigh the means. Success outweighs failure.
Plus, chicks dig scars.

Source By: Morgan Urtso Seven Habits of Highly Successful Athletes

Wednesday, 9 September 2015

The Right Running Hydration Gear Makes All the Difference In Your Hydrating Needs

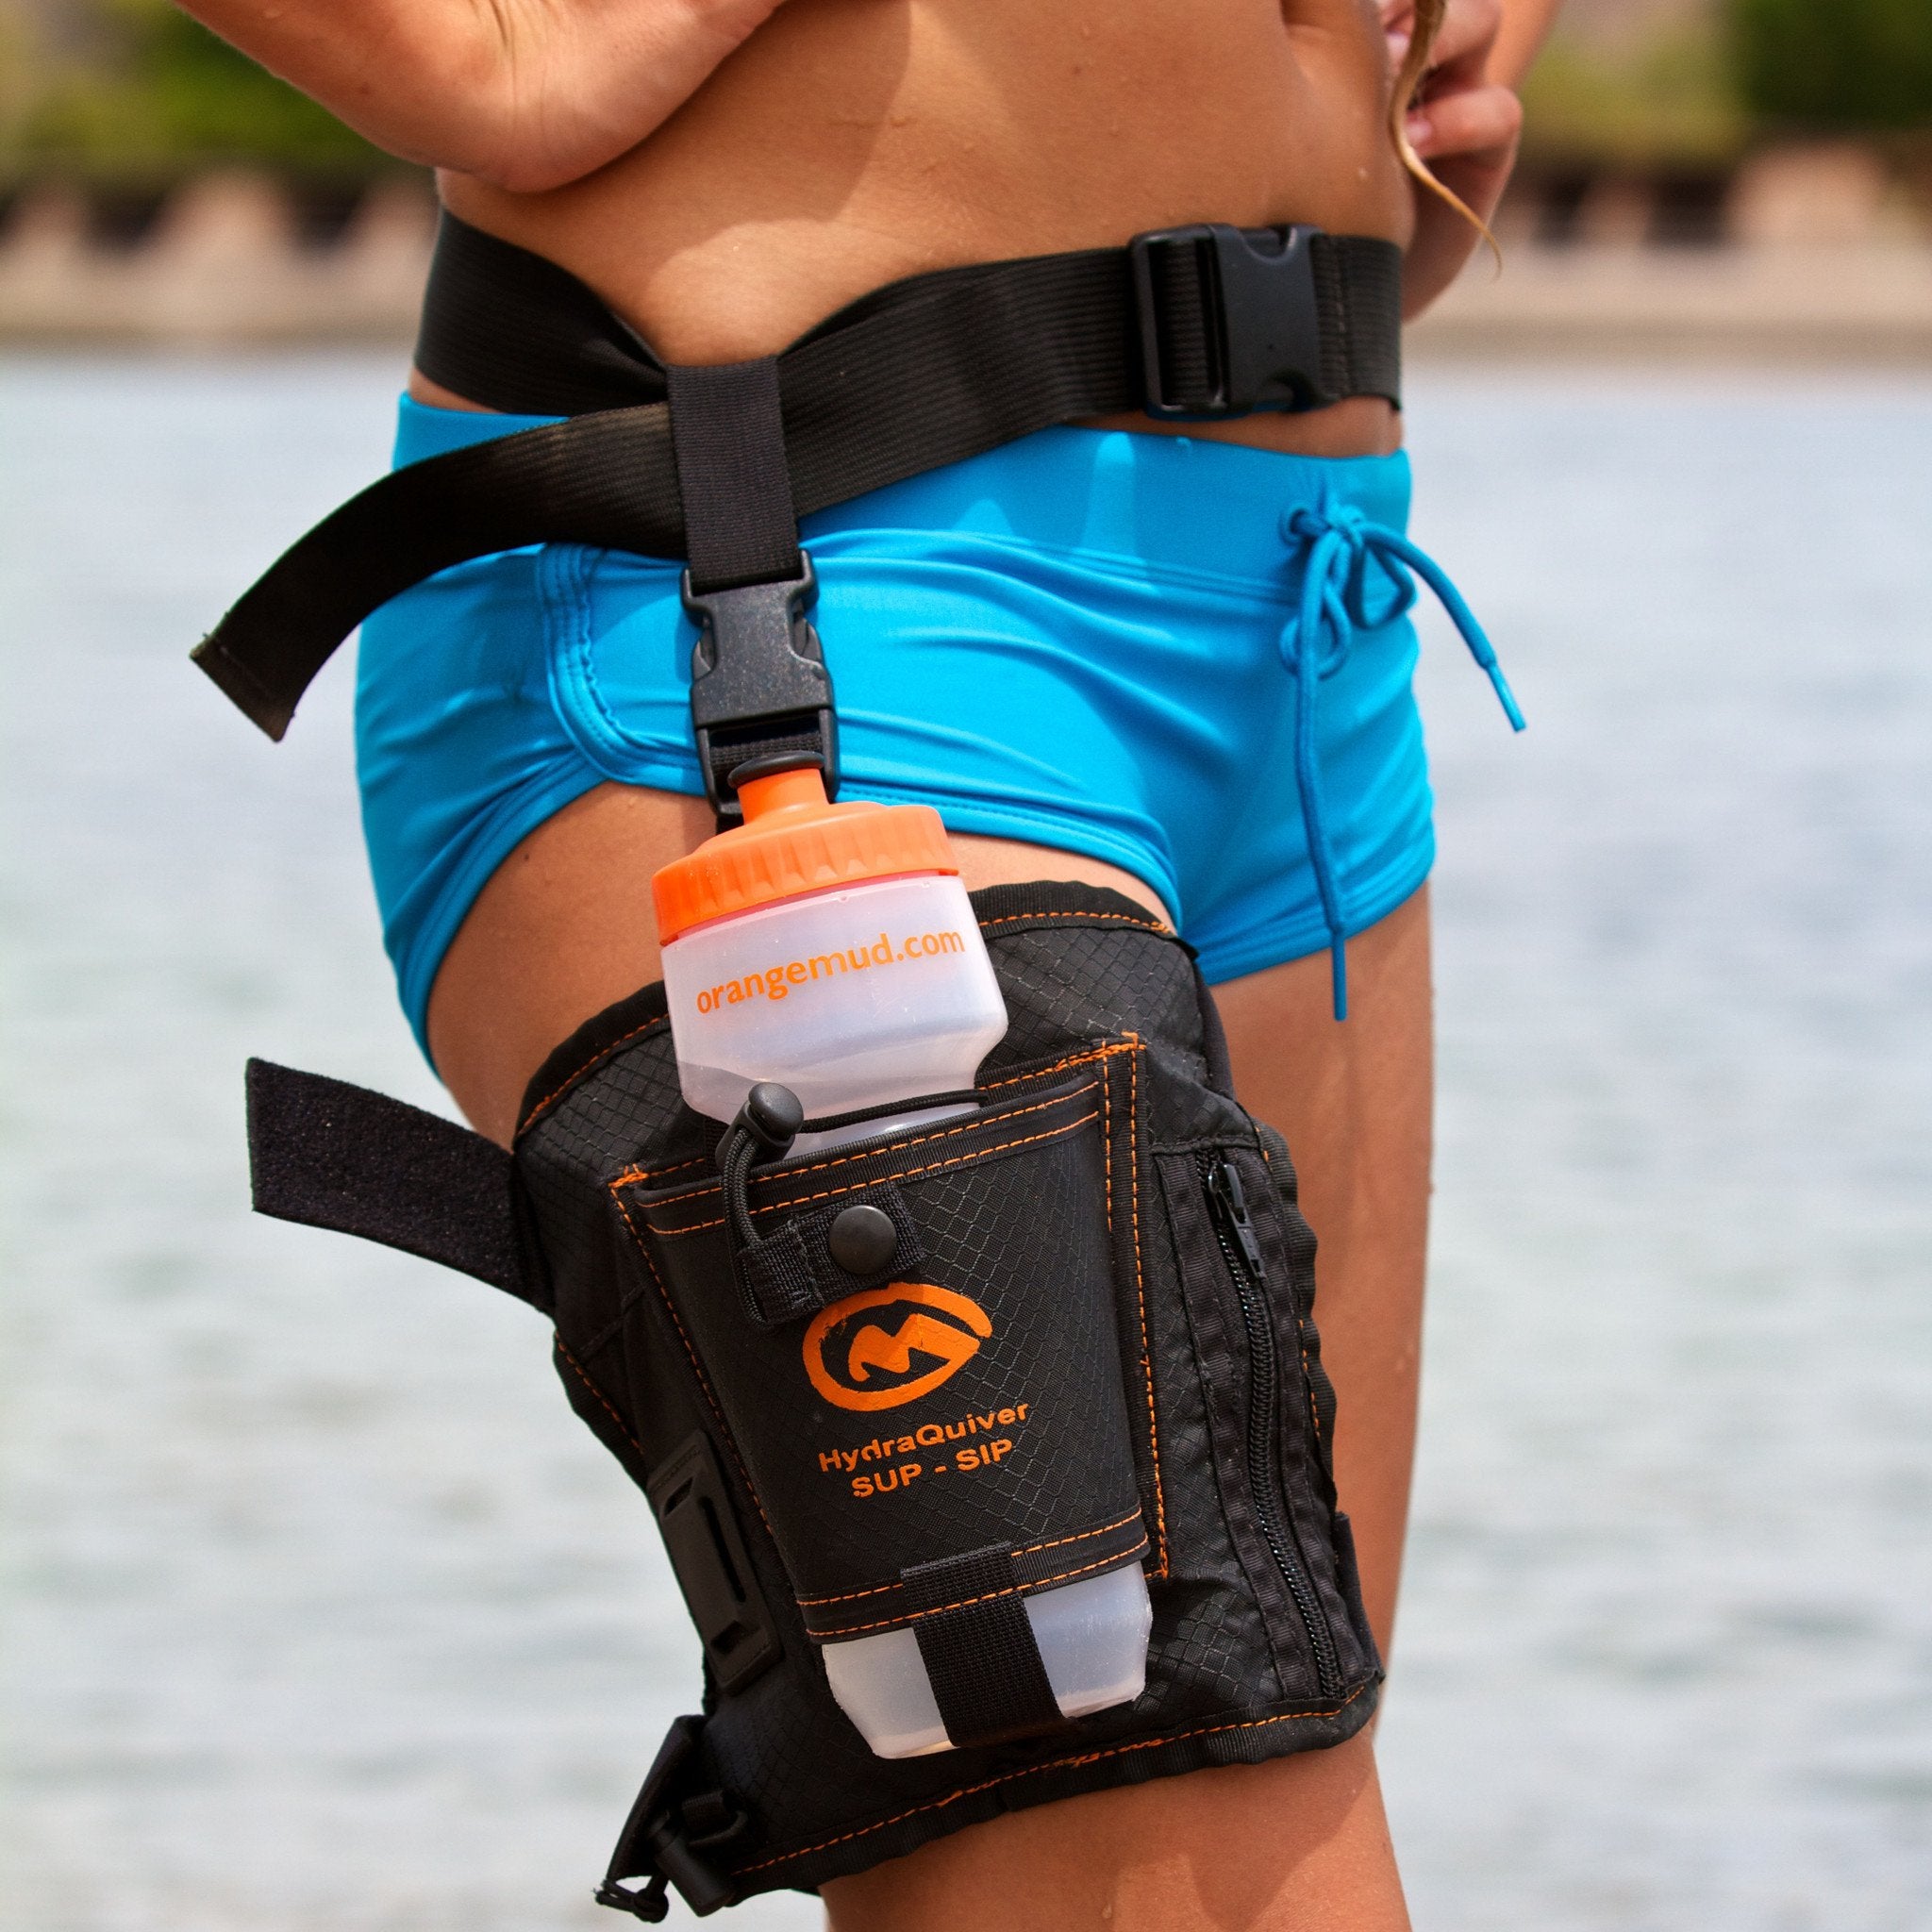
Whether you’re a leisure jogger, or you plan on entering the next marathon, having the right running hydration gear can make a difference in your approach to the final destination you seek to achieve!

Hydration gear is starting to be an integral part of the athletes training as a runner, and when the runner’s limits are being pushed further and further to achieve certain personal goals your body needs the right equipment to seriously keep you fully hydrated throughout the day.

Unlike hikers and trekkers, individuals that take long runs or have intensive training programs not only need to replenish their body with cool fresh water, but they need the proper hydration gear that is lightweight and is convenient for them.

You may be able to wear a backpack style hydration system, but it may wind up too bulky, and for longer running programs, you may get very hot and sticky, which eventually will make you feel extremely uncomfortable.


Your Hydration System Should Be Designed For Performance And Convenience!

Running products on the market today are made to be extremely lightweight and have high-tech components that allow for proper airflow and evaporation. It should be no different when you search for quality running packs, and the more features you can find on a pack to help eliminate moisture, provide stability, and have proper design for your convenience, the better chance you will be happy with that product for many years of running.

Now whether you’re searching the local running stores, or online, the best way to find out exactly what will work best for your needs is to compare the level of running and time you spend and measure it up to some of the current pack systems available. The last thing you want to do is spend money on an inferior water pack that will not fit your overall requirements.

The next thing you will want to determine is what you’re more accustomed to using, because you may prefer bottle style packs over the bladder with the water tube style. Even though technology is advanced, you may be more comfortable using the older technology such as the basic water bottle.


Don’t Buy Water Products That Have All The Bells And Whistles If They’re Not Needed!

You want to make sure that you purchase the water hydration product that suits your style of running. If you decide to go with the super advanced system and it winds up not fitting your running style, you will waste your money and more than likely not use the pack because of the extra features getting in your way.

When you come to the hydration pack section, or the website that lists all the running packs, the first thing you should do to determine which one is right for you is see how much water capacity the bladder holds, or how many water bottles they carry.

Once you find the one with the exact ounce capacity that you require during your run, the next step is to make a list of items you need to carry on you during your run. This is an important question to ask, because there is a big difference between what you need to carry with you, and what you’d like to take with you.

I’m sure you would like to carry your Mini-Pinscher in your pack, but do you need to? On the other hand you may need to carry extra energy bars, dry clothing, and necessary running accessories. When you have this information readily available, it will help determine the exact size pack needed.


When running, whether it is on flat surfaces or uneven mountain trails, comfort will be a crucial part of your running packs features. Many overlook this and of course the more expensive systems have more comfort features available, however, it will come down to the level you run, and how much comfort you really need.

Many specific hydration designed running packs are produced with stable ergonomic features and are very well insulated to keep your water fresh and cool, plus they provide quality adjustable straps for complete comfort. If you decide to spend a little more money, you can get additional valuable running features such the lumbar attachment to prevent bouncing that can be very annoying to joggers, and also reflective belts for additional safety, as well as unique pockets for your pedometer, and other necessary jogging items.

I wish you all the best in finding the right hydration system, and if this summer is going to be an extremely hot one this year, keeping your body fully hydrated during an intensive run is even that much more important to you!

Brigi G by Fit 4 Health

Friday, 24 July 2015

The short guide to training at home

It all comes down to how you see it, the space – actual and in your mind and how prepared you are, mostly mentally. Exercise is not rocket science, if you put in the time – you will get results, most people have problems sticking to it after several goes.

Space.
People buy gym memberships not for the professional equipment, although there is that, too, but mostly for the commitment factor. And not just because you paid money for it but also because once you are there – you will inevitably work out. In order to be set for exercise you need to be away from everything else and concentrate on training only. Your house is a place for living, on the other hand, and you simply don’t have a routine (not yet) to train, there is no special area for that in most people’s houses so the number one priority for you if you want to exercise in your home environment is to make that space, space reserved for training specifically.
a) Make it somewhere in the area where you can leave all of your equipment if you have any – like Swiss ball or dumbbells, of just something that reminds you of exercise – exercise mat, perhaps. The area needs to be dedicated to exercise and it has to be accessible.
b) Pick the area where you walk past but you don’t do other stuff at, like playing video games on the carpet or watch TV, it’ll compete with your training activities if you associate leisure time with exercise you may not enjoy so much.
So, once you have that space you will be able to go there whenever you want to or planned to work out.  You will not need to think of where you are going to set up – you’ll just go straight there.
The people who invest heavily on a home gym and then never use it make one simple mistake: they don’t make it accessible. They close the door, they set it up somewhere out of the way – somewhere where they are not reminded of it. They cover their equipment, like a treadmill or a bike, with clothes and magazines and end up neglecting the whole thing because it’s not easy to jump up and go, it’s not “staring them in the face” – it’s in the corner/basement/behind closed doors. So make sure your home gym area is where you can see it, where you walk all the time – that it’s central in your house if you want to make exercise a priority in your life. Otherwise it’ll be an out of sight out of mind kind of thing.

Simplify.
It’s hard to get yourself to exercise when you are underprepared, when you need to go through an hour’s worth of setting up before you get to train. If you need to look for your clothes, a bottle of water, music and whatever equipment you might have – you are unlikely to get started. Make it easier on yourself and have everything on hand: your training clothes, mp3 player and water all set and ready to go when you are. Some people, like myself, wear training clothes at home – it’s comfortable and you are ready to work out at any moment of the day.

Plan.
You can’t make time for exercise and then wonder what you are going to do – you are unlikely to start, to be honest, if you are not entirely sure what it is you’ll be doing exactly. So, having a clear idea of what your plan of action is – is crucial. Make it simple so you know when it’ll be over, how much time you need and if you can afford to spend that time training. Make it reasonable so you don’t dread it and keep postponing it to a later date – make sure that whatever program you are following is the one you are physically able to stick to. Make it easy to follow – have a visual guide or a list you can cross things off, something that’ll let you go through the motions and get the sense of progression. If you’re following a DVD make sure you don’t have to dig for it for half an hour – have it at hand.

Invest, mentally.
In the beginning of your journey spend as little money as possible, instead, try to spend time on getting motivated and inspired by other people. A lot of people get side-tracked by what equipment and gear they need, they keep on spending money, before they can even begin to exercise. It becomes yet another distraction, an obstacle between you and exercise. You think you need something to begin with but you don’t, you just need to want to start. If you think some particular equipment is “the stuff”, before you throw your money away, borrow it from a friend first or make do with a DIY substitute first, at the very least the cheapest possible version of that thing. Most of the time, what you think is going to be the solution will only join all the other junk in your garage and you may even find that it was absolutely useless after a few tries. So, before you throw away your money, try it out elsewhere, at the store or by using a guest gym visit and test that equipment there first.
Fitness is all in your head – if you are all set it’ll be a lot easier to train at any point of the day, here and there even if it’s just 15-20 minutes – it will all count. And once you get into a routine and make it part of your lifestyle it’ll get easier and easier to find the time and the motivation to exercise.

Source

Sunday, 21 June 2015

You Get A Full Body Workout And A Toned Torso With A Rowing Machine


One of the most complete cardiovascular exercises around has to be rowing. A proper workout on a rowing machine will tone all of the major muscle groups such as your legs, back and arms.

The beauty of using a concept 2 rowing machine is first of all it doesn't involve water.
This rower doesn't get you wet and there are no early morning trips to get your machine
out of the boat shed. No cold changing rooms and gale force winds for your training session. And there is definitely no need to find the nearest river to row your machine on. All you have to do is set it up in an adequately spacious area and away you go.

There are lots of different machines available on the market. Although they generally fall into 2 categories:

-Water rowers

-Air rowers

The water rower, which contrary to their namesake, does not end up in you getting wet after a vigorous workout. The machines are very beautifully designed and use enclosed water and paddles for resistance as opposed to air. These rowers tend to be quieter than air rowers and are just as much works of art as they are exercise machines.

Then we have the concept 2 air rower. There are many other brands available but this piece of machinery is commonly accepted to be one of the best, if not the best. They
are engineering masterpieces and are all calibrated to the same standard. So, if you do a certain time on a concept 2 rower, you can rest assured that, that time will be
replicated exactly on another concept 2 machine. This is the reason why the world indoor rowing championships use the concept 2.

The information that the display monitors show on the concept 2 is extensive, with the new monitors even being able to be plugged into a PC, so you can race
with other rowers from all around the world.

Brigi G | Fitness Inspired Formula

Tuesday, 27 January 2015

Running For Fitness: Top Running Health Plans


Where was the last place you ran to?  Running is easily overlooked as a boring, run of the mill, or repetitive type of exercise.  However, a lot of people are not aware that they could add anywhere between 10 to 15 years to their lives by simply running for fitness.
Running not only helps strengthen your legs, develop your muscles, and keep your body looking lean and tone, but it also helps relieve stress and can improve your focus throughout the day.  If you are eager to reap the benefits that running has to offer, let’s take a look at how you can start running for fitness in 4 simple steps.
Get fit and toned with the “Muscle-up Fitness” course today!

Step 1:  Go Outside and Run

running for fitness
This might seem simple, but a lot of people fall short when it comes to running because they are not motivated enough to get outside and begin.  Start running by simply putting on a pair of running shoes and hitting the pavement.  If you are a running beginner, the repetitive motion of running might seem a little strange for your body at first.  However, keep at it and soon enough your muscles will start to spring into action.
  • Form:  When you begin running for fitness, take note of your running form.  Try to keep your body loose and run in a way that feels natural to you.  Make sure that you pick your feet up high enough off the ground and relax your upper body.
  • Breathe:  The right form of breathing is important in any kind of exercise, and also when you are running.  Breathe as naturally as possible: inhale oxygen through the nose, fully expanding your lungs, and exhaling through a widely opened mouth.
  • Stretch:  Remember to stretch as soon as you finish running and get home.  Stretch out each muscle group for about 15 to 20 seconds if you can.


Step 2:  Develop a Routine

While running for fitness, you are going to want to aim to run at least 3 days a week.  This will help you build endurance and space out any recovery time that you have to help your muscles and body develop.
  • Extend your time:  As you get more comfortable with your routine of running 3 days a week, push yourself to run further and longer.  For example, if you ran 10 minutes for the first week, then go ahead and try to bump it up to 15 minutes the second week.  The more you increase your running time, the easier it will be for you to run longer without stopping.
  • Switch it up:  We will admit that running can get boring overtime, especially if you are running the same track or route, and you can get easily burned out.  To add some spice and adventure to your usual running routine, try to run down a route that you have never been on before. Or, try to incorporate some other exercises in between your running.
To fit kickboxing into your exercise routine, enroll in this extreme kickboxing course.

Step 3:  Running for Fitness

After you develop a routine for your running, you will be able to advance your level of fitness when it comes to running.  You can go about this by taking these simple steps that will help you develop as a runner and an athlete.
  • Purchase good shoes:  Even if you do not run regularly, you have probably noticed that there are a good amount of running shoes available on the market.  There is no one right shoe for each person; and you will have to see which shoe works best for you.
  • Get a running partner:  Running by yourself can get boring, and running with other runners will give you some motivation and make running more fun by making a group activity out of it.  You will be able to find running groups that are solely for recreation, or composed of runners who are training for a race.

Step 4:  Train for a Race

running for fitness
Of course this step is optional, but once you have the running basics under your belt, you can consider training for a race.  Training for a race will help boost your fitness levels, as well keep your motivation levels high.  With racing, once you complete a race, there is a good chance that you are going to want to do another one: racing can be addicting!  Here is a sample racing plan that you can use to train for a 5K race.  A 5K race is just a bit over 3 miles.  This plan follows a weekly schedule 3 days a week for 2 months of training.
Week 1:  Brisk five-minute walk to warm-up.  Then alternate 60 seconds of jogging and 90 seconds of walking for 20 minutes.
Week 2:  Brisk five-minute walk to warm-up.  Then alternate 90 seconds of jogging and two minutes of walking for the span of 20 minutes.
Week 3:  Brisk five-minute walk to warm-up, then do two repetitions of the following:
  • Jog 200 yards / 180 meters (or 90 seconds)
  • Walk 200 yards / 180 meters (or 90 seconds)
  • Jog 400 yards / 365 meters (or 3 minutes)
  • Walk 400 yards / 365 meters (or 3 minutes)
  • Week 4: Brisk 5 minute warm-up walk, then:
  • Jog 1/4 mile / 400 meters (or 3 minutes)
  • Walk 1/8 mile / 200 meters (or 90 seconds)
  • Jog 1/2 mile / 800 meters (or 5 minutes)
  • Walk 1/4 mile / 400 meters (or 2-1/2 minutes)
  • Jog 1/4 mile / 400 meters (or 3 minutes)
  • Walk 1/8 mile / 200 meters (or 90 seconds)
  • Jog 1/2 mile / 800 meters (or 5 minutes)
Week 5:
  1. Brisk 5 minute walk to warm-up walk.
  2. Jog 1/2 mile (or 5 minutes)
  3. Walk 1/4 mile (or 3 minutes)
  4. Jog 1/2 mile (or 5 minutes)
  5. Walk 1/4 mile (or 3 minutes)
  6. Jog 1/2 mile (or 5 minutes)
  7. Workout 2: Brisk five-minute warm-up walk, then:
  8. Jog 3/4 mile / 1200 meters (or 8 minutes)
  9. Walk 1/2 mile (or 5 minutes)
  10. Jog 3/4 mile (or 8 minutes)
Week 6:
  1. Brisk five-minute warm-up walk.  Then:
  2. Jog 1/2 mile (or 5 minutes)
  3. Walk 1/4 mile (or 3 minutes)
  4. Jog 3/4 mile (or 8 minutes)
  5. Walk 1/4 mile (or 3 minutes)
  6. Jog 1/2 mile (or 5 minutes)
  7. Workout 2: Brisk five-minute warm-up walk, then:
  8. Jog 1 mile /1600 meters(or 10 minutes)
  9. Walk 1/4 mile (or 3 minutes)
  10. Jog 1 mile (or 10 minutes)
Week 7: Brisk five-minute walk to warm-up, then jog 2.5 miles (or 25 minutes).
Week 8: Brisk five-minute walk to warm-up, then jog 2.75 miles (or 28 minutes).
Week 9: Brisk five-minute walk to warm-up, then jog 3 miles (or 30 minutes).

Run For Fitness

Your own running for fitness program can be as personalized as you want it to be.  To get into the groove of running takes persistence and patience, but if you follow the above steps, you will start building up endurance, stamina, and motivation for running in no time.

Source

Friday, 5 December 2014

Improve Your Strength and Mobility With These TRX Moves

To have longevity in movement (being able to play and do what you love for a very long time), mobility has to be addressed in your fitness routine. Let’s first take a look at what mobility is so we can apply this principle to how we are training. Mitch Hauschildt, the Prevention, Rehab and Physical Coordinator at Missouri State University and Founder/President of Maximum Training Solutions, explains mobility like this:
“Mobility can be defined as the ability to maintain a biomechanically advantageous position throughout a full range of motion. It is necessary for truly authentic movement. Research tells us that poor mobility is the number-one detriment to athletic performance [and] performance in general. If you are not taking the time to address each client’s mobility restrictions, you are not only setting them up for pain, but you are limiting their ability to reach their athletic, weight loss, strength or fitness goals.”
Ideally, you want to incorporate movement patterns that address and enhance mobility, while also challenging strength.
Most of us who have been training or participating in sports for any amount of time know that mobility can be our best friend or our worst enemy. Staying focused can be a challenge for me, so going into a class and rolling around or heading to a station designed just for mobility makes me want to poke my eyes out. I want to feel mentally stimulated while I work on my mobility issues, so I designed some exercises that will do just that. These exercises also challenge strength and stability in all planes of motion, so you can get more done in less time.
These strength and mobility exercises using the TRX Suspension Trainer can help you or your clients maximize training time and goals. They are designed so you can break them down and perfect each part, grooving correct movement patterns as your mobility and strength increase. These exercises take practice, so perform each one as long as you can maintain quality movement patterns and continue practicing until the complete patterns can be achieved.
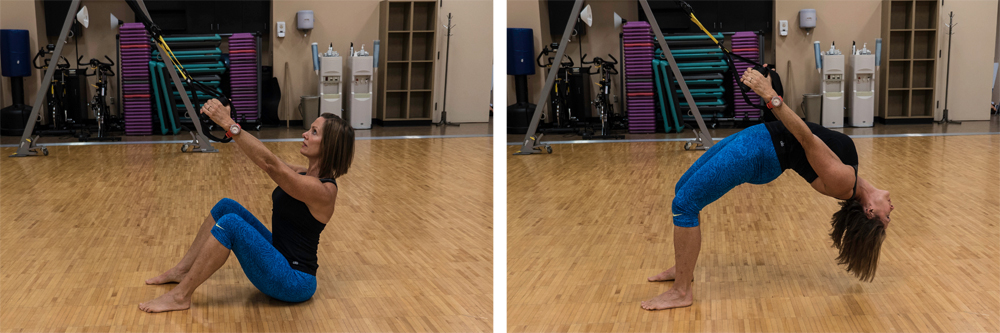
Hip Extension to Bridge
Hip extension to bridge
Adjust the straps to mid-length. Sit on the ground with feet hip-width apart, facing the anchor point. With arms extended, grab the handles and keep the shoulders retracted (as if you are holding $100 bill under your armpit). Slowly press up from the heels, squeezing your glutes and extending your hips while bracing your core (pulling ribs toward hips) to a bridge position. Hold for a couple of beats. With the feet planted, begin to extend your thoracic spine, steering the crest of your head toward the floor. Hold this position and continue to breathe and deepen into the position, keeping the hips strongly engaged. Carefully return to bridge position, hold, and then flex at the hips to return to the starting position. 
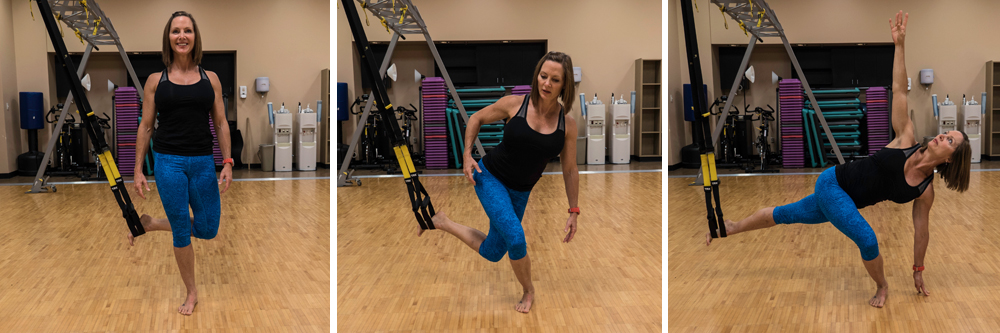
Crossing Lunge to Touch
Crossing lunge to touch
Adjust straps to mid-calf, single-handle mode. Stand sideways to the anchor point, with the hip in line with the anchor and the outside foot in the foot cradle; externally rotate the hip. Keep thet core engaged, the spine tall, the lower tailbone toward the floor and the shoulders retracted,  continue lowering until the outside arm touches floor. To progress the movement, extend the leg that is in the straps as you lower toward the floor. Try to prevent the chest and shoulders from collapsing as you touch down. Work toward opening the chest when you touch down. Drive the heel and big toe into the ground as you come to full extension of the standing leg.
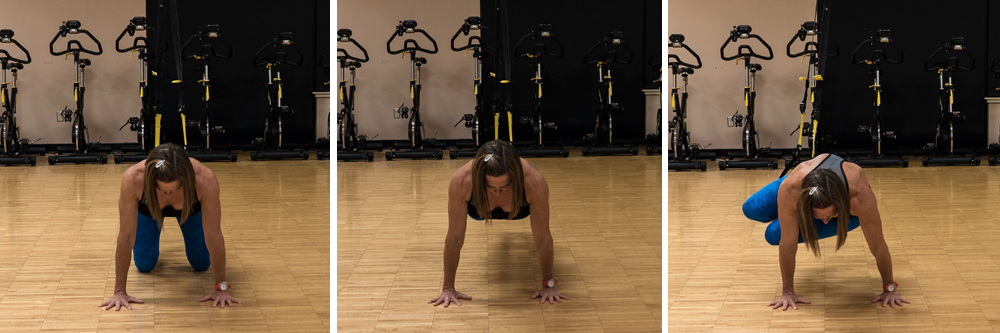
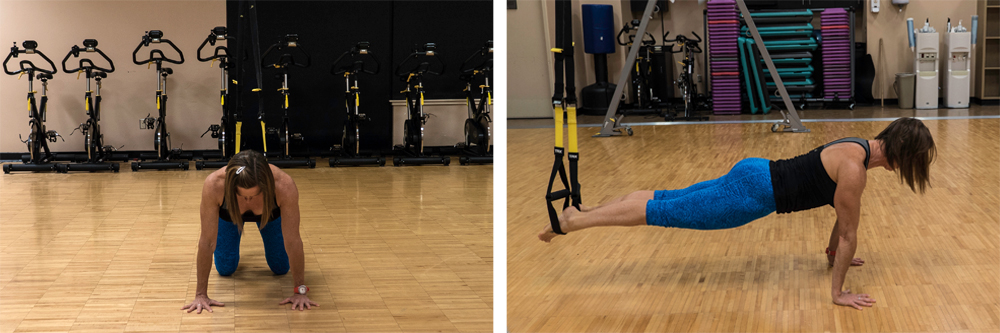
Oblique Crunch to Hold
Oblique crunch to hold
Adjust straps to mid-calf and, with your body facing away from the anchor point, place the toes in the foot cradle. Position your knees on the ground, hands under the shoulders with fingers spread wide; engage the lats and retract the shoulders. Brace the core, squeeze the glutes and press the feet in to the foot cradles to rise up into plank position. Keep the ears, shoulders, hips, knees and ankles all in one line. Slowing bring both feet toward the back of one arm, hold and slowly count to four before returning to plank; hold and move to the other side and repeat.
Half-kneeling Lift to Side
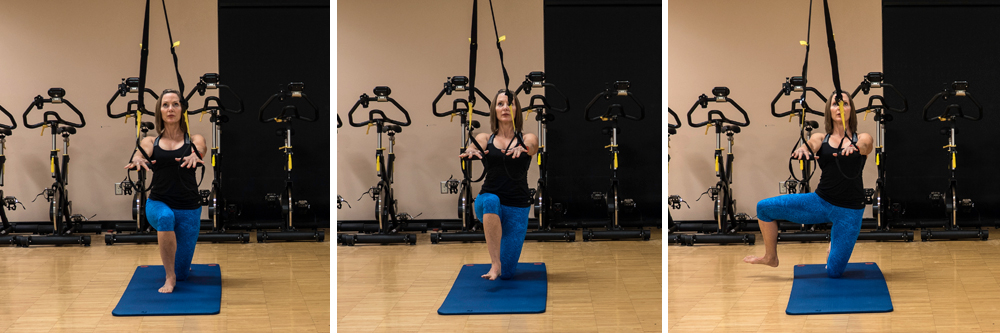
half kneeling lift to side
Adjust straps to mid-length. Center your body to the anchor point in a half-kneeling position, with your front foot lined up with the back knee (as much as possible). This position requires more stability. Flex the back toes and press in to the floor. Bring the handles to rib height, firmly pressing into the handles with open hands to engage the core. Slowly lift the front foot (keeping the foot flexed) and hover over the floor about an inch or two; hold for a few breaths. While keeping hips engaged and square to the anchor, slowly move the leg to the side and hold. Return the leg to the starting position, hold and extend the leg while keeping the foot above the floor. Hold and then flex the knee and return to the half-kneeling position. Repeat this pattern on the  other side.
Abducted Plank to Push-up
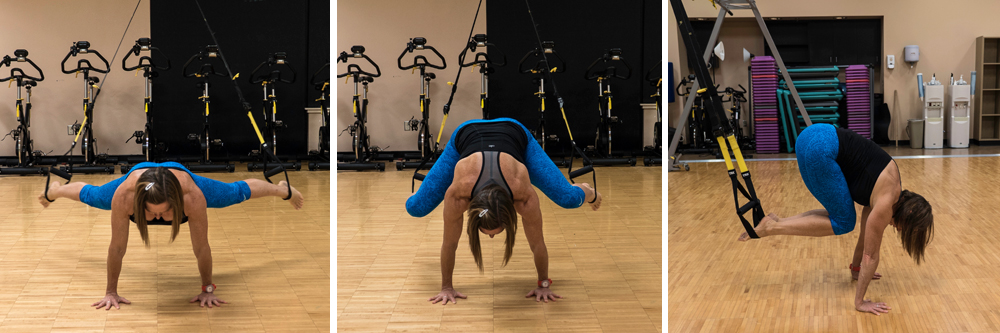
abducted plank to push-up
Adjust straps to mid-calf and, with your body facing away from the anchor point, place the toes in the foot cradle. Position the knees on the ground and the hands under the shoulders with fingers spread wide; engage the lats and retract the shoulders. Brace the core, squeeze the glutes and press the feet in to the foot cradles to rise up into plank position. Keep the ears, shoulders, hips, knees and ankles all in one line. Press in to the foot cradles, spread the legs as wide as you can, and bring the knees toward the elbows and circle in to the chest; hold for a beat. Extend back to a solid plank (no sagging) and add a push up. Complete as many repetitions as you can while maintaining excellent form.

Source

Thursday, 4 December 2014

Best toning exercises

All about the base? It's all about intensity with this serious fat-burning circuit

Want to shape up fast? You should try one of our favourite methods of training: Tabata. Think high-intensity intervals, incorporating hardcore 20-second bursts of exercise split up by 10 seconds of rest. Exercises include anything from squats to star jumps. Repeat these 30-second routines for eight bouts for an effective workout that will not only improve your endurance, but also help you perform better for longer at maximum effort, while boosting your metabolism - even after your workout has finished!
Warm up with two minutes of jogging on the spot, then leg swings, to help loosen your muscles and get your body revved up for the session. Next, do the first exercise at maximum intensity for 20 seconds, followed by 10 seconds of rest. Do all four exercises, then repeat so you’ve done a total of eight exercises and been working out for a total of four minutes. Rest for three minutes and repeat the four-minute sequence once more through. Don’t forget to cool down and stretch to stop your muscles seizing up. 

STAR JUMPS:
 
  • - Works: Gluteals, hamstrings, quads, calves, shoulders, core
  • - Time: 20 seconds
  • - Start with your legs together and arms by your sides. In one motion, jump and spread your legs out to the sides and arms out and up over your head.  Land in this position, then return to the starting position and repeat. 

SQUATS:
  • - Works: Gluteals, hamstrings, quads, core
  • - Time: 20 seconds
  • - Stand with your feet hip-width apart and arms down by your sides. Push your hips back and bend your knees to lower into a squat, bringing your hands up to your chest. Push yourself back to the start position.

PLANK UP AND DOWN:
  • - Works: Arms, shoulders, back and core
  • - Time: 20 seconds
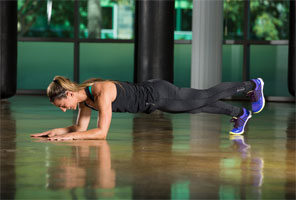
  • - Start in a plank position on your forearms, with your palms facing in and belly button pulled into your spine. Walk your left hand in, placing it under your shoulder and pressing your body up, then walk your right hand in so that you end up in a full plank position with both arms straight. Quickly lower your left elbow to the floor, then your right, so you’re back in your elbow plank.

BICYCLE CRUNCH: 
  • - Works: Abs, obliques, hip flexors
  • - Time: 20 seconds 
  • - Lie flat on the floor with your hands behind your ears. Raise your legs a few inches off the floor and lift your shoulders up. Use your abs to drive your left elbow and right knee towards each other, twist back to the centre, then drive your right elbow and left knee towards each other. Continue alternating sides as fast as possible.  
 
 Source

Monday, 1 December 2014

Burn Baby Burn: Fire Up Your Metabolism With This Hot And Hotter Cardiovascular Routine

Good news ladies: plodding away for hours on the treadmill is not the best way to burn calories. Instead, you can speed up your metabolism and your workout with some higher-intensity interval training.

Research and my own years of experience prove that high-intensity cardio not only increases both exercise- and resting-energy expenditure but also results in greater fat loss and less muscle breakdown.
Consider this: Twenty minutes of high-intensity aerobic exercise can boost your V[O.sub.2] max as well as burn more calories, increase your metabolism and preserve your muscle tissue, all at the same time. On the other hand, too many long, slow cardio sessions may actually have a detrimental effect on your physique because, in addition to using fat as fuel, the body breaks down muscle protein for energy.

Get With The Program

The key to interval training is to do it right and use it sparingly–no more than twice per week. Continue with longer sessions as well, alternating between lengthy, slow-paced cardio and shorter but more intense interval-training sessions. You can adapt the guidelines in the chart to any aerobic activity you please. In fact, you’ll get better results by changing your mode of exercise every time you do cardio.
Begin each session with a 5-7-minute warm-up, then increase intensity one of two ways: Either increase speed or resistance for the prescribed amount of time, then reduce intensity and recover. When you’ve alternated work and recovery intervals for the desired length of time, cool down and stretch.

Be Creative

Intervals come in many forms, so don’t feel like you have to limit yourself to the cardio machines at the gym. Run laps at a track, ride a bike or grab a jump rope and hop to it! Not only will intervals allow you to train harder and burn more calories, but you’ll also challenge yourself and dump the boredom of yet another session of steady-speed cardio training.

Fat-Burning Interval Training

By alternating harder and easier segments, you can burn more calories.

Notes: Total interval workout time doesn’t include 5-7-minute warm-up and cool-down.

Source

Sunday, 30 November 2014

Tips for keeping your easy runs easy


Tips for keeping your easy runs easy
The biggest training mistake I make is running my easy runs too fast. On the surface this may not seem to be a major error, but it is.
It takes our bodies a few days to recover from grueling training runs, such as 800m repeats and long runs. When we run easy in the days between intense runs, we recover more quickly. But if we run too hard, we hinder the recovery process. Over time, this can derail our training goals and even lead to an injury.
However, even though I know this, it’s challenging to run slow some days. When I feel strong, I naturally want to push the pace even when my plan calls for slower miles. So, I’ve been trying different methods to keep my pace in check, including:
  • Reevaluating my speedwork paces. One of the reasons runners may want to push it on easy days may be because their tempo, fartlek, or repeat paces are too conservative. If you’ve been hitting your speedwork targets fairly easily and you’re naturally running your easy runs too quickly, set faster pace goals for your speed workouts and see how you fair.
  • Running blind. Sometimes knowledge can be a bad thing. I glance at my watch or running app after every mile – even during easy runs. I have a habit of always wanting to negative split on a run. So, if it naturally happens after a few miles, I’ll keep picking up the pace to see if I can keep it up for the entire run. But I don’t play this game when I don’t know what my exact time is after each mile. The solution: run without technology so I don’t know my pace.
  • Running at a different time of day.As a morning runner, I loathe running in the afternoon. I always feel sluggish and unmotivated at that time of day. But this can be a blessing in disguise when it comes to keeping the pace slow.
  • Running with a buddy. The trick here is to enlist a friend who is either slower or wiser than you. You won’t be able to run fast when you run with a slower runner. When you run with a wiser runner, he or she will help you hold yourself back you when you fall off your goal pace.
  • Adding strides to the end of my run.If you’re really feeling the need for speed on an easy day, reel it in until you finish your planned workout. Then do a handful of 50 meter strides afterwards. A couple of short bursts of speed is better than going hard for an entire workout.
  • Focusing on the bigger picture. I remind myself that easy runs are necessary if I want to meet my marathon goal. I also repeat “slow now, fast later” – mantras have a powerful effect on running performance. Sometimes just reminding myself why I need to keep it slow is enough to hold me back.
Who has successfully reeled in their easy run pace? Share your tips with the rest of us!

Source 

Wednesday, 26 November 2014

Balance Training for the Glutes and Abs

Targeting the gluteals and abdominals in a training session is a popular goal for many fitness seekers, but what about training for balance? Do you regularly seek out strategies for improving balance in your exercise routines? Considering that balance training has been shown to reduce the risk of falls (especially in older adults) and improve dynamic balance in both athletes and non-athletes, incorporating this type of training could be a wise choice. In addition, many of the exercises used to train balance call upon the muscles of the hips and trunk to provide stability. This means you get the added benefit of strengthening the glutes and abs while you’re working to become more balance savvy. Plus, the various single-leg exercises that target the glutes in balance-training programs are beneficial for knee health because they promote proper alignment between the hip, knee and ankle.
To experience these benefits, add one set of the following exercises at the beginning of your workouts, twice a week for at least six weeks (in other words, perform these balance exercises 12 times over the course of six weeks). To check your progress, take the single-leg balance test* (for both legs) during the first week. Retake the test again after the sixth  week of training to see if there is a difference in your score.
*Single-leg Balance Test:
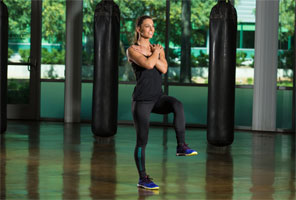
single leg balance
Grab a stopwatch and stand with your feet directly underneath the hips.
Cross your arms over the chest.
Lift one leg off the floor, making sure your legs do not touch each other.
Start the timer the instant your foot leaves the floor. Stop the timer when your foot touches back down, or if your body starts flailing to regain balance. The test should be performed with minimal bodily movement.
Record your score for each leg. The longer the time spent standing on one leg, the better your balance.
There are no norms for comparison, only your own score. The goal is to increase the time you are able to stand on one leg from pretest to post-test.
Note: It is up to you whether or not you wear shoes during this test. It makes sense that if you train in shoes, you should also test your balance wearing shoes. Clearly, this is not a scientific assessment, but making the pre- and post-tests factors the same, and the training variables the same as during testing (e.g., wearing shoes versus going barefoot), will give you a more realistic result.
1. Split Lunge
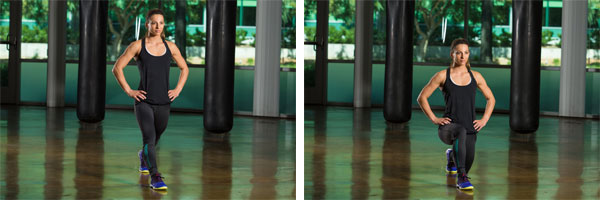
split lunge
Adopt a split-stance position with one leg in front of the other and your feet hip-width apart (i.e., your feet should not be directly in line with each other). Your front foot should be far enough forward so that the front shin remains vertical upon descent. Keep your front foot flat on the floor, while balancing on the ball of the back foot. Lower and raise your body by bending both knees and keeping your back heel off the floor. Go as low as you comfortably can without compromising balance. Perform 10 repetitions on each side.
For more challenge, try adding a small jump on the way up. Be very careful that the front knee stays in line with the toes and does not cave inward.
For less challenge, try holding the position (without raising or lowering) for 30 seconds on each side.
2. Side Shift Into Single-leg Balance
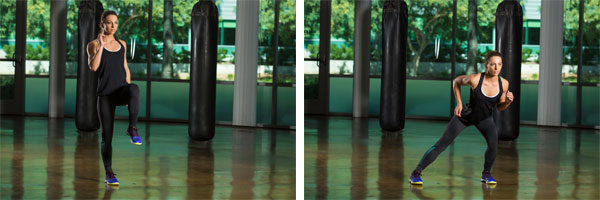
single leg lunge
To start, stand with your feet together. Take a long step out to the side, as if you are performing a side lunge. Quickly push off the floor and return the leg, but instead of placing the foot beside the other one, raise your knee up toward the chest and hold for a count of 2. Essentially, you’re performing a quick side lunge directly into a single-leg balance without letting the foot touch the floor upon the return. Perform 10 repetitions on each side.
For more challenge, hold a dumbbell in the same-side hand as the lunge leg.
For less challenge, return the lunge foot to the starting position beside the other foot, instead of lifting the knee.
3. Standing Cross-body Rotation
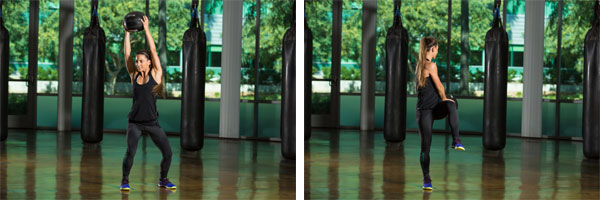
standing cross body rotation
To start, stand in a wide squat. Pull one knee up toward the opposite shoulder, while driving the opposite elbow to the outside of the knee, essentially creating an across-the-body rotation with opposing limbs in a single-leg stance. Keep your torso as vertical as possible as you rotate through the trunk. Perform 10 repetitions on each side.
For more challenge, hold a dumbbell or small medicine ball with both hands. Lift the weight up on a diagonal and then drive the weight to the outside of the knee that is lifted.
For less challenge, bring the foot in to tap the floor beside the other foot, instead of lifting the knee.
4. Elbow Plank Leg Raise
plank leg raise
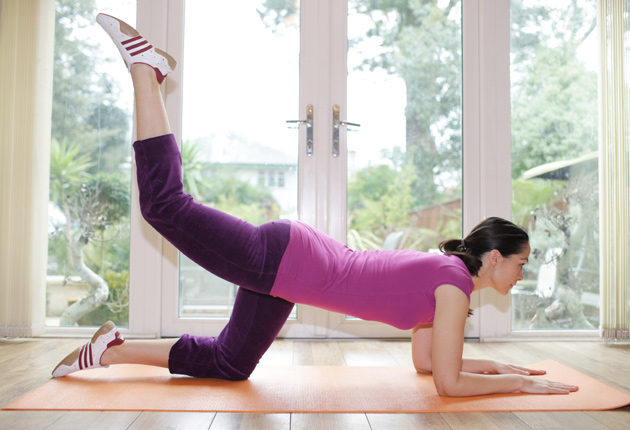
Adopt a plank position on your elbows and toes. Be sure to engage the abdominals to prevent the hips from rocking side to side. Squeeze the same-side glutes to lift up one leg at a time. As you lift the leg, the movement should be controlled by the glutes. Keeping the knee very straight while you lift will help prevent the hamstrings from contributing more than they should. Perform 20 repetitions (10 on each side).
For more challenge, place your elbows on a BOSU trainer or other unstable surface.
For less challenge, tap one knee to the floor at a time, instead of lifting the leg.
Putting It All Together
As noted earlier, perform your balance work early in your exercise session. This will help you avoid the risk of neuromuscular fatigue, which could occur if you wait until the end of your workout. Interestingly, available research shows that a multicomponent exercise program that consists of strength, endurance and balance training appears to be the best strategy for improving balance (Cadore et al., 2013; Zech et al., 2010). Hence, for the most benefit, balance exercises should be included as part of a comprehensive training program.
Source