Showing posts with label posture. Show all posts

Tuesday, 8 December 2015

Reasons Why Plank Exercises Are Great

Some of the best exercises are the least complicated, and plank exercises I think fall into that category. These have recently become an important part of my exercise routine because they are great for core conditioning. In fact, they may look too easy to be beneficial, but especially if you have irritation in the lower back this exercise might be your answer. But it also gives the hamstrings, glutes and shoulders a good workout, and will support proper posture and improved balance.
It should be noted, however that there are some common mistakes made when people do planks, and perhaps even more so than most exercises doing improperly could lead to injury. These exercises will tax the upper and lower regions of the spine. If these areas are weak it will normally cause the spine to sway. This can put compression pressure in the vertebrae and can cause back injuries. It is important especially when starting out, to know just where your limits are and not to exceed them. If you feel any pain in the back area, don't push it, but work your time up little by little.

Besides trying to hold the position for too long, other common faults are placing the hands too close together, allowing the hips and head to drop, and holding your breath. And what should your goal be? You are considered to be fairly fit in the core area if you can hold the abdominal plank position for at least two minutes. But again, you should build up to that point slowly.

That said, here are some reasons why you should be looking to plank exercises as part of your fitness program
1. Posture and balance improvement. By merely staying in the plank position for the period of time requires you to work on your balance. This can be enhanced further by doing planks on a BOSU ball, or by doing side planks. If we do lose our balance and posture position as we age, it is normally because of the weakening in the core area. Planks are great for this.

2. Alleviates back pain. Whatever you do to strengthen your core area is probably going to make your lower back stronger. The reason is because plank exercises require minimal movement while contracting all the layers of the abdominals.
 
3. Tones the stomach region. These exercises will be in our core muscles of the belly area. This is the foundation of the outer abdominals, or six-pack abs. This will be helped further by pulling in the area of your belly button, which will contract those deep inner transverse abdominal muscles.

4. Builds flexibility. The first time get into the plank position you will probably feel how the body becomes stretched. Not only in your posterior muscles but also in the shoulder area, the hamstrings and even the arches of your feet down to your toes. Plank exercises are a natural for stretching the body.

5. Mood enhancement. All of the above reasons for doing planks will help to improve a person's mood. Stretching and releasing the tension from muscles throughout the body are going to invigorate anyone who does these wonderful exercise routines.
 
Where you carry your weight has a lot to do with your overall health, as it is a  marker for issues having to do with the kidneys and liver. Read more about how to put on good weight through diet and exercise on our website  http://muscle4weightloss.com/. Rich Carroll is a writer and avid health advocate now living in Chicago.

Thursday, 25 June 2015

10 Things to Know About Muscle Fibers


Toning up, or improving muscle definition, is one of the most common goals of individuals starting an exercise program. The term tone comes from “tonus,” which is the technical term for a state of contraction of a muscle fiber. If all of the fibers within a muscle contract, it creates the shape commonly associated with a well-defined muscle.
The primary purpose of muscle fibers is to control physical forces moving through the body. Muscle-shortening actions can generate a force to move a resistance; for example, when moving from a seated to a standing position, the quadriceps and gluteus maximus shorten to help the body stand up against gravity. Muscle-lengthening actions can be applied to control and decelerate a force; for example, the quadriceps and glutes lengthen to control the motion of the body as it returns to a seated position. If you are interested in designing exercise programs that produce results, it is important to have a good understanding of how muscle fibers work and respond to exercise.
To more effectively help your clients achieve their fitness goals, keep in mind these important facts about muscle fibers and how they are affected by exercise:
1. Muscle fibers adapt to the specific type of exercise stimulus imposed during training. Mechanical stress refers to the physical stresses applied during resistance training, which cause microtrauma to muscle fibers. As fibers are damaged from exercise, they signal the biochemical reaction to produce new satellite cells responsible for repairing the mechanical structure of the muscle cell and for building new muscle proteins.
2. Muscle fibers are activated by a motor neuron, which is the connection between the central nervous system and the specific muscle required to perform a particular activity. A muscle motor unit is the motor neuron and the attached muscle fibers. Think of a motor unit as a light switch for the muscle—as a muscle is required to generate a force, the motor units will “light up” to stimulate the fibers to shorten in order to produce that force. There are a number of different muscle unit types, which are typically organized into three general categories: type I, type IIA and type IIB
3. According to the all-or-none theory, a motor unit is either active or inactive. When it is signaled to contract, it activates all of its attached muscle fibers. Slow-twitch motor units have a low threshold for activation and low conduction velocities, and are attached to type I muscle fibers. Fast-twitch motor units have a higher activation threshold, are attached to type II muscle fibers and are capable of conducting signals at higher velocities, resulting in greater amounts of muscle force.
4. Type I fibers are known as aerobic fibers. These fibers have a higher density of mitochondria, which are efficient at aerobic metabolism (the process of creating energy to fuel muscle activity with oxygen). The mitochondria give the cell a darker color, which is why these are known as red muscle fibers. Type I fibers use oxygen to create energy for lower-intensity, long-term, endurance-oriented activities like walking, running, swimming, cycling or standing for extended periods of time.
5. Type IIB fibers are known as anaerobic muscle fibers. Type IIB fibers store energy that is released for short, explosive, extremely high-intensity activities. Type IIB fibers do not have mitochondria and have a colorless appearance, which is why they are known as white fibers. Because they have a limited supply of stored energy, and thus fatigue quickly, Type IIB fibers are used for strength and power activities requiring a high amount of force in a short period of time.
6. Type IIA fibers have mitochondria, so they can be involved in aerobic activities; however, they can also be used to produce force rapidly during activities requiring a high amount of strength or power. Fast-twitch muscle fibers also have a greater diameter than type I fibers and play a more significant role in hypertrophy (the technical term for muscle growth). Recruiting and innervating type II muscle fibers requires creating enough mechanical overload to fatigue the involved muscle by the end of the set
7. Muscle fibers work according to the size principle. As a muscle requires force, it will start by activating the smaller type I motor units. When these type I motor units can’t provide the necessary force (or fatigue), the larger type II motor units and muscle fibers are recruited to perform the work. A muscle has a finite number of motor units and the higher-threshold type II motor units are not “turned on” unless a high level of force is needed. The most common way to increase motor unit activation is to lift heavier weights, because an increased load placed on a muscle will cause a greater number of motor units to activate more fibers to generate the force necessary to overcome the resistance. This is why your muscles shake when you try to lift a heavy weight for the first time—muscle motor units not previously used are being “woken up” and called into action.
8. Muscle fibers experience two specific types of hypertrophy. Myofibrillar hypertrophy refers to the increase in size or thickness of individual actin and myosin protein filaments, which can improve the force-production capacity of individual fibers. Myofibrillar hypertrophy does not lead to larger muscles; rather, it results in thicker muscle fibers capable of generating more force. Sarcoplasmic hypertrophy is an increase in the volume of the semifluid interfibrillar substance surrounding an individual muscle fiber. This fluid contains the proteins used to promote tissue repair and growth. The muscle “pump” that bodybuilders work to achieve is actually sarcoplasmic hypertrophy—the cross-section of muscle fibers will increase, but most of the enhanced muscle size is due to an increased volume of the sarcoplasm and non-contractile proteins not directly involved with force production.
9. One of the long-term adaptations of muscle to resistance training is an increase in muscle fiber cross-width. As the cross-sectional area increases in size, the fibers have more surface tension and become capable of generating higher amounts of force. Muscles with a larger cross-sectional area of individual muscle fibers are capable of producing greater amounts of force. In addition to being responsible for producing the force necessary for dynamic movements, type II muscle fibers have a greater diameter (cross-width) than type I fibers and are responsible for the hypertrophy, or increased size, of a particular muscle.
10. Type IIA and IIB muscle fibers are responsible for generating movement as well as muscle size and definition. Both classifications of type II muscle fibers create higher levels of force to produce human movement and are known as phasic muscles. Type I fibers are responsible for maintaining postural and joint stability, and can be categorized as tonic muscles.
If your client has a fitness goal related to improving muscle definition or building strength, the only way to achieve this is by activating the type II motor units and muscle fibers. There is a common misconception that developing muscle tone (“toning up”) is best achieved by using lighter weights for higher repetitions. While it is possible to achieve definition with lighter weights, it requires doing a high volume of repetitions. Using light weights for high repetitions can improve the aerobic efficiency of type I fibers, but unless the exercise is performed to fatigue which occurs only after recruiting the type II fibers, it will not result in the desired goal of definition. However, if time is an issue (as it is for many people), using a heavier weight for fewer repetitions is an effective technique for stimulating growth and definition from the type II fibers. It is important to note that exercising with higher repetition ranges will result in muscle growth from sarcoplasmic hypertrophy, while using heavier loads for fewer reps induces myofibrillar hypertrophy, which increases strength without necessarily inducing significant gains in muscle growth.

Source

Monday, 15 June 2015

How To Stretch Hip Flexors: 5 Ways To Loosen Your Hips


how to stretch hip flexorsThe hip flexor is infamous for being difficult to stretch, easy to injure, and nearly impossible to heal.  Most people have tight hip flexors in their genetics, which cause them to have drastically less flexible legs, hips and torsos.  For the rest of the world, sitting is one of the worst things you can do for a tight hip flexor.  Sitting for long periods of time, on a day-to-day basis (desk jobs, I’m looking at you), causes your hip flexors to not only tighten, but to actually shorten.  So whether or not you’ve injured your hip flexor, stretching it is good and preventative practice, and you’ll notice the results immediately.  Hip flexors control the tension necessary for pivoting forwards and backwards and side to side.  Being flexible in the hips will improve your posture, make you a better athlete (and dancer) and help you get the most out of your workouts (especially those involving leg and abdominal exercises).  Stretch out your hip flexors, then take your elasticity to the next level with these yoga sequences for strength and flexibility.

Warming Up

Ok, the last thing you want to do is injure your hip flexor when you’re trying to strengthen it.  That would be painfully ironic.  So avoid tears by warming up with a few of these easy exercises:
  • Lunges (Overhead and Reverse)
  • Leg Swings
  • High Knees
  • Leg Lifts
  • Self-Massage

Pigeon Pose

A little yoga never hurt anyone (in fact, I think it only ever helped).  The pigeon pose is a yoga classic, and it’s great for stretching hip flexors.  Begin by bending with a straight back and placing your hands palm down on the floor; then lower yourself to your knees.  Step with one leg forward until it is between your hands.  Make a right angle with that leg, so that it rests on its side and your shin is parallel with your chest (which should be facing straight forward).  You want to keep your hips straight and your back straight and arched.  You can alleviate some of your weight by pushing down on the floor with your hands.  Drop the other leg slowly so that it stretches out straight behind you; this is when you will begin to feel your hip flexor stretch.  Move slowly and always maintain balance, and like I said, use your hands to alleviate some of your body weight.  Breathe slowly and ideally hold the pose for at least two minutes.

Variation on the Lunge

This is essentially a lunge with emphasis on the hip flexor.  Start with a straight back and lunge forward with one foot.  Bend until both legs are at right angles; the knee in front should be level with your hips, the knee in back should be anchored by a thigh that is in perfect line with your back and neck (the knee should be touching the floor).  Rotate your pelvis forward until you begin to feel tension in the hip of your forward foot.  Now, raise the opposite arm of the forward foot overhead, angling it at almost a right angle in the direction of the forward foot.  You should feel considerable tension now.  Hold for at least one minute, extending the arm further to add tension as desired.  Return to standing and repeat for the opposite side.
This will help strengthen your core, too.  But there’s a better and more fun way to build your core: hoop fitness with 5X world record athlete Betty Hoops.

Butterfly

This might take you back to grade school, but even the hip flexor aficionado can delight in this simple yet satisfying maneuver.  First, take a seat.  As usual, keep your back arrow-straight.  Bring your feet together and toward your pelvis.  Your legs will bend beyond forty-five degrees and, when your soles touch, form a diamond (your knees will not be touching the floor; they should be elevated so as to resemble butterfly wings).  Hold your ankles with your hands and allow your thighs to relax.  Try to match your elbows to your knees simply by relaxing; but if you can lower your knees further without pain or force, by all means, go for it.  Relieve your hip flexors by raising your knees so that they are in line with your shoulders.  Hold for several seconds before lowering back to elbow height.

Hip Swing

If you liked sitting down for the Butterfly, you’ll love the Hip Swing, which requires you to lie on your side.  To begin, lie on one side and prop yourself up with your corresponding elbow.  Your hips should form a line perpendicular to the floor.  Raise the top leg so that it angles gently upward from the hip.  You do not need to raise it as high as possible; level with the ground is just as ideal.  Point your toe, keep your abs tight, and sweep your leg forward as far as you can while keeping it (and your back) straight.  Slowly reverse the movement and sweep the leg behind you as far as possible (squeezing your buttocks will win you extra inches).  Always maintain balance and control.  Switch legs before the stretch begins to feel like an exercise.  You do not want to over-burden the hip flexor.

Standing Hip Flexor

This is more of an exercise than a stretch, but it’s both gentle and strengthening, and probably the best way to bolster the delicate muscle.  For this you will need resistance bands.  Begin by attaching one end of the band just above one foot and the other end to a secure bench.  Face straight away from where you have anchored the band.  Keeping your leg and back straight, lift/push it forward gently to a two count, then release it in the same manner.  You do not need to hold your leg forward, and you do not need to strain yourself; a little resistance goes a long way.

Source 

Monday, 1 June 2015

Exercises for Neck Pain: Stretch the Pain Away

A pain in the neck, (and I mean a physical pain in your neck, not the person whistling loudly on the bus), can happen to anyone and may have many causes, including poor posture and muscle strain. Neck pains are mostly minor and last for short amounts of time, usually for a few months at the most. Most neck issues can be resolved by exercises that stretch and strengthen the neck and shoulder area. If the issue persists, a doctor or chiropractor should be consulted for more intense exercises or prescription drugs.

Causes and Symptoms of Neck Pain

Neck pain is usually a relatively minor injury and can be helped with simple exercises and stretches. Because the neck is connected with the back and shoulders, a strain or injury in those areas may affect the neck as well. Neck pain can be caused by several factors: worn joints caused by old age or overuse; trauma due to injuries, such as whiplash or sports injuries; poor posture; tumors; muscle strain caused by overuse or continually sitting in an awkward position.
You may not notice neck pain until you turn it a certain way and the pain can range in intensity from a dull ache to a very intense electric-shock sensation. Numbness may also occur, as well as muscle weakness. Most neck issues last for only a short time, but even more chronic problems can be solved with stretching, massages, acupuncture and a few simple exercises.

Exercises to Get Rid of Neck Pain

These neck exercises are useful for getting rid of existing neck pain as well as building strength in the neck in order to prevent potential neck issues in the future. They are also quite convenient and can be done anywhere at anytime, like the office, in the car or on an airplane. If you have a heating pad, it may prove beneficial to apply it to your neck before these exercises to warm up the muscles. After the exercises, a cold pack or bag of frozen vegetables wrapped in a towel may be applied to reduce inflammation.

NECK STRENGTHENING EXERCISES
Chin Tuck – This postural exercise stretches and strengthens the muscles that pull the head back into alignment over the shoulders. Not only will this exercise build strength, it can be done as soon as neck pains appear to prevent from becoming worse. When you’re comfortable with this exercise, it can be performed at work or, even in a car with the help of the headrest.
  1. With your spine against the wall and your feet 3 inches out from the bottom of the wall, pull the upper back and head back until the back of your head touches the wall with your chin down so that your head is pulled straight back and not looking up.
  2. Hold your head against the wall for 5 seconds then release.
  3. Repeat 10 times.
  4. After you’re used to performing the exercise without the help of the wall, you can do it while sitting or standing, from 5 to 7 times a day.
Shoulder Blade Squeeze – The neck, shoulders and back are all connected and this exercise works your neck as well as upper back.
  1. Sit up straight with your chin tucked in slightly and your shoulders pushed back just a bit.
  2. Slowly squeeze your shoulder blades together as far and as hard as possible, making sure it does not cause you any pain.
  3. Hold for 5 seconds, release and repeat 10 times.
WEIGHT TRAINING EXERCISES
These simple strength-building exercises utilize 2-5 lbs. dumbbells with knees slightly bent. Do 3 sets of 8-12 reps, 3 times a week on non-consecutive days. (Taking a day off between your workouts allows your muscles to rest and rebuild; if you exhaust the same muscle groups two days in a row, you risk injury, so plan to do these exercises on alternating, non-consecutive days.)
Shoulder Shrugs
  1. Hold arms at sides, palms facing in.
  2. Keeping arms straight, pull shoulders up to ears then pause for 3 seconds and lower.

Reverse Flies
  1. Bend forward so your chest faces the floor with your arms hanging down and palms in.
  2. Bend your elbows slightly, squeeze your shoulder blades and raise your arms side to side, parallel to the floor.
  3. Pause 3 seconds then lower.
Upright Row
  1. Starting with your palms in front of your thighs and facing your legs.
  2. Bend your elbows out to the sides and pull the weights up to around collarbone level.
  3. Pause 3 seconds then lower.
EXERCISES FOR NECK PAIN
Neck Tilt
  1. Tilt your head down toward your shoulder, leading with your ear.
  2. Gently tense the neck muscles and hold for 5 seconds.
  3. Return your head to the center and repeat on the opposite side.
  4. Tilt your head down to rest your chin on your chest.
  5. Gently tense your neck muscles and hold for 5 seconds.
  6. Repeat 5 times on each side.
*NOTE* You can add resistance to this exercise by putting your palm on your face and gently pushing against the direction you are tilting your neck. If it hurts, you’re pushing too hard; relax, and don’t apply enough force with your palm that you are in discomfort.
Neck Stretch
  1. Keeping the rest of your body straight, push your chin forward so your throat is stretched.
  2. Gently tense your neck muscles and hold for 5 seconds.
  3. Return your head to the center position and push it backwards, keeping your chin up. Hold for 5 seconds.
  4. Repeat 5 times.
Neck pain is a common affliction and is usually not very serious, from a medical perspective. With the help of these strengthening and pain-alleviating exercises, any neck pain should begin to go away within 2 weeks and within 4-6 weeks you should be mostly healed. Continuing these exercises for anywhere between 6-8 weeks should help prevent the symptoms from ever returning. If pain or weakness persists, or if you have any doubts that your pain is caused by anything other than simple posture habits or everyday muscle tension, contact your doctor or a chiropractor.

Source 

Tuesday, 3 February 2015

Sitting at a Computer All Day? These 4 Stretches Will Help!

0  
Ever since I quit my nursing job and started working from home, I went from standing for 8+ hours at a time to virtually sitting… all day long. I noticed that my flexibility went from high to none-fast! Also, my lower back started hurting which was strange because never ever did I have back pain in my entire life!

It wasn’t until I began a yoga class that I learned that tight glutes and tight hips can lead to back pain by pulling those muscles out of alignment. Tight hips and glutes can also lead to a tummy pooch by forcing your lower back to arch itself.


Sounds lovely, right?

These 4 stretches have helped me tremendously and I would recommend them for anyone who has a desk job or who happens to sit for long periods of time. I do these 4 moves every morning and every night. At first, it was a bit painful, but now my flexibility has improved and my back pain has virtually disappeared.

Here are 4 stretches to undo sitting all day:

1. Lizard Pose


From Downward Facing Dog Pose, step your right foot forwards between your hands. Heel-toe your foot towards the edge of your mat, so that your foot is slightly wider than your shoulders.


Let your hips grow heavy, so that they settle forwards and down. Begin to walk your hands forwards until you are able to come down on to your forearms. You may place your forearms on the ground, or on a block.


Extend your heart forward, lengthening the spine. Try to soften the heart and draw the shoulder blades together, taking the rounding out of your back.


Keep your right knee hugging towards your midline to get into the inner hip and thigh area of your right leg. You can keep your left knee lifted with your leg active, or for a more restorative version, you can lower your left knee.


2. Happy Baby Pose


Lie on your back. With an exhale, bend your knees into your belly.


Inhale, grip the outsides of your feet with your hands (if you have difficulty holding the feet directly with your hands, hold onto a belt looped over each sole.)


Open your knees slightly wider than your torso, then bring them up toward your armpits.


Position each ankle directly over the knee, so your shins are perpendicular to the floor. Flex through the heels. Gently push your feet up into your hands (or the belts) as you pull your hands down to create a resistance.


3. Pigeon Pose


Begin in Downward-Facing Dog (Adho Mukha Svanasana), or on your hands and knees in Table Pose.


Bring your right knee between your hands, placing your right ankle near your left wrist. Extend your left leg behind you so your kneecap and the top of your foot rest on the floor.


Press through your fingertips as you lift your torso away from your thigh. Lengthen the front of your body. Release your tailbone back toward your heels. Work on squaring your hips and the front side of your torso to the front of your mat.


Draw down through your front-leg shin and balance your weight evenly between your right and left hips. Flex your front foot. Press down through the tops of all five toes of the back foot.


Gaze downward softly.


Hold for up to one minute. To release the pose, tuck your back toes, lift your back knee off the mat, and then press yourself back into Downward-Facing Dog. Repeat for the same amount of time on the other side.


4. Plow Pose


Begin by lying flat on your back with your legs extended and your arms at your sides, palms down.


On an inhalation, use your abdominal muscles to lift your legs and hips up toward the ceiling. Bring your torso perpendicular to the floor. Straighten your legs and slowly lower your toes to the floor with your legs fully extended.


If your toes do not yet touch the floor, support your back with your hands. Lower your legs as far as possible, keeping your legs straight. Continue to keep your back supported if your feet do not touch the floor.


If your feet rest comfortably, extend your arms along the floor and interlace your fingers. Press your upper arms firmly into the floor, drawing down through the pinkie finger side of your hands.


Align your hips over your shoulders. Un-tuck your toes and press the tops of your feet into the floor.


Lift your tailbone higher, and draw your inner groin deep into your pelvis. Keep a space between your chin and chest, and at the same time, lift your chest to open the upper back. Soften your throat. Gaze down toward your cheeks.


Hold the pose for up to five minutes.


To release, support your back with your hands. Then, slowly roll down, one vertebra at a time, bending your knees if you need to.


Image: Yogaoutlet.com


Friday, 14 November 2014

Yoga for Neck and Back Relief

An astonishing 80 percent of Americans—men and women of all ages—suffer from back pain. There are numerous reasons people experience acute and chronic back pain, including poor posture, injury, excess weight and structural deformities, such as scoliosis. Not surprisingly, lifestyle choices can help or hinder back discomfort.
Individuals who lead a sedentary lifestyle and/or work primarily at a desk are at particular risk for back pain because the body’s musculature adapts to the lack of movement, and sitting for long periods often results in a “hunched” spine and tight and weak muscles throughout the body. Yoga, however, can be a great way to counteract these negative effects.
The following yoga poses benefit spinal health by opening and lengthening muscles that connect, surround and intertwine the spinal discs. This specific routine focuses on opening the spinal column in various planes of motion and includes flexion, extension, lateral flexion and rotation of the spine. Stretches are most effective when held for 30 to 60 seconds and combined with deep breathing.
Note: If you suffer from back pain, consult your medical doctor on how to manage the pain. Pain specialists, physical therapists, chiropractors and specialized personal trainers can conduct a postural assessment and movement screen to unlock any muscular deviations or weaknesses that may contribute to back pain.
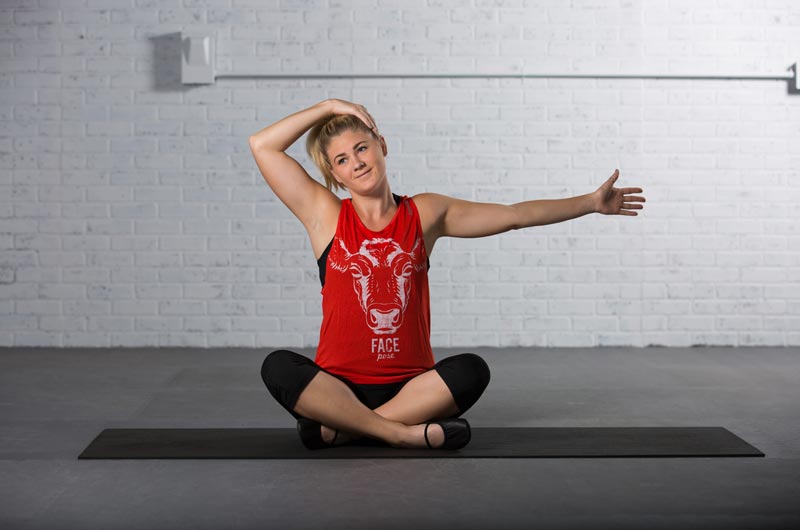
Head-to-hand Neck Release
Head-to-hand neck release
Purpose: Lengthens the sides of the neck, chest, biceps and palms

How to Perform: Sit into a cross-legged position (or a chair). Bring your right ear toward the right shoulder. Lift the left arm to shoulder height and spread the palms with the thumbs facing up. Place the right hand lightly on top of the head and apply slight pressure, if necessary. Retract the left shoulder blade toward the spine and hold the posture. Repeat on the other side.
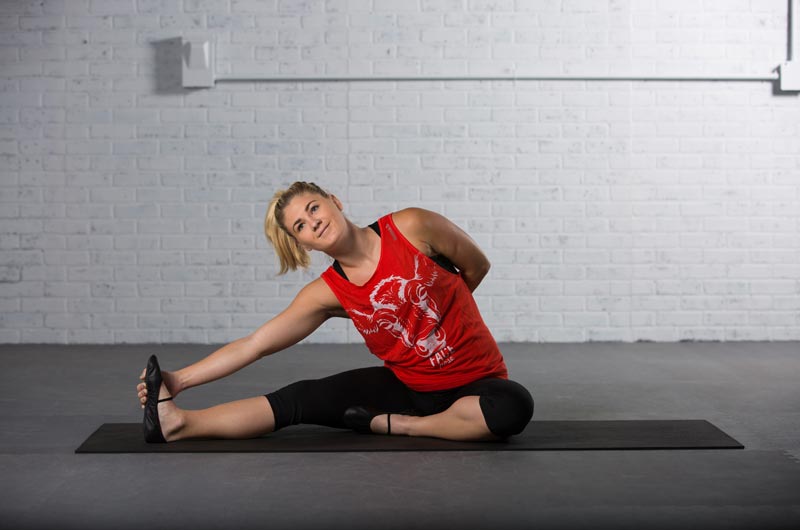
Revolved Head-to-knee Pose Variation
revolved head to knee pose
Purpose: Lengthens the obliques, neck and posterior muscles of the legs

How to Perform: Sit on the ground and place the legs into a straddle or “V” position. Place the right foot next to your left inner thigh. Lift the chest and slide the left forearm down the left leg and hold until you feel a stretch. Place the top of the right hand on the low back, near the left hip. Relax the shoulders and lower the left ear toward the left shoulder. You should feel a stretch in three areas: the back of the left leg, the right side body and the right neck. Hold the pose and repeat on the opposite side.
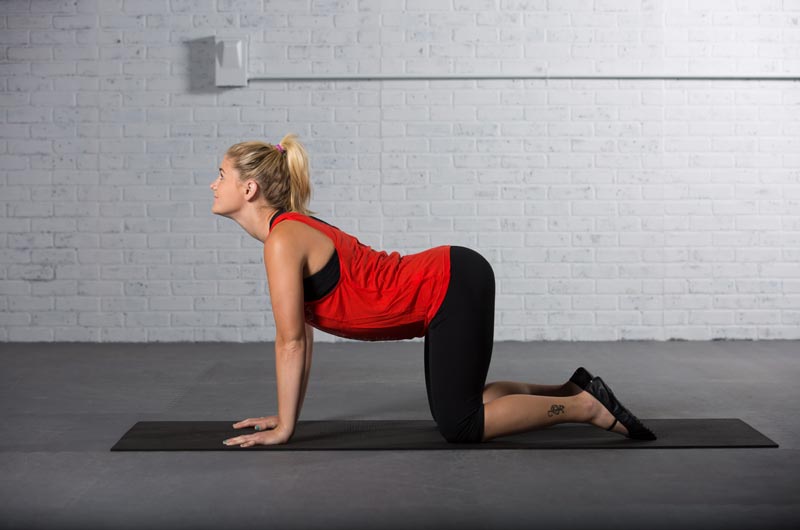
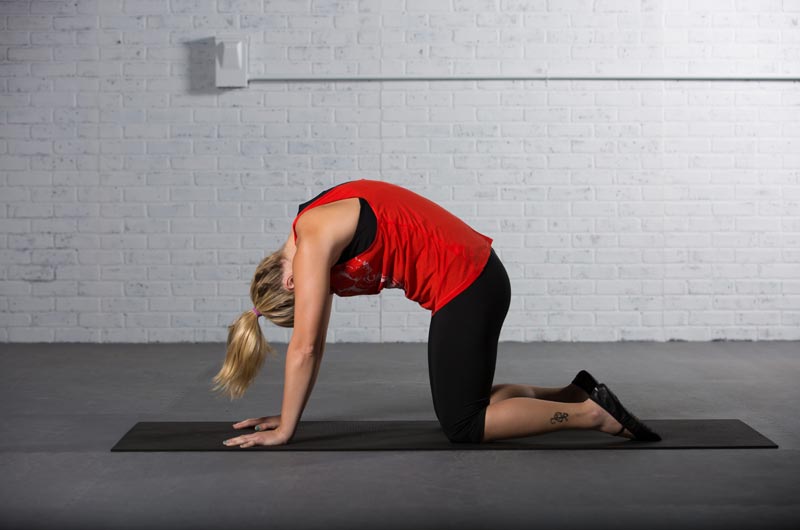
Cat Cow
cat cow
cat cow
Purpose: Flexes and extends the spine to increase mobility
How to Perform: Start on all fours with knees hip-width apart and hands shoulder-width apart. Start with a neutral spine; inhale deeply and then exhale as you round the back up toward the ceiling and the chin drops down to the chest. Inhale and lower the navel toward the floor and lift the chin upward. Continue flowing between cat and cow, matching the movement with the breath, for one minute.
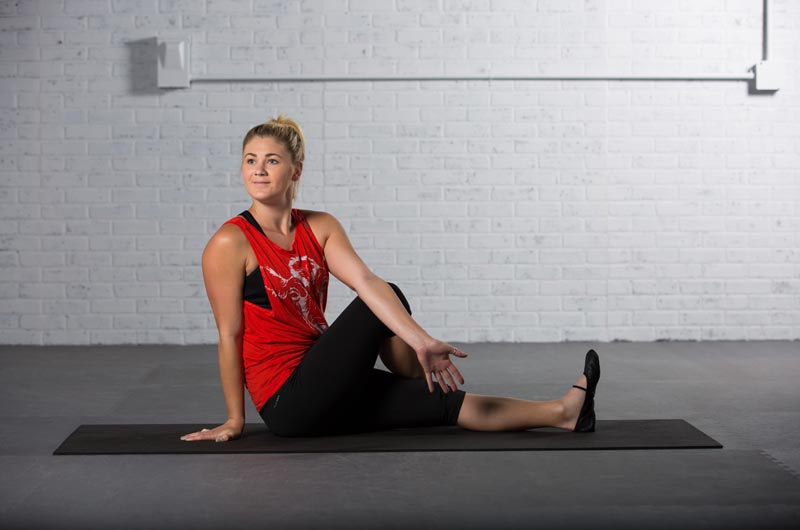
Seated Spinal Twist
Seated Spinal Twist
Purpose: Opens the external rotators of the hip, erector spinae and rhomboids
How to Perform: Sit on the floor with legs extended in front. Bend the right knee and place the right foot next to the left knee or inner thigh. Rotate your chest toward the inner thigh and place the left elbow on the right thigh. Place the right hand on the ground behind the body and look behind you. Repeat on the opposite side.
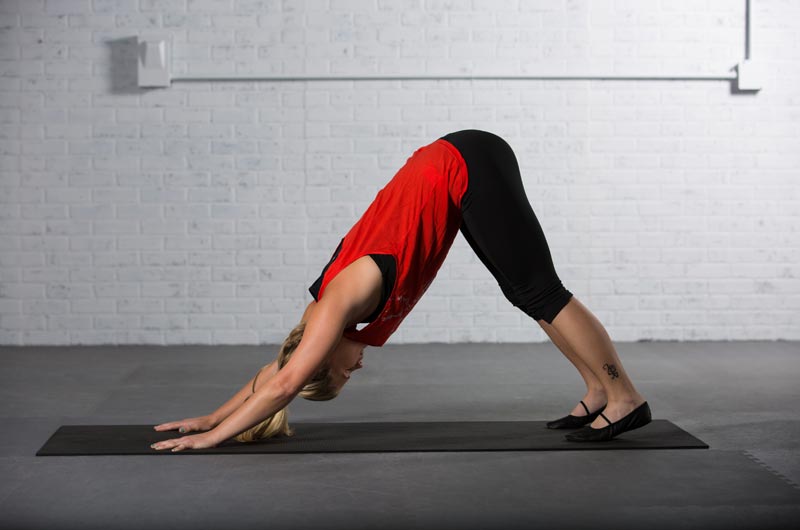
Downward-facing Dog
downward facing dog
Purpose: Lengthens the posterior muscles of the legs and expands the chest
How to Perform: Start on all fours with knees hip-width apart and hands shoulder-width apart. Curl the toes underneath and lift the hips into the air. Think about lifting the tailbone toward the ceiling and roll the shoulders away from the ears. The chest should be relaxed as you do your best to maintain a neutral spine. Relax the heels toward the ground. Hold for three to five deep breaths.
Supine Revolving Spinal Twist
Supine revolving spinal twist
Purpose: Increases mobility in the thoracic spine
How to Perform: Lie on the floor on the right side of the body in a fetal position. Bend the knees to 90 degrees and place the arms straight in front the shoulder. To support your head, lie on a pillow on rolled towel. Inhale and lift the top arm up and rotate to the point of comfort. Some people can open completely into a lying spinal twist. Exhale and rotate back to center and re-stack the arms. Your gaze should follow the hand. Continue for 60 seconds and then hold open the spinal twist with either the left arm at shoulder height or by placing the left hand on the rib cage. Repeat on the opposite side.
source