Showing posts with label strengthening. Show all posts

Monday, 7 December 2015

Exercise and Balanced Diet for a Healthy Life

A combination of a good exercise regime and a balanced diet will produce lasting results of healthy life. Exercise not only keeps a person fit but makes one feel good about oneself. As the sayings go, "a healthy body has a healthy mind" and "you are what you eat". Exercising regularly stimulates the brain to produce endorphin, a chemical that helps a person feel more relaxed and peaceful. A balanced diet is essential to maintain a healthy weight. Exercise and nutrition go hand in hand.
Studies have shown that aerobics exercises can make your bones strong which in turn helps you age better. Eating a low fat, low carb and high protein diet can be helpful in achieving goals faster. Exercising regularly prevents the risk of developing heart diseases, diabetes and certain types of cancers. To ensure that you are exercising hard enough without straining your heart, calculate heart rate by using the heart rate calculator. The optimum workout requires the heart beat to go up to 75% of heart rate which will burn a lot of calories in little amount of time.

Basic exercises to get you started:
There are three basic components to all exercise routines; Aerobics, Strength training and Flexibility or Stretching.

Aerobics exercise: Walking, jumping and swimming are the best forms of aerobics exercise. Jump rope brings the heart rate up much faster than walking. Hence, ten minutes of jump-rope, is equivalent to twenty minutes of walking. Swimming is considered as the only workout that allows all the muscle groups to work together simultaneously to burn maximum calories.
 
Strength Training: Weights and Pilates are known as muscle toning and strengthening workouts. Weight training should be done at least three times a week. Pilates are getting quite popular nowadays especially in the western countries. It teaches control of mind and body and helps strengthen core muscles.

Flexibility exercises: Yoga and stretching. Yoga is known for relaxation. It calms anxiety and brings about a holistic approach to life. Stretching is highly recommended after every workout. It is a good way to prevent injuries and soothe tired and sore muscles.

Benefits of exercising:
The benefits of exercise are innumerable, to name a few:
• Increased brain performance
• Feel more energetic
• Releases stress
• Keeps diseases at bay
• Makes the heart stronger
• Removes anxiety and depression

Importance of a Balanced Diet:
A balanced diet will provide you the energy your body needs to function properly. It is important to maintain healthy eating habits so that your immune system is strong enough to fight illnesses. Poor diet can hinder the growth and development in children. Kids with bad eating habits are more likely to continue it for the rest of their lives.
 
Easy tips to follow:
A healthy diet is a composition of fresh fruits and vegetables, lean proteins, dairy and whole grains. Here are some simple do's and don'ts to get you started.
• Don't fill yourself up with empty calories, like cakes and cookies, etc.
• Try to make every calorie count by obtaining them from the four major food groups.
• Prefer fresh fruits over store bought juices.
• Try to eat six small meals instead of three large ones.
• Always eat a healthy snack between breakfast and lunch, and between lunch and dinner.
• Finally have a small snack just before bed time. That way you won't end up consuming large portions at each meal.
When starting a healthy lifestyle, do some homework on how to calculate heart rate for optimum workout, find out the caloric intake required for your age and try to maintain a food journal in the beginning. Just keep yourself disciplined through exercise, maintain a balanced diet, and you can enjoy a happy life for many years to come. Start bringing a change today by living the healthy way.

Tuesday, 1 December 2015

The Benefits of Using a Foam Roller Pre/Post Workout

Foam rollers are effective for increasing flexibility, but when are they best utilized? The answer to that question isn’t necessarily limited to when it’s most beneficial to use a foam roller. It’s rather a matter of how. According to National Academy of Sports Medicine CEO and founder Mike Clark (h/t OutsideOnline.com), practically everyone fails to properly utilize foam rollers. Correctly using a foam roller before strenuous exercise can decrease your chances of contracting an injury and improve your workout.

Tension release from problem areas
Your basic instinct to gently roll back-and-forth consistently won’t yield optimal results from using a foam roller. Instead, it’s important to apply pressure on problem areas of your body, such as the hip flexors and glutes. Hip flexor strain is a common outcome of daily physical activity, like sitting upright in a desk chair during an eight-hour workday. It’s also a primary point of concentration for mild lower back pain. You can effectively release the tension in your hip flexors, and other problem areas of the body, by rolling your hips on a foam roller for approximately one to two minutes before a workout.

Optimized range of motion
Stretching is widely conceived as an important element of pre-workout activity, but conventional stretching technique does not directly target muscle receptors and tendons. While it’s entirely possible to warm-up each major muscle group through stretching, using a foam roller can help prepare tendons for strenuous activity and also decrease muscular-tension imbalances. Foam rolling can help increase your body’s overall range of motion and enable you to perform explosive weightlifting exercises with greater authority.
 
Decreased muscular imbalance
Muscular imbalances refer to certain muscle groups within the body being stronger than others. Over time, it’s likely that you’ve noticed peculiar variations in how your body reacts to strenuous exercise. For example, it’s possible you’ve realized your quadriceps are able to handle more weight in the squat rack than your chest can tolerate on the bench press. While this is relatively common among active gym-goers, it could be an outcome of muscular imbalance. Clark emphasizes that foam rollers activate the Golgi tendon organ, which effectively allows conventional stretching to activate muscle receptors. This process helps create balance within the body, thus enabling you to exercise at optimal capacity.

Increased strength and flexibility
According to research published in the Journal of Strength and Conditioning Research, a dynamic warm-up model will increase strength in the quadriceps and flexibility in the hamstrings. A conventional warm-up period typically consists of moderate stretching activity and low-intensity exercise. However, combining the use of a foam roller with a regular stretching regimen, and performing five minutes of moderately intense cardiovascular activity, such as spinning, has the potential to enhance your body’s ability to execute strenuous exercises. Although research regarding foam rolling and its correlative effect on exercise remains limited, experts like Clark tout foam rollers ability to stimulate muscle receptors, which aid the process of lengthening muscle fibers.
 
Enhanced effectiveness of stretching
The ultimate benefit of utilizing a foam roller both before and after a workout is that it enhances the effectiveness of conventional stretching methods. Foam rollers apply deep pressure to problem areas, especially those in the pelvic region. This consequently activates muscle receptors, which increases your overall range of motion, decreases muscular imbalance, and helps maximize your strength and flexibility.

John Shea is a team sports fanatic and fitness aficionado. His work has been published across a wide platform of online audiences in the realm of health and fitness. His passion for fitness is exemplified in his writing, as he aims to help readers improve their overall well-being.

Source

Monday, 28 September 2015

Great Abs With Balance Ball!

Doing yoga on the ball can benefit anyone, including:

1. Yoga beginners. Moving into poses with the ball's support builds confidence and can help your muscles gradually stretch and strengthen as you improve your yoga routine.

2. People recovering from injuries. Some injuries create muscular weaknesses that make it difficult or painful to do yoga postures such as backbends or Warrior poses. A ball can ease you into a pose comfortably and with less risk for re-injury.

Work Those Abdomens!

Abdominal work is only part of the story. You may be surprised to learn that even more essential to your core stability than a set of six-pack abs are tiny muscles that run along the spine and support the body's joints. Normally we associate a strong body with the large muscle groups.

But, what really improves overall body fitness is the strength of these tiny muscles. They're the ones that keep you from falling, wrenching a disk in your back, or spraining your ankle when you slip on a patch of ice.

Elevated Pushups for Pecs, shoulders, triceps, and abs

How to do it: Place the front of your knees on the ball and your hands flat on the floor (your whole body should be parallel to the floor). Look down at the floor and lower your face to within a few inches of it, then push back up to the starting position.

To Inflate the Ball

1. Attach the yellow piece to the pump by screwing into place.

2. Before inflating, use a yard stick or tape measure to mark the size of your ball in centimeters (55, 65 or 75) on a wall or floor.

3. Inflate the ball as much as possible, without over inflating.

4. With use, the ball will stretch a bit and can be further inflated.

5. Add more air as necessary, never inflating the ball larger than the centimeters in diameter indicated on the box.

The balance ball rolls around easily, so core strength and balance are required to keep it still. The challenge of keeping the ball still makes the ball an excellent tool to teach stability and rehabilitation. The simplest movement can become a huge challenge when you do it on the ball. Using a ball can give your workout a little more variety and extra challenge. You can try these exercises after your Pilates mat work.


Brigi G | by Fit4Health

Saturday, 5 September 2015

At Home Cardio Workout with No Equipment - Fat Burning Cardio Intervals

No equipment, and no reason to not jump right into this quick cardio interval workout that will have you sweating in a hurry but won’t take up more than 30 minutes of your day.

This is a mid range difficulty routine (maybe a 3.5/5 on the difficulty scale, what do you guys think?) that’s a good option for just before or after a strength routine for the upper or lower body. It’s also good paired with a long stretching or yoga routine or as a standalone recovery cardio workout - just make sure to check out the options for a cool downs below if this is the only workout you’re doing for the day.

As shown, it’s not a low impact workout, but I’ve provided low impact modifications all throughout the video (I apologize that a couple of times it took me a bit into the interval to remember to do so!). Whatever your fitness level, make sure that you’re pushing yourself relative to your own strengths and weaknesses. You can make this easier by moving more slowly, taking out the jumping motions, and keep the range of motion more shallow. On the other hand, you can make this harder by adding jumps or jumping more powerfully for each movement, moving faster, using a deeper range of movement, or even holding onto weights or wearing a weighted vest. You can also take shorter or longer breaks as you need to, and more or less frequently; it's all up to you to make the changes that you need to in order to properly push yourself. If you ever find yourself getting discouraged because it seems too difficult, remember that everyone has a starting place, and just make it your main goal to push yourself a little further each time.


Note:
All information provided by Fitness Blender is of a general nature and is furnished only for educational/entertainment purposes only. No information is to be taken as medical or other health advice pertaining to any individual specific health or medical condition. You agree that use of this information is at your own risk and hold Fitness Blender harmless from any and all losses, liabilities, injuries or damages resulting from any and all claims.

Friday, 14 August 2015

10 Ways to Get the Best Fitness Workout Routine

When it comes to a holistically hale and hearty life, fitness is definitely one of the watchwords! If you do not feel fit and healthy, you simply can't feel happy from within! I'm sure none would disagree. Each one of us must make sure that we take out some time from our hectic schedules to pursue a fitness workout routine. Let's take a look at some of the ways we could aim for a fitter self!

1. The best exercise for abs: side plank.
You should lie down on your left side with your elbow below your shoulder and your legs stacked. Then the right hand should be placed on your left shoulder or on your right hip. Once you have braced your abs and lifted your hips off the floor, hold on for as long as you can. Switch sides and repeat.


2. Standing dumbbell fly: For broader shoulders
A dumbbell should be held in each hand by your sides. Without shrugging, the upper body should be used to swing the weights up by a few inches. The arms and torso should form an upside down V shape. It will contribute hugely to your fitness healthy lifestyle!

3. Towel Cable Row: For great arms!
A towel is to be hooked to a cable pulley, following which you should stand in front of it, set up to do a row, while holding an end of the towel in each hand. Then the shoulder blades should be squeezed together and the towel rowed to your rib cage.

4. Pec Minor Dip: One of the best workout routines for chest
Once you've suspended your body over parallel bars, let your shoulder blades come together as you lower your body towards the floor. Make sure your elbows are locked while doing this. Thereafter, your shoulders should be spread and your body pushed upward again. There, can you feel your pecs working? Even with slight movement, it can do a lot to improve the overall size and shape of your chest.

5. Deadlifts for back muscles.
Begin with a low squat position and grab the bar with an overhand grip. Then your torso should be raised once you've sat back on your hips, pushed through your heels, and ascended upward. Throughout the motion, a tight core and straight back should be maintained.

6. The kettlebell complex: Most effective functional fitness workout
This will work wonders for you if you are short of time, or looking for a quick workout involving minimal stuff. All you need for this is a kettlebell and 20 minutes!

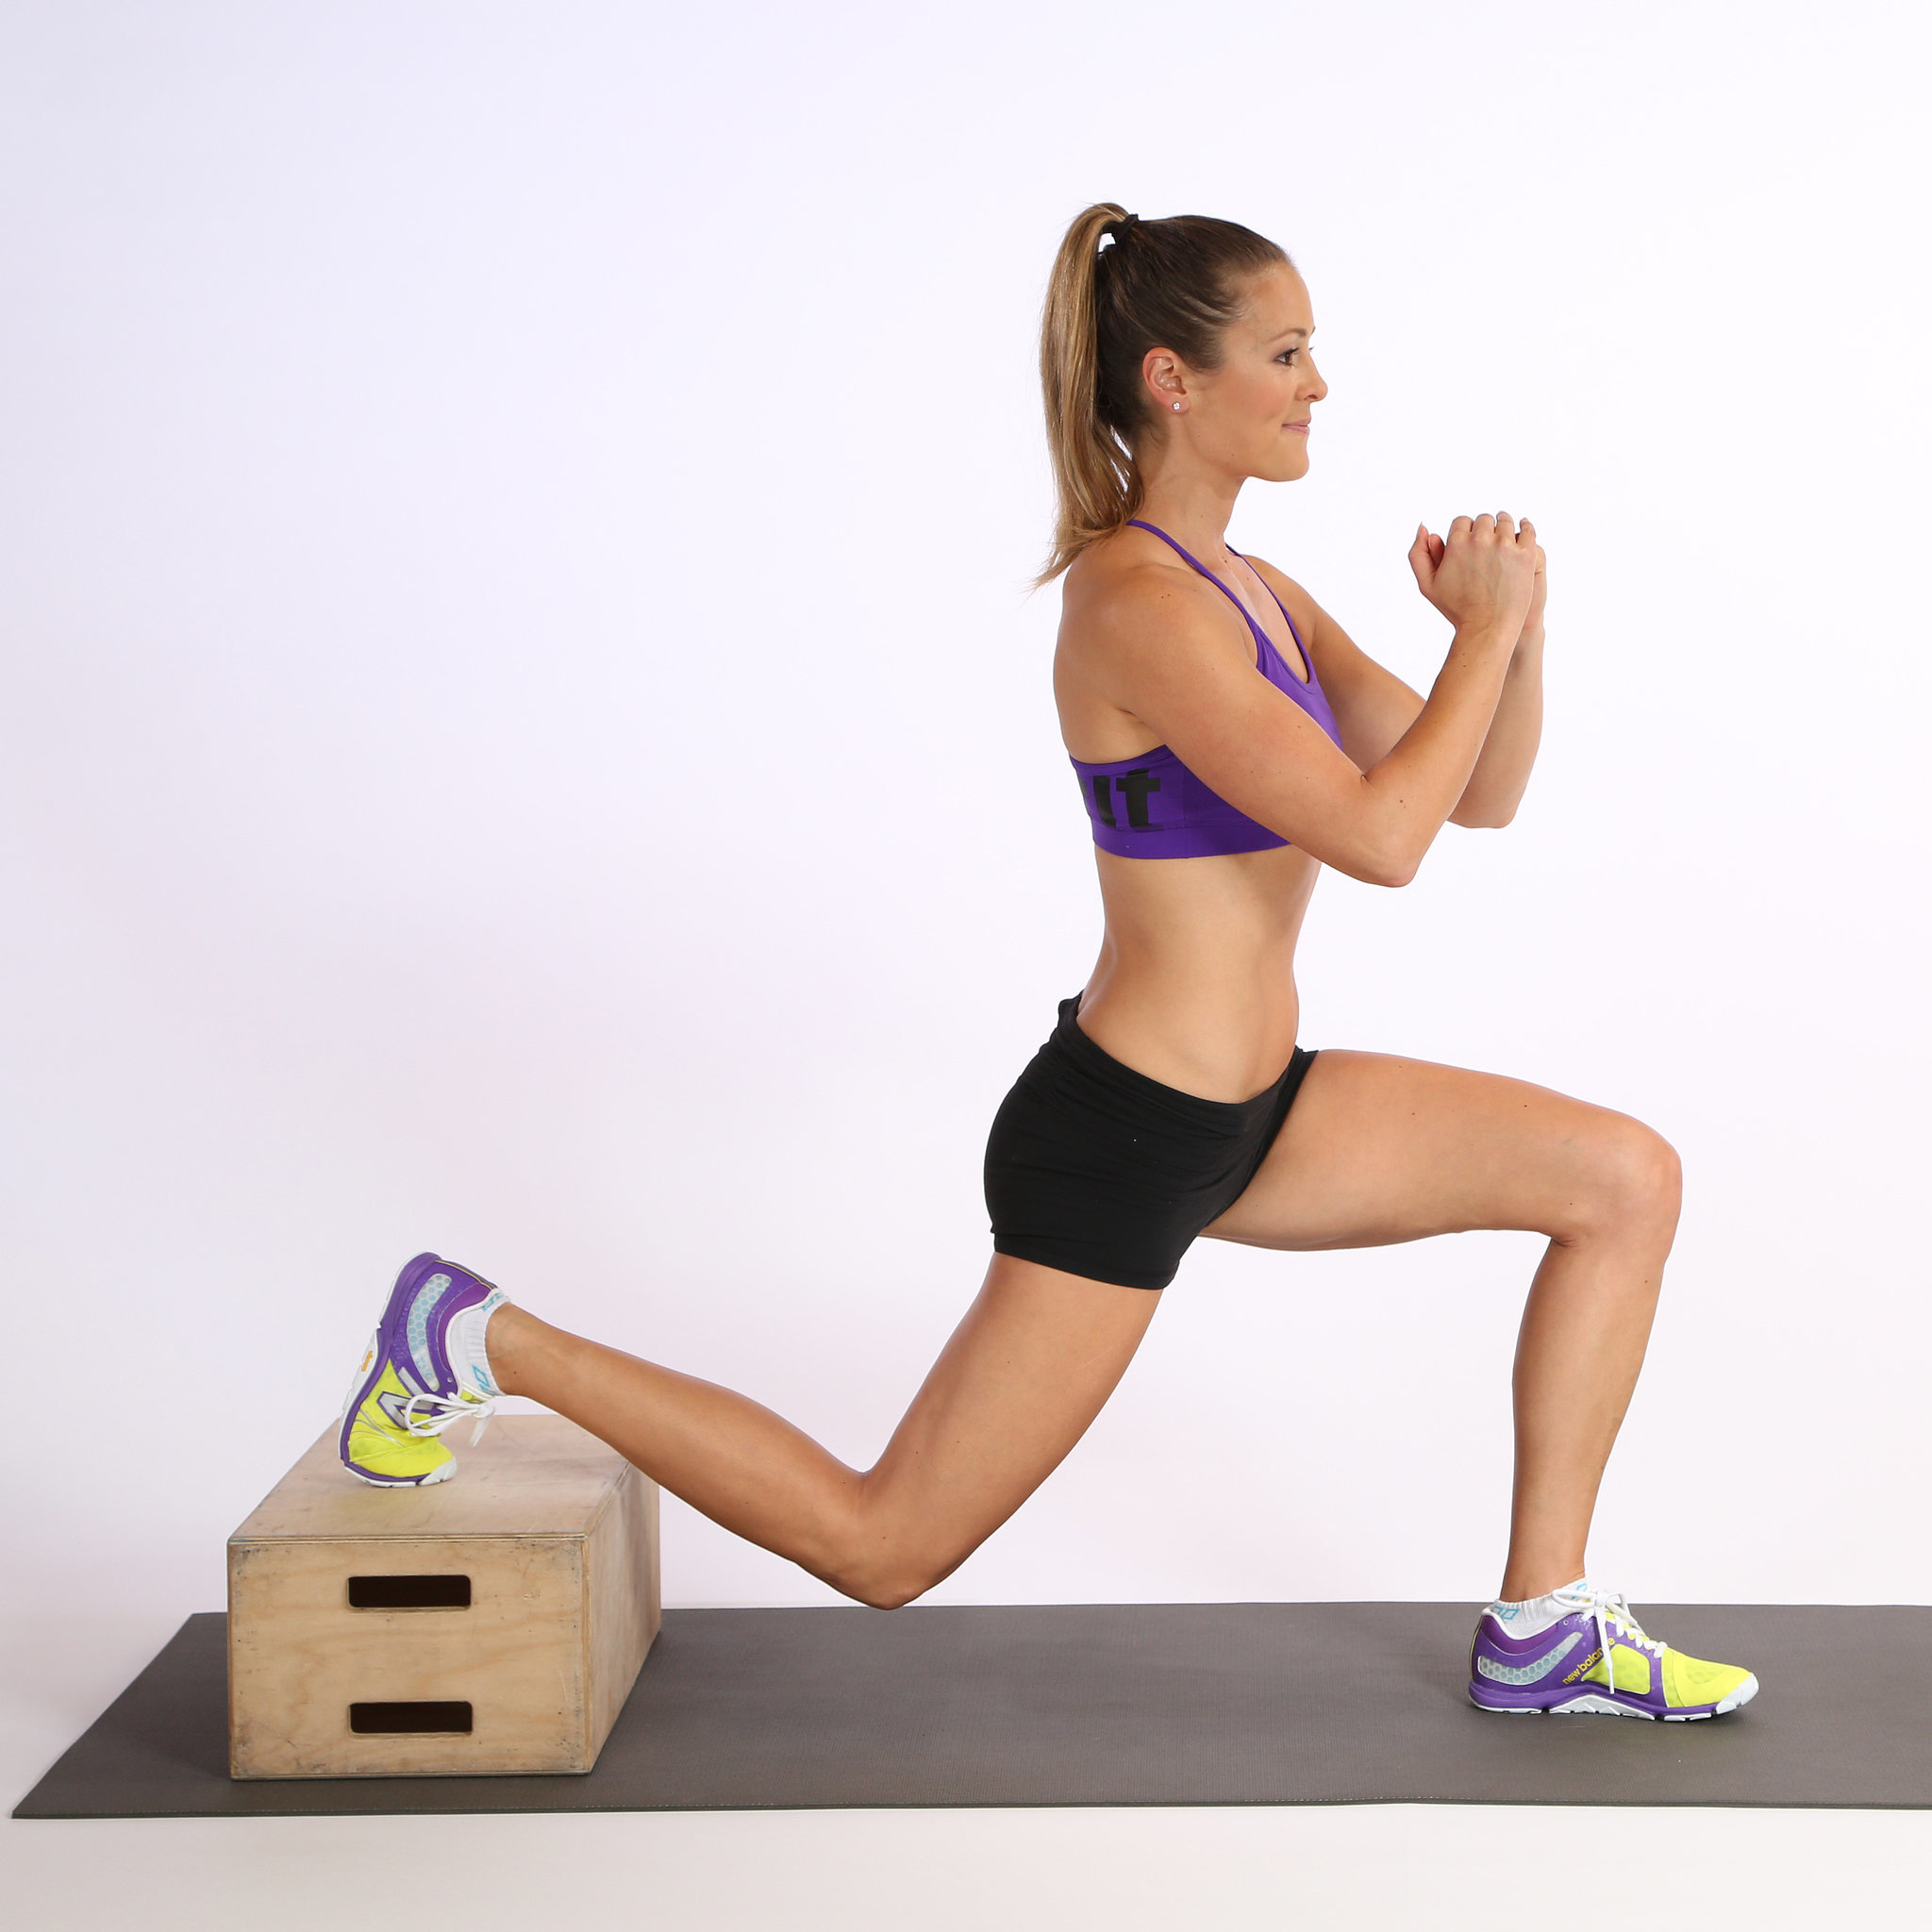
7. Bulgarian split squat: one of the best leg workouts
Hold a dumbbell in each hand once you stand lunge-length in front of a bench. Then the top of your left foot should be rested on the bench behind you. Your body should be lowered until your rear knee nearly touches the floor and your front thigh is parallel to the floor.

8. TRX Atomic Pushup: An excellent time-crunch move
Begin with your feet in a TRX suspension trainer or on a sliding surface. Follow this up with a pushup and then your knees should be pulled to your chest and then pushed back.

9. Squat with Ball: The best workout routine for toned thighs
Once you place an exercise ball between the wall and the curve of your lower back, stand with your feet apart by shoulder-width. Follow this up with bending your knees and lowering 5 to 10 inches. Make sure your shoulders are level and your hips square. This position should be retained for 3 seconds and then repeated.

10. K-Tread: Workout even while you're swimming, for a fitness healthy lifestyle!
In the deep end of the water, tread on it, making small circles with cupped hands and the right leg should be lifted straight in front of you, bringing it at hip level. Reach for the toes of left leg towards bottom of pool. Following this, the legs should be switched quickly, bringing right leg down as the left leg is raised, and hold on to this position for 5 seconds. This should be continued for 30 seconds, altering sides.

Happy workout, folks!

Monday, 10 August 2015

How and why you should train with TRX

TRX - WHAT IS IT?
Well, it is amazing! There’s not one thing I don’t love about TRX for myself and for my clients. Maybe you have seen that “ropey, strappy thingy” at the gym or maybe you just want to know more, or perhaps you’re hearing about TRX for the first time. No matter what, I want to cover the basics for you in hopes that you try it out and learn what all the hype is really about.
Being a TRX Certified Instructor, I use TRX in my own training routine as well as with my clients. I use TRX Training at my gym and also have one in my home for an anytime workout. I love how you can pack it up and take it to the park, do a workout in your own home, or bring it along with you when traveling. No excuses, right? No matter your fitness level, the TRX is perfect and versatile for everyone; athletes, rehab, stay at home moms, body builders, young and old. TRX offers a cardio workout, a resistance workout, muscle flexibility workout, as well as balance. No matter what your goals are, you can benefit from the TRX. Before we discuss everything there is to know about the TRX, it’s important to first understand exactly how the body works.

HOW THE BODY WORKS: 
I am a trainer who incorporates many types of functional and corrective training in my clients’ routines. You’ll see why in just a moment. It is so important to understand the fundamentals and foundation of your body. Everything you do in life starts with one part of your body. Any guesses? IT’S YOUR CORE. Your core is not just about those six pack abs you see - it is so much more than that. Your core is made up of your pelvis, back, chest muscles, and also the abdominals. It is your core that is responsible for your body stability, flexibility and balance. Makes sense, right? Also, do we always move in the same direction every day like robots? No, we surely do not! We move with twisting, bending movements and we’re going left, right, down, up, side-to-side, as well as forwards and backwards. This is called “multi-plane” movements. Once you think of your body moving “all around” these different ways, wouldn’t you agree it would be very important to train your body the same way?
Whether you’re picking up after the kids or dog, playing sports, cleaning your house or car, and of course then working out, you are using your CORE whether you know it or not. For the most part, you are moving multi-plane. This is very important for us to understand because the stronger your core is and the more familiar your body is with moving multi-plane, the less injuries you will have, not only in your lower back but in your entire body.

WHAT IS TRX EXACTLY?
TRX stands for Total Body Resistance Exercise. It’s a type of training that uses your own body weight and gravity to build strength, balance, coordination, flexibility, core and joint stability, all while preventing injuries. Not to sound intimating, the TRX was originally designed by a Navy Seal who needed to stay in shape within limited space using something he could easily take on his travels. (This is why you can pack it up and take it with you nearly anywhere you can place the anchor point.) Consequently, he created TRX and boy, did the rest of the world catch on. 

THE MANY ADVANTAGES OF USING THE TRX SYSTEM:


  For starters, you can minimize your training time by working your whole entire body switching from one exercise to the next in just seconds. The best part to me? As I mentioned, in every exercise you engage your core. So, this is great news if you’ve been focusing on your core. Now watch how much harder things become when you REALLY engage your core. Are you up for the challenge? Just think of how developing good core strength and stability will only enhance your performance and way of life. Your whole body will work and feel better.
Another advantage in using your own body weight and gravity is you are able to adjust your own personal fitness level. I love that you have control of the intensity just by walking yourself closer or further away from the anchoring point. That means instead of having to grab a different set of dumbbells or add more weight to machines, you just simply adjust your foot placement. Easy enough, right? This is also why you can keep your heart rate up and keep moving. No wasted time (important in my workouts!) which keeps you constantly challenging your body through every exercise.
WHAT ARE SOME EXERCISES I CAN ADD TO MY ROUTINE TO HELP MY PERFORMANCE?
With any new workout routine (yoga, weights, spin class,) it’s important to start off with the basics. Make sure you have mastered the proper form and technique before you move on to advanced movements. The basic movements (yet still challenging) include: Chest Press, Row, Lunge, Squat, Plank, Tucks, Pike, Side Lunge, Oblique Twist and Back Extension. Say hello to CORE work! Some of my favorite moves that are more advanced are: atomic push-ups and single-leg squats. What I also LOVE doing with TRX is stretching. You can get fantastic full body stretches for your entire body in ways like no other. 
TRX has been a huge part of the fitness industry and is only growing larger, from professional athletes who need peak performance to everyday people who just want to feel and look their best. Personally, I love that TRX is exactly what I preach all the time--there is no tension on the joints if alignment and form are on point. That is how all workouts should be. It is uncomplicated to learn and a truly great way to incorporate new resistance training to any workout routine. You can find videos online to understand more and when you purchase one, it comes with a fantastic workout DVD. 
My hope when you see TRX for the first time is to feel more encouraged and give it a try!

 Posted by Monica Nelson of Monica Nelson Fitness

Monday, 3 August 2015

At Home Exercises - Crossfit Workouts At Home - Pro Trainer Live

At home exercises - Crossfit Workouts At Home - Pro Trainer Live. Do you want to go to the gym? Why not try the benefits of exercising at home. Visit the site for more home work out tips.
You've probably heard the newest craze in the athletic arena, it's called Crossfit and it is tough stuff. CrossFit was founded upon the strength and conditioning programs used by many government academies such as police, military and special ops units. However crossfit is not solely entitled to those in elite fields, in fact you could do your own Crossfit workouts at home by yourself and still achieve results.
CrossFit was designed to be used by elite athletes and elderly individuals alike. The only difference is the amount of load used in the workouts and the intensity. That's all that separates you from an elite athlete. Yes you could be essentially training with the same workout used by some of the fittest people on Earth. The only thing you would adjust is the amount of load and intensity that is right for your body and experience level.
Crossfit workouts at home are a great way to lose weight, gain lean muscle and improve cardiovascular health. So what kind of movements does Crossfit entail anyway? Well, it's a combination of plyometric exercises, Olympic style lifts and non-traditional lifts with equipment like kettlebells, bags of sand, pulley systems or weighted items filled with water. Sounds like fun right? Well it is if you have the right mind set. Although it can be fun it is considered a high impact workout. On a scale of 1 to 10 Crossfit would easily get an 8 - 10 rating on the list of high impact workouts.
The benefits of CrossFit are mainly due to the high intensity of the workouts. The intensity and power exercises are effective for burning up high number of calories in short periods of time. At the same time these high impact workouts are improving your aerobic fitness and producing the anabolic hormones such as testosterone, HGH and IGF-1 that are responsible directly for muscle growth. Here is the important thing to remember: CrossFit is an excellent workout program for any exercise enthusiast, however if you are just starting out with exercising then you need to take it slow. Use reduced volumes and intensities to build up a fitness base first and progress from there. The average Crossfit workout is not a recommended for people just starting to exercise or returning to exercise after a long break.
If you are starting out with Crossfit workouts at home to get into shape here are some great exercises you can employ at your own pace. You will need a couple of light dumbbells, or pop bottles filled with water, or any object that has a weight of 3 to 10 pounds.

Singe Arm Snach: Works the butt, back, shoulders and arms.
Single Arm Snatch For Crossfit Workouts at Home
Standing with your feet wide and toes turned€out slightly, place a dumbbell on the ground between your feet. Squat down low, and pick up the dumbbell with right hand. Move back up to a straight position onto the balls of your feet. As you move upwards pull the weight close to your body and over your head reaching for the sky. Bring the weight back down and repeat. You can do 10 reps on each arm and 3 - 6 sets of each.

Bear Crawl or Knee Tucks: Works the entire body.
Running Knee Tucks
This is one of the best Crossfit workouts you can do at home. Here you get down on all fours in a higher than normal push up position. From there you either do 30 reps or 30 seconds worth of knee tucks. Pretend you are racing an opponent and you need to move as fast as you can to beat your opponent. Drive one knee up to your chest and the other leg drives back to the ground. Doing 3 - 6 sets of these will work your entire body and leave you breathless.
Dumbell Swings: Works the butt, back, shoulders and arms.
These are perhaps the most fun and dynamic of the exercises. Simply stand with your feet wide and toes pointed out slightly. Hold onto your weight of choice starting with the weight on the ground between your legs. Move the weight dynamically from the ground all the way over your head reaching for the sky. Repeat 10 - 20 times maintaining a good rhythm and fluid movement. Do 3 - 6 sets of each.

The Sumo High Pull: Works the butt, back, shoulders and biceps.
Sumo High Pulls
Like doing cleans, stand with your feet wide, hold on to your dumbbells, either one in each hand or use a bar with light weights on it. Squat and lower the weights between your legs. Go back up to a standing position pulling the weights up to your shoulders focusing on keeping your elbows high. Repeat 10 - 15 times performing 3 - 6 sets.

Box Jump: Works the lower body.
Box Jumping for Crossfit Workouts at Home
Find a step or a box that is at least 8 inches off the ground. Simply jump off the box backwards to the ground. Focus on reacting quickly when your feet hit the ground to jump off again and land on the box. These are extremely high impact and should only be done if you are already in decent shape. Start with 3 sets of 6 - 10 reps and simply increase the number of sets up to a maximum of 6 as you progress.
Doing Crossfit workouts at home are a great way to get into shape at your own pace. Utilize some or all of the above exercises at your own pace and start the journey on getting the body you want on demand. For more information on at home workouts with a personal trainer online contact us.

Source 

Friday, 24 July 2015

The short guide to training at home

It all comes down to how you see it, the space – actual and in your mind and how prepared you are, mostly mentally. Exercise is not rocket science, if you put in the time – you will get results, most people have problems sticking to it after several goes.

Space.
People buy gym memberships not for the professional equipment, although there is that, too, but mostly for the commitment factor. And not just because you paid money for it but also because once you are there – you will inevitably work out. In order to be set for exercise you need to be away from everything else and concentrate on training only. Your house is a place for living, on the other hand, and you simply don’t have a routine (not yet) to train, there is no special area for that in most people’s houses so the number one priority for you if you want to exercise in your home environment is to make that space, space reserved for training specifically.
a) Make it somewhere in the area where you can leave all of your equipment if you have any – like Swiss ball or dumbbells, of just something that reminds you of exercise – exercise mat, perhaps. The area needs to be dedicated to exercise and it has to be accessible.
b) Pick the area where you walk past but you don’t do other stuff at, like playing video games on the carpet or watch TV, it’ll compete with your training activities if you associate leisure time with exercise you may not enjoy so much.
So, once you have that space you will be able to go there whenever you want to or planned to work out.  You will not need to think of where you are going to set up – you’ll just go straight there.
The people who invest heavily on a home gym and then never use it make one simple mistake: they don’t make it accessible. They close the door, they set it up somewhere out of the way – somewhere where they are not reminded of it. They cover their equipment, like a treadmill or a bike, with clothes and magazines and end up neglecting the whole thing because it’s not easy to jump up and go, it’s not “staring them in the face” – it’s in the corner/basement/behind closed doors. So make sure your home gym area is where you can see it, where you walk all the time – that it’s central in your house if you want to make exercise a priority in your life. Otherwise it’ll be an out of sight out of mind kind of thing.

Simplify.
It’s hard to get yourself to exercise when you are underprepared, when you need to go through an hour’s worth of setting up before you get to train. If you need to look for your clothes, a bottle of water, music and whatever equipment you might have – you are unlikely to get started. Make it easier on yourself and have everything on hand: your training clothes, mp3 player and water all set and ready to go when you are. Some people, like myself, wear training clothes at home – it’s comfortable and you are ready to work out at any moment of the day.

Plan.
You can’t make time for exercise and then wonder what you are going to do – you are unlikely to start, to be honest, if you are not entirely sure what it is you’ll be doing exactly. So, having a clear idea of what your plan of action is – is crucial. Make it simple so you know when it’ll be over, how much time you need and if you can afford to spend that time training. Make it reasonable so you don’t dread it and keep postponing it to a later date – make sure that whatever program you are following is the one you are physically able to stick to. Make it easy to follow – have a visual guide or a list you can cross things off, something that’ll let you go through the motions and get the sense of progression. If you’re following a DVD make sure you don’t have to dig for it for half an hour – have it at hand.

Invest, mentally.
In the beginning of your journey spend as little money as possible, instead, try to spend time on getting motivated and inspired by other people. A lot of people get side-tracked by what equipment and gear they need, they keep on spending money, before they can even begin to exercise. It becomes yet another distraction, an obstacle between you and exercise. You think you need something to begin with but you don’t, you just need to want to start. If you think some particular equipment is “the stuff”, before you throw your money away, borrow it from a friend first or make do with a DIY substitute first, at the very least the cheapest possible version of that thing. Most of the time, what you think is going to be the solution will only join all the other junk in your garage and you may even find that it was absolutely useless after a few tries. So, before you throw away your money, try it out elsewhere, at the store or by using a guest gym visit and test that equipment there first.
Fitness is all in your head – if you are all set it’ll be a lot easier to train at any point of the day, here and there even if it’s just 15-20 minutes – it will all count. And once you get into a routine and make it part of your lifestyle it’ll get easier and easier to find the time and the motivation to exercise.

Source

Wednesday, 15 July 2015

6 Exercises for a Stronger Core

Your core consists of the muscles that stabilize the spine and hips, and includes all the muscles of the abdomen, back, glutes and upper legs. A strong core helps protect the entire midsection, and enhances both mobility and stability, which, in turn, improves movement efficiency and keeps the muscles functioning in coordination with one another. This, of course, helps improve balance, posture and strength.
A common misconception is that doing exercises while lying supine automatically increases core strength. While these exercises can help improve abdominal strength, the entire core must be challenged to help improve total-body function. A better approach is to use a variety of stances, such as single-leg, supine and prone, to incorporate a wide range of movements. Here are a few of the best exercises to challenge the entire core.

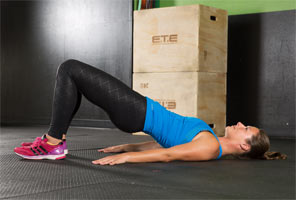
Glute Bridges


While many consider the abdominal muscles to be the most important for increasing stabilization, strong glutes are essential as well. Many injuries and faulty movement patterns are a result of underactive glutes and overactive quads and hip flexors. To combat this, activate and fire those glutes before workouts to make sure they are turned on and ready to work.
Lie supine on the floor with knees bent and both feet flat on the floor. Keep the head relaxed and slowly push through the heels to raise the hips as high as possible. The knees, hips and shoulders should be in one straight line. This exercise activates the glutes and hamstrings, and stretches the hip flexors, which are often overactive and tight. Hold the top position for three seconds and slowly lower. Do eight to 10 reps per side. To progress this exercise, try one leg at a time or place the feet on the round side of a BOSU.

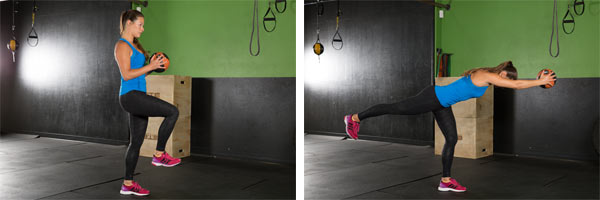
Medicine Ball Single-leg Reach


Disguised as a leg workout, this move is great for the glutes, hips, back and abs. Grab a 5- to 10-pound medicine ball and stand on the right leg. Slowly reach forward while hinging at the hips (not the back). Simultaneously lever the back leg out behind the body. Reach as far as possible—work toward bringing the arms, torso, and left leg horizontal to the floor. As the core gets stronger, increase the weight of the medicine ball. Perform two to three sets of eight to 10 repetitions per leg.

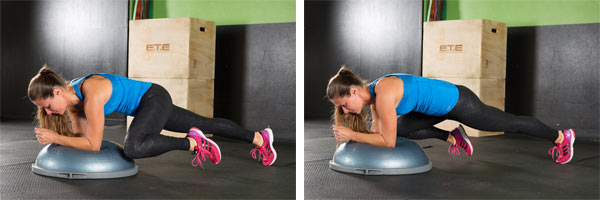
BOSU Plank Variations


Before attempting planks on the BOSU, make sure your client has impeccable plank form and can hold it for at least 30 seconds on the floor before attempting advanced variations. Planks are meant to strengthen the core, so if your client’s form wavers too much (back sinks, arches or bends), have him or her practice a little longer before advancing.
Start with the elbows on the round top of the BOSU. This creates an element of instability that must be controlled throughout the exercise. Perform a plank for 30 seconds. Begin adding small, alternating single-leg lifts, focusing on lifting the leg with the glutes and not shifting the hips at all. Next, try bringing one leg out about 45 degrees to the side, tapping the toe to the ground and returning to plank position. Perform five repetitions on each leg. Finally, try bringing the left knee out to the side, and tapping it to the BOSU just outside the left elbow. Repeat five times per leg. To regress these variations, perform them on the floor or on a flat bench before moving to the BOSU

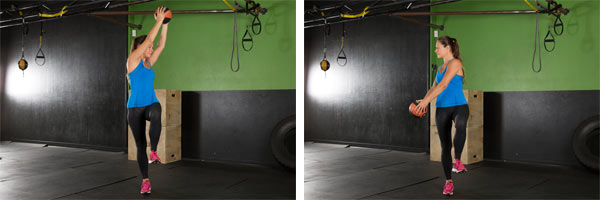
Medicine Ball Single-leg Woodchop


Grab a 5- to 10-pound medicine ball and stand on the right leg. Raise the medicine ball overhead, slightly over the left shoulder. Swing it down quickly, but with control, to the outside of the right leg. Try to keep the torso upright, with a constant slight bend in the right leg. Slowly bring it back up to starting position and repeat eight to 10 times. To regress this exercise, start on two legs and gradually progress to standing on one leg.

TRX Pike


Place the toes in the foot cradles and lie prone on the floor, ready to plank. Push up into a high plank on the hands, establishing perfect form. Keeping the legs straight, push the hips straight up into the air while simultaneously pulling the TRX toward the hands. Slowly lower back down to finish in plank position. Complete eight reps to start, gradually increasing to 15 reps as core strength improves. To regress this exercise, bend the knees to pull the TRX toward the hands.

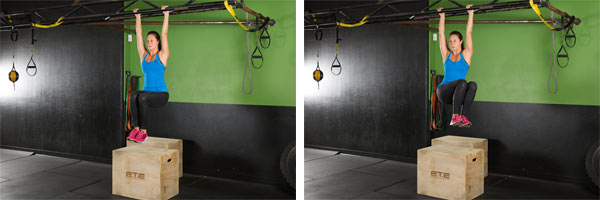
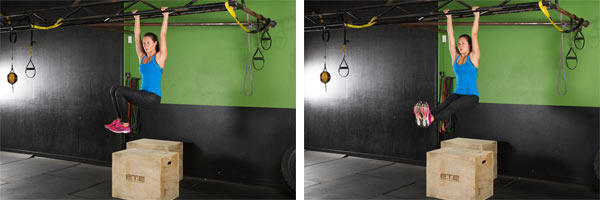
Hanging Leg Lowers


Exercises in which the legs are unsupported are a great way to work the deep abdominal muscles and the hip stabilizers. However, these exercises are not recommended for individuals with diagnosed lower-back pain.

If your client is a beginner, start this exercise using a Captain’s Chair. Once the client has developed a good strength base, progress to ab straps or hanging from the hands. Start with the knees bent, and lift them slowly as high possible, pulling the knees to the chest. Instead of focusing exclusively on the upward movement, think about the slow downward movement. Take about five seconds to slowly lower the legs back down to the starting position. This eccentrically works the deep abdominals, providing control and stabilization, while also preventing swinging. Repeat eight to 10 times. To progress this exercise, slightly twist the knees to the left and right to challenge the obliques. Additionally, try keeping the legs straight but only raise them as high as possible while maintaining straight knees. Again, focus on the slow lowering motion.

Source

Tuesday, 14 July 2015

Plank Exercise Variations

There is definitely no reason at all not to spice up a standard weight training workout with a few planking postures. Plank training benefits are extensive. When utilizing any planking posture, you'll be strengthening core muscles, that are essential stabilizers for your entire body. You'll very quickly see lumbar issues getting better, coupled with increased abdominal definition. Undoubtedly, the easiest way to increase muscular strength while reducing back conditions and enhancing alignment is plank training. While conventional stomach workouts, like sit-ups and crunches, put stress on the spinal column, plank exercises maintain a straight pose, enhancing posture.
Everybody is able to really benefit from plank routines. Athletes of most sports use planks to develop mid-section strength and durability, probably the most crucial element of pretty much every sport. The military services also supports core muscle training due to their rapid, stomach strength and durability development.
Let's see why you should add planking to your workout routine!

One of the better parts of planking postures is the numerous that may be made from each and every one. As an example, to improve the ab training routine while using the standard plank position, steadily lift up 1 foot off the yoga mat and maintain the posture. The very same approach may be used in types of planking. For additional intense plank exercise routines, consider making use of a chair. Creativity is important because they could be utilized in a plethora of possibilities. Among the more conventional methods of adding a weight bench would be to assume the regular planking pose, and positioning your feet on top of the bench. Yet another popular posture turns around this, and it has the arms on top of a bench.
Lateral planking, as the name indicates, are like standard planking but carried out laterally. Using the lateral plank, the sole parts of the body in contact with the floor include the arm on the side closest the surface, in addition to the feet. This amazing planking activity focuses on the ab muscles along the side of the mid-section, referred to as the oblique muscles. Lateral planking poses are much harder versus classic front side planking position, and definitely will call for a substantial amount of abdominal area power.
The posture of inverted planking is quite simply a standard plank flipped. You should have your backside oriented with the floor together with both arms in contact with the surface. You will need to bear in mind for all planking postures, the sole body parts that are in contact with the surface include the arms, feet and hands. The inverted plank focuses on basically the identical muscle groups as the front side plank exercise.
The question for you is how one can transition this information of a planking workout routine to a health club. Adding planking along with other training is extremely advocated. Despite the fact they may be absolutely advantageous by themselves, planking training is in most cases built into a complete exercise routine. As with every workout routine, the positive outcome of the execution is dependent mainly on the level of fitness of one's participate. With respect to standard and inverted planking, beginning with only thirty second reps is perfectly fine. The wonderful thing about planking is inside of a month or so you will realize quick positive changes on the time period you will be able to maintain for each and every planking posture. For veteran "plankers", a normal front side planking posture is comprised of 2 to 3 minute reps, together with about 5-10 sets or higher. A standard lateral planking posture is made up of 1 or 2 minute reps. This is obviously just a approximate guideline as every person adapts planking postures to fulfill their own particular requirements.
The biggest benefit of a planking workout is the fact that it's free! Zero health and fitness center memberships or complicated equipment are necessary for these activities. The only mandatory tools are spirit, iron will and dedication. Since plank activities don't require related equipment, you can utilize them anywhere. Take a couple of minutes at lunchtime or maybe when you feel exhausted at the job, move down to the ground, perform a couple of plank exercises, and acquire the amazing returns. You will quickly feel recharged and much less worn out than your coworkers who stuffed themselves at break. The number one overwhelming positive regarding plank workouts is how the negative aspects are practically non-existent. A result of the large number of adaptations, virtually all fitness levels can take advantage of plank exercises. They are one of the best calisthenic exercises that is 100% free, uncomplicated and hassle-free.

Source 

Tuesday, 30 June 2015

7 Squat Variations That Will Strengthen Your Lower Body


Squatting is a foundational movement that most of us perform every single day. All over the world, people are squatting while doing everything from household chores to sitting down in a chair. Even so, the squat can pose a challenge to many people. Starting with various squatting patterns and progressing to more challenging moves can be a great way for beginning exercisers to strengthen the muscles of the lower body and improve their ability to perform this foundational movement.
The best place to start is the body weight squat, and then progress to adding different loads and varying the movement patterns. The following seven exercises will help your clients regain the natural squatting ability they undoubtedly possessed as a child. After all, as strength and conditioning coach Mike Boyle says, “Squatting isn’t an ability you gain, it’s an ability you lose.”

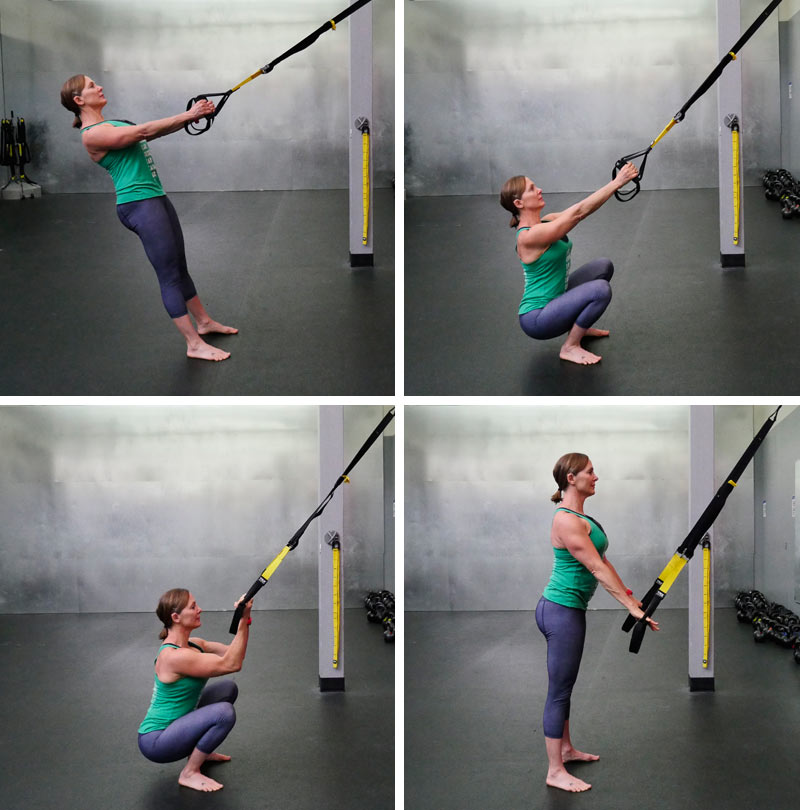
1. TRX Squat Bottom’s Up 


Adjust the TRX Suspension Trainer to mid length. Stand facing the anchor point with the elbows bent below the shoulders. Keeping a solid plank, lean back until the arms are extended. Pull the tailbone toward your heels and hold for a beat or two. Extend the spine, trying to pull the chest through the arms. Curl your torso up, keeping the elbows in line with shoulders. Stomp around a bit and then hold for about 10 seconds. Press into the handles, maintaining a strong plank, to stand. Perform as many repetitions as possible while maintaining proper form.

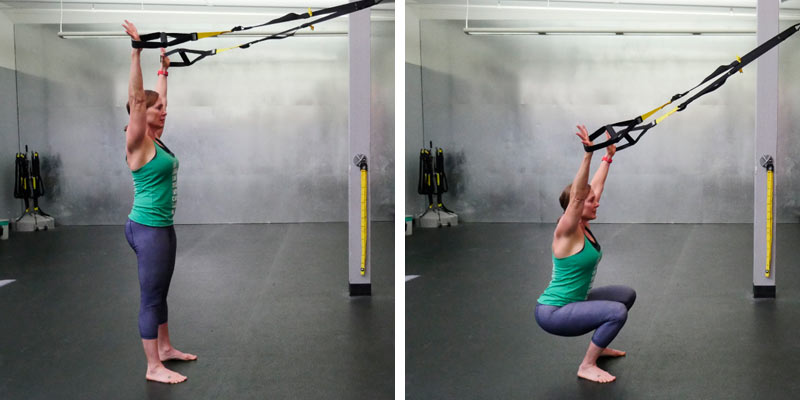
2. TRX Overhead Squat 


Adjust the TRX Suspension Trainer to mid length. Stand facing the anchor point, with the legs about shoulder-width apart. Extend the arms overhead while holding the straps. Press the hands into the foot cradles, creating tension in the straps; keep the shoulders down and back. Root into the ground while pressing back into the straps and pull the body toward the ground; be sure to maintain a stable torso. Lower only to where proper form can be maintained. Drive the feet into the ground to rise up to full extension.  Perform as many repetitions as possible while maintaining proper form.

3. TRX Overhead Squat: Single Leg (Advanced Progression) 

Adjust the TRX Suspension Trainer to mid length and stand facing the anchor point. Stand on the left leg and center the right leg toward the anchor point. Press the hands into the foot cradles, creating tension in the straps; keep the shoulders down and back. Root into the ground while pressing back into the straps and pull the body toward the ground; be sure to maintain a stable torso. Lower only to where proper form can be maintained. Drive the feet into the ground to rise up to full extension. Repeat on the other side. Perform as many repetitions as possible while maintaining proper form.

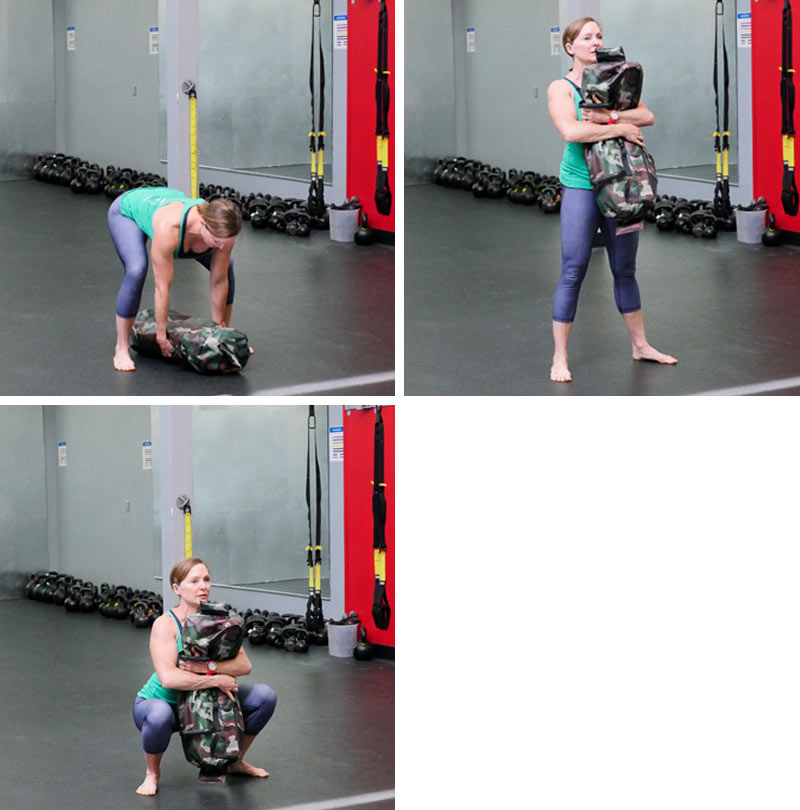
4. DVRT Bear Hug Squat 


Place a Strength Ultimate Sandbag (USB) on the floor and stand halfway over the bag. Keep a flat back, the hips hinged and the knees flexed while grabbing under the bag. If the hips are too tight to reach the bag with proper form, put the USB on a higher surface. Keep the arms locked and the shoulders packed. Use enough force from the hips to adjust the grip on the USB, ending in a hugging position. Try to pull the USB apart to engage the postural muscles of the back. Maintain tension throughout the posterior chain by keeping the USB close to the body. Lower the tailbone toward the ground into a deep squat. Keep the torso tall and drive through the heels to stand. Repeat.

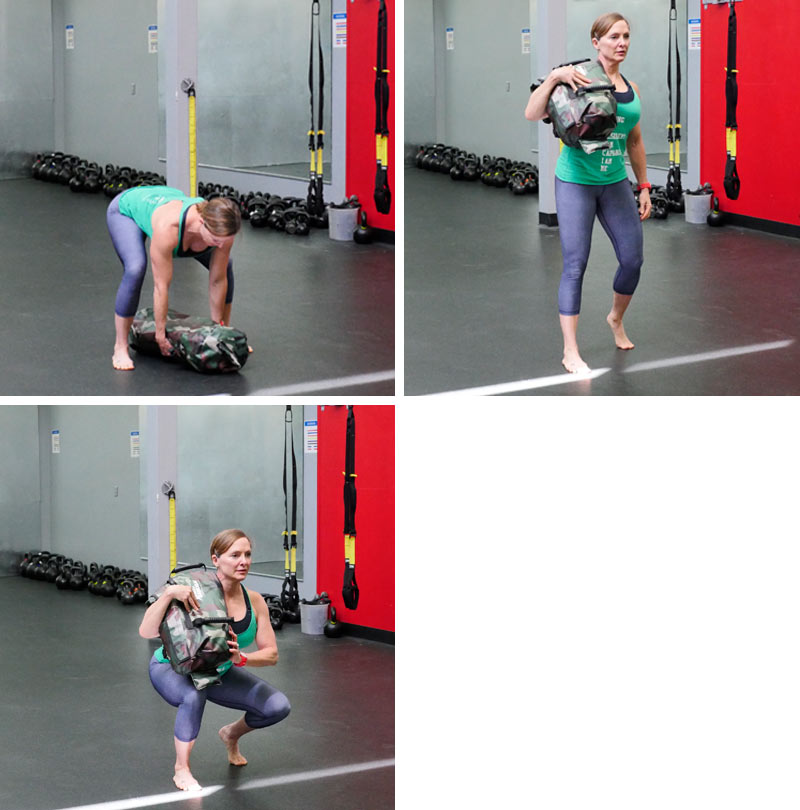
5. DVRT Shoulder Squat: Staggered Stance 


Place a Power USB on the floor, smooth side up, and stand halfway over the bag. Hinge the hips back and then slightly bend the knees. Keep the shoulders packed and reach under or grab the sides of the USB. Press the feet into the ground and explosively direct the USB to the right shoulder. Step the left foot back so that the left toe is in line with the right heel. Stay on the ball of the foot with about 40 percent of body weight distributed on the rear foot. The shoulders should be parallel to the floor; watch for lateral swaying. Keeping the feet rooted into the ground, pull the tailbone toward the ground. Only go as deep as possible without losing form. Drive the front heel into the ground to return to extension. Repeat on the other side.

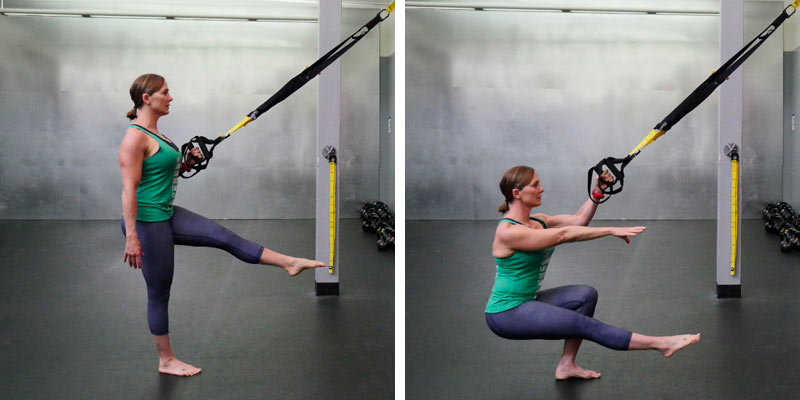
6. TRX Single-arm, Single-leg Squat 


Adjust the TRX Suspension Trainer to mid length. Grab the handles with the right hand, keeping the elbow under the shoulder. Position the right leg in line with the anchor. Keep the torso stable and tall and lower the tailbone toward the floor. Keep the knee in line with the mid foot, taking care not to let the knee collapse. Repeat on the other leg.

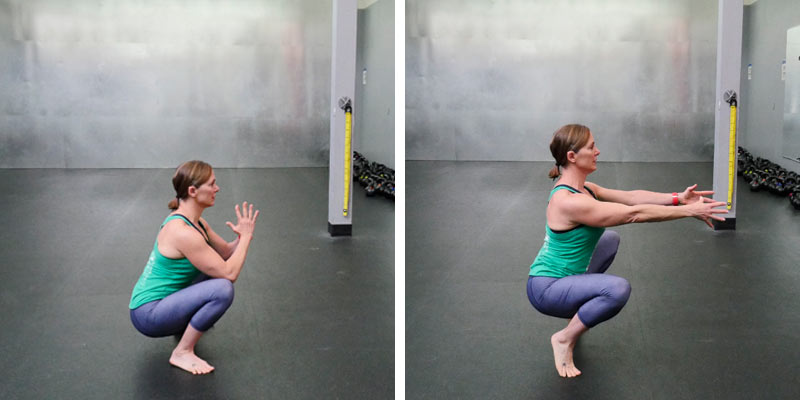
7. Deep Squat With Toe Balance 


Stand with the legs about shoulder-width apart. Root the feet into the ground and corkscrew the hips. Keep a stable torso and pull the tailbone toward the ground while keeping the weight in the heels. Squat between the knees. Hold the position at the bottom and lift the heels to balance on the toes. Keep the knees wide and the torso tall. Balance on the toes and then slowly rise up to the starting position. Repeat.

Thursday, 18 June 2015

Improve Your Strength and Performance With This 5 x 5 Workout


Figuring out how to safely and effectively challenge your clients while helping them to achieve the results they want can be tough. Here’s a technique from the former Soviet Union you might want to consider: lifting just five reps at a time.
The former Soviet Union had the best sports scientists in the world. In the 1950s and ‘60s, at a time when coaches in the U.S. did not want athletes to lift weights because it was feared it would make them slower, the Soviets conducted research that showed that a proper strength-training program could boost athletic performance. The Soviet system focused on developing maximal muscle tension to improve levels of strength. Lifts that involved large amounts of muscle mass to create the highest levels of tension helped athletes improve their strength, which, when combined with proper skills practice, can improve sport-specific performance.
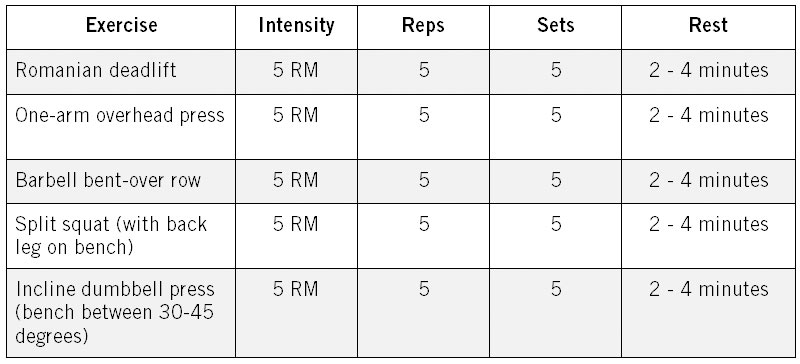
The Soviets pioneered many technical training techniques that can be difficult to replicate during a limited amount of exercise time. However, one technique that can easily be applied in less than an hour is doing exercises for only five repetitions at a time. To achieve the greatest benefits, the exercises should be compound movements involving large amounts of muscle mass, which is reflected in the workout below. The goal of each lift is to achieve the greatest amount of muscle tension possible. The Soviets were the first to recognize that using heavy loads to develop high levels of muscle tension involved recruiting more motor units and their attached muscle fibers, which led to strength gains. And, as a bonus, this technique also applies the science of muscle physiology to increase strength without significantly increasing muscle size.
Make sure that you have your clients perform a complete dynamic warm-up before starting this workout. For the best results, use a weight that is heavy enough to make the final rep extremely challenging, but it should not cause failure. In addition, resting for a second or two between each repetition allows maximal tension to be generated with each rep. Complete at least five sets of each exercise, with approximately two to four minutes of rest between sets to allow for optimal recovery. To save time, perform this workout as a circuit, with approximately two minutes of rest between each exercise.

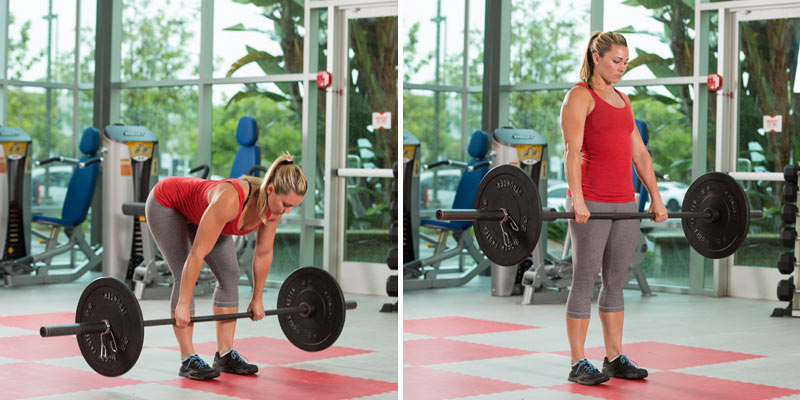
Romanian Deadlift

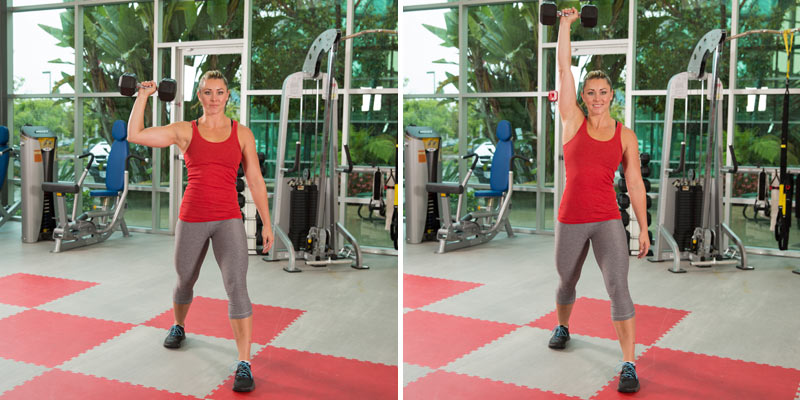
One-arm overhead press

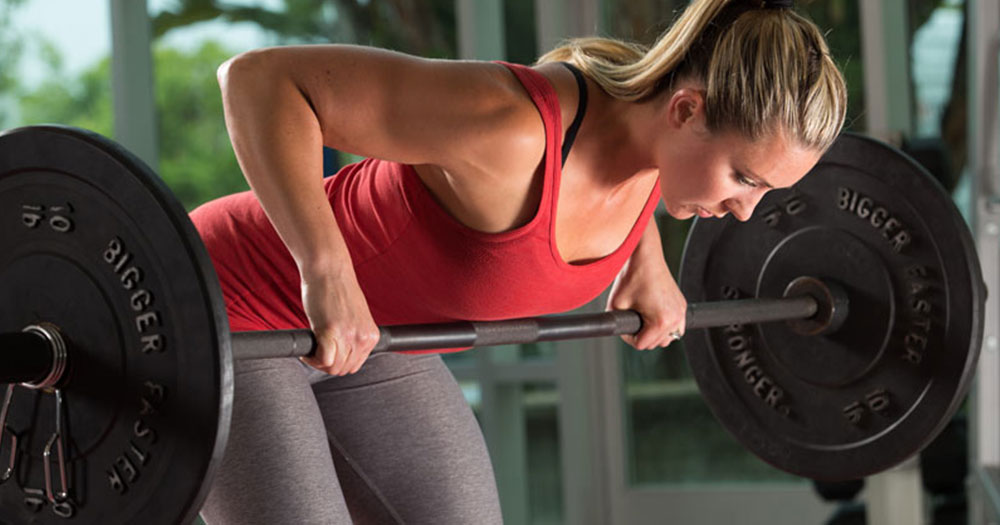
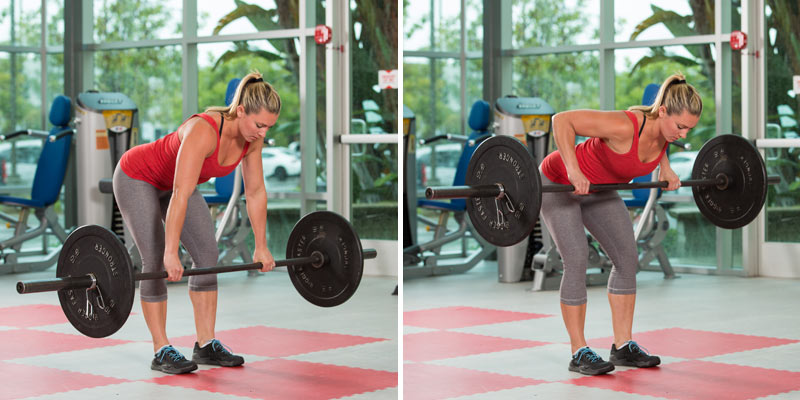
Barbell bent-over row

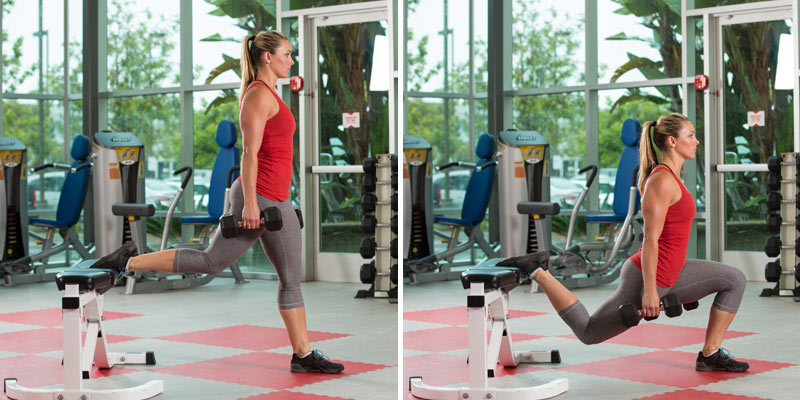
Split squat (with back leg on bench)

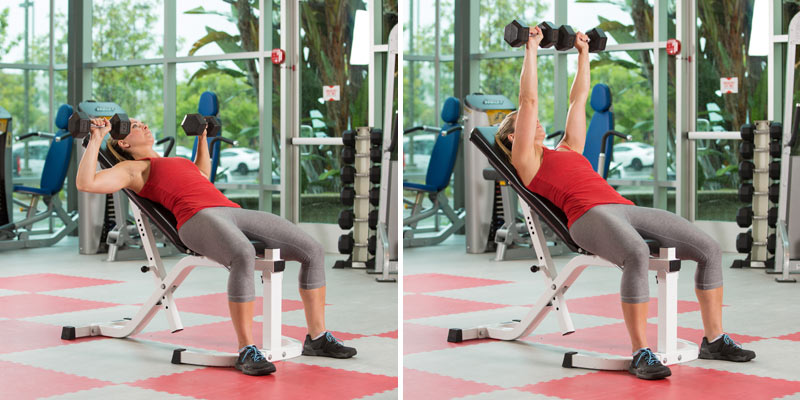
Include dumbbell press (bench between 30-45 degrees)

Sunday, 14 June 2015

Seven Exercises For A Hot Upper Body

Why Women Store Fat
If you've been grabbing the extra fat in your thighs and triceps and wondering where it came from, your hormones could hold the answer. Yup, that's right. Hormones. Estrogen could be responsible for packing the fat cells in the back of your arms and thighs.
Estrogen also plays an important role in building muscle mass, preventing heart disease, bone breakdown, and may even stimulate bone formation. We simply need the right level of estrogen to look and feel great.
If our estrogen levels get too high, we can suffer from a number of negative side effects including cyclical headaches, anxiety, breast tenderness, water retention, irregular bleeding, and weight gain. Unfortunately, a blood test is the only way to know what your hormone levels are but there are other ways to keep your estrogen under control. Increasing the amount of exercise you perform daily can significantly lower estrogen levels.

Total Body Fat Loss Is Key
Isolated movements such as tricep exercises can help build muscle, increase strength, and boost your metabolism. But, spot training isn't enough. If you want results, you need to do the right combination of exercises and lose fat from all over your body before worrying about those so called "problem areas".
To burn fat, your exercise program requires three basic elements:
Cardio Exercise -- Your fitness program should have the right combination of slow cardio and intense interval training.
Strength Training -- Your workout week should also include 3-5 days of strength training per week. It's impossible for a female to bulk up, unless she is intentionally doing so. This part of your fitness routine will tone your muscles, build up your strength, and increase your metabolism. You'll burn fat more efficiently and use the fat you take in through your diet more wisely.
Proper Nutrition -- Without proper nutrition you won't lose fat. Knowing what to eat and when to it it is crucial to achieving your goals.

Exercises To Get That Hot Upper Body
Tricep Dip -- This strength exercise targets your triceps, but it also works your anterior delts, pecs, and rhomboids. The triceps consist of three heads that run from your humerus and scapula to your forearm: the lateral, medial, and long head. The lateral head is found on the top of your arm. The medial head comes down your midline, and the long head runs along the bottom of your arm. These heads allow you to straighten your elbow, and they also work in conjunction with your latissimus dorsi to bring your arm toward your body.
To perform a tricep dip:
1. Position yourself in front of a bench, chair, dip bar, or a set of rings with your hands shoulder width apart.
2. With your legs bent and your feet hip-width apart, elevate yourself so your arms are straight and your elbows slightly bent. (This will keep the tension on your triceps, instead of the joints in your elbows.)
3. Keeping your back close to the support, lower your upper body to the floor by slowly bending your elbows into a 90-degree angle.
4. Continue the movement until you reach the bottom, before pushing yourself back into the starting position. Just be sure to avoid bending your neck or moving your ears close to your shoulders.

Strong, Sensuous Shoulders

If you want a hot upper body, you'll need to work your shoulders.

These usually aren't what women consider sexy, but they are vital! They're the start of the hourglass figure we fight so hard to achieve. But strong shoulders will give you more than just good looks.
When you're exercising your shoulders, you're helping fight the natural ageing process by keeping them strong and building bone density. You're also decreasing your chance of suffering a shoulder injury. Sadly, unlike males, women aren't born with naturally shapely shoulders, so we have to work at it.
Lateral Raises
To really give your delts a workout, try an exercise like the cable lateral raise. This movement focuses on your lateral delt, but it actually works all three.
To perform a lateral raise:
1. Stand with your feet shoulder-width apart and a dumbbell in each hand.
2. Slowly raise them level with your shoulders while keeping your hands in front of your hips and your wrists facing each other. Pause before returning your arms to the start position.
Lats and Traps
When you work your back, you're actually working the latissimus dorsi muscles, or "lats". They start at the top of the humerus and fan down your back to the vertebrae and pelvic girdle.
Your lats make it possible for you to lean back or sit straight. They give your body some stability, but they also allow you to pull your arm toward your pelvis and bring your body toward your arm (like during a chin-up, for example).
Your trapezius muscles, or "traps", run along your spinal column, from the base of the skull to your middle to lower back. Their function? To pull up, down, and towards the centre of your body. They also make it possible for you to shrug your shoulders, lower your shoulder blades,
and bring them together.
Pull-Ups
To get your traps and lats into shape, try pull-ups as a simple way to work a lot of muscles. In addition to working your lats and pectoralis major, pull-ups also work your posterior delts, traps, rhomboid, and your levator scapulae, as well as your teres major, pectoralis minor, and serratus anterior muscles. The biceps, rectus abdominis, erector spinae, transverse abdominis, and obliques are also involved.
To get started, try a standard chin-up. To perform one of these, use an underhand grip to pull your chest toward the bar. Once you've reached the top, hold the position. Then, lower your body into a dead hang.
When you're ready to move beyond a chin-up, switch to a pull-up by using an overhand grip. Then, there are several other variations you can try, including pulsating at the top of the movement or hanging onto the bar for as long as you can.

Importance of Chest Exercises

If you want to have a sexy upper body, you need to focus on the balance between your joints, tendons, target muscles, and their opposing muscles. Referred to as the planes of motion, this balance is a vital component for any quality exercise program. And if you want a strong upper body and back, you'll need to work your pectoral muscles.
The planes of motion is based on the fact that, even though you're working the target muscle (the agonist), you need to be working the opposite muscle (the antagonist) the same amount. If you're doing squats to work your quads, you'll also want to do exercises that work your hamstrings, calves, glutes, and lower back to avoid an imbalance. Hence, the need for chest exercises.
Your pectoral major muscles, or pecs, run from the humerus to the sternum and rib cage. And they work with your back muscles to pull your arm toward your body. Alone, they allow you to pull your arm forward.
Cable Flys
1. Step forward with your chest out and stomach tight to put resistance on your pecs.
2. Bend your elbow slightly and pull the cables toward each other in front of you by straightening your arms. Think of it like there's a stability ball on your chest and you're pulling the cables around the ball.
3. Once you've reached the top of the movement, pause, and return to the starting position.

Sexy Six-Pack Abs
Everyone wants the gorgeous ¬‚at stomach and the famous six-pack. But these stunning 'bumps' aren't separate muscles. They're two muscles called your 'rectus abdominis', and they're found between your ribs and pubic bone, joined in the centre by the linea alba.
It's these muscles that move the trunk of your body, ¬‚ex your spine during movements such as a crunch, and bring your pelvis to your ribcage during leg-hip raises or posterior pelvic tilts. They do more than just help you move, however.
Your rectus abdominis helps

 Source