Showing posts with label core-strengthening. Show all posts

Saturday, 10 October 2015

30 Minute Intermediate Full Body Workout

Ladies, what do you think about this 30 mins full body workout? Honestly I feel so much better after this workout.

30 Minute Full Body Workout with Rebecca Louise in full HD # 2 (no music
version). Shape up your abs, legs, butt, and strengthen your core with
this great routine. This workout burns 221 - 303 calories.

Thursday, 19 February 2015

3 TRX Flows That Will Increase Your Flexibility, Strength and Mobility

Flow is a concept commonly associated with yoga, but have you ever tried sequencing non-yoga-based strength, balance and flexibility moves all together, without any breaks or pauses? The following flow routine featuring the TRX Suspension Trainer is a great way to harness the benefits of flow, with its balance challenges and constant movement, while also targeting flexibility, strength and mobility. Each of these movements is relatively simple, but when performed slowly and with control, they combine to create a unique and challenging workout that your clients and class participants are sure to love.
Note: Each of these sequences requires thoughtful movement and great body awareness. Help your participants focus on what is happening to their bodies as they work through the flow. Does their core want to disengage because the strength of a single leg movement is too tough? Are they compensating a lift of the leg because of mobility and flexibility challenges? These types of questions will help your clients begin to notice how their bodies cheat movement. Until they feel it, they can’t make the appropriate adjustments. These flows can assist in exposing the areas where the body compensates for imbalances or weaknesses.
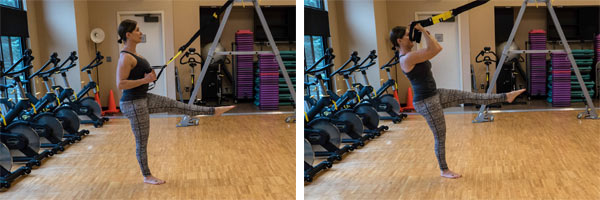
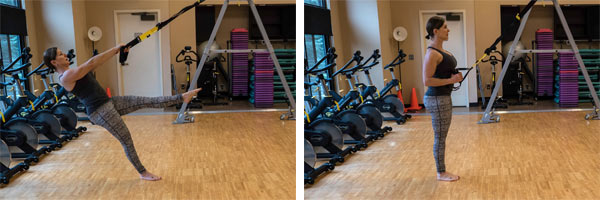
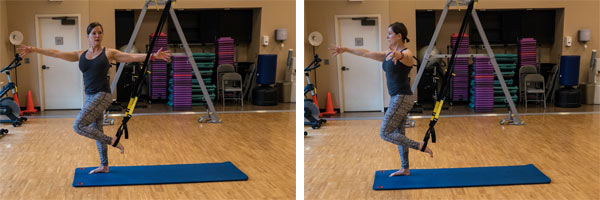
1. Core Flow
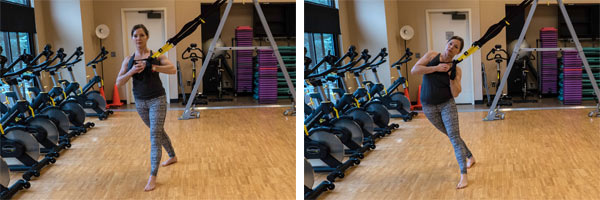
TRX Flow

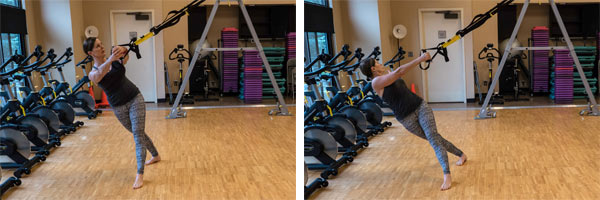
TRX Flow

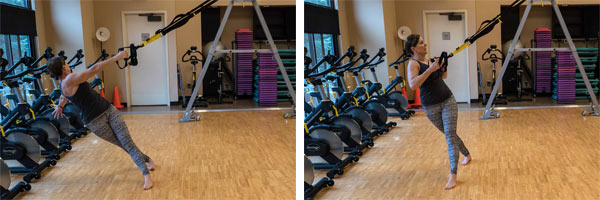
TRX Flow

This sequence uses eccentric loading of the side body, core stabilization, rotation, thoracic opening, single-leg balance and strength.
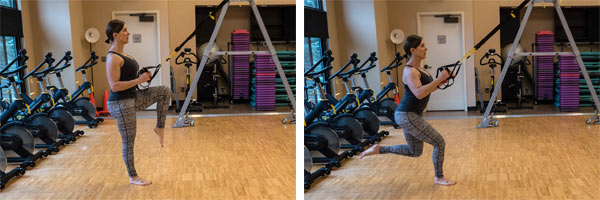
Adjust the TRX Suspension Trainer to mid-length; stand sideways on the left side of the anchor. Stand in an off-set position, hip in line to anchor. Put the handles in single-handle mode and hold in front of the sternum. Maintain good posture, with shoulders down, ribs in, body in a straight line and eyes at the horizon. Lower to your edge and raise back up. Press the handle straight out from the sternum, maintaining tension on the straps and keeping the arms straight. Bring the arms toward the anchor, being sure to keep the body in plank position without any sagging. As you reach the center, release the right arm and reach toward the floor, opening the chest and maintaining strong hips and legs. Raise back up, grab the handle and pull the body into a row position, bringing the handles back to the sternum. Rotate back to sideways, extend the right leg in front and lower to a squat. Raise back up, holding on one leg with the right leg extended and straight, before lowering the leg back to the starting position. Repeat the entire sequence on the other side.
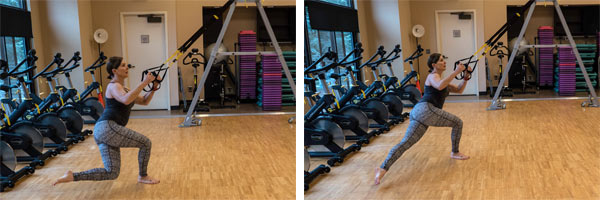
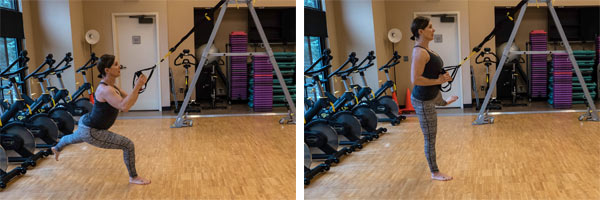
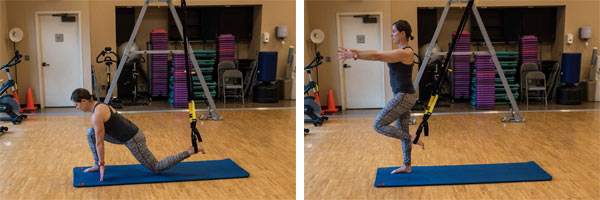
2. Crossing Lunge Flow
TRX Flow

TRX Flow

TRX Flow

TRX Flow

TRX Flow

This flow challenges upper- and lower-body strength and mobility.
Adjust the TRX Suspension Trainer to mid-length. Stand facing the anchor point, holding the handles with palms facing each other and the elbows under the shoulders. Center the right leg to the anchor point and lift the left leg with the knee bent. Lower the tailbone toward the floor into a single-leg lunge position. Drive the knee behind the right leg, keeping a 90-degree bend in the knee. Extend the leg from this position and circle it behind the body and toward the left side of the body. Keep the leg straight and abducted, with the foot flexed and the toes and knee facing strength ahead. Extend the right leg to stand as you bring the left leg to the front. Be sure to keep the torso lifted and the core strong, being careful not to lean to the side or the back. Bring the arms up, elbows in line with the shoulders, and the palms facing away from your face. Extend the arms and curl back to the starting position.
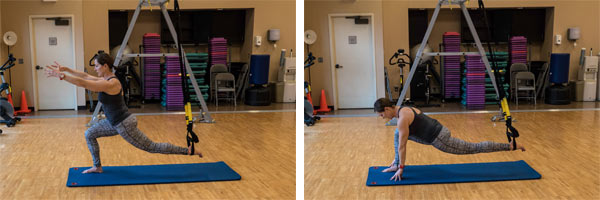
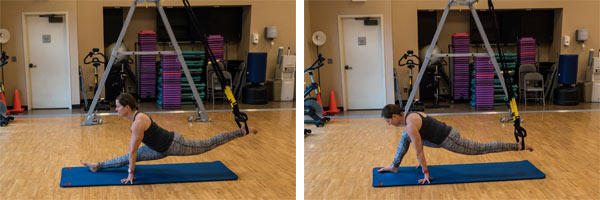
3. Lunge to Stand Flow 
TRX Flow

TRX Flow

TRX Flow

TRX Flow

TRX Flow

TRX Flow

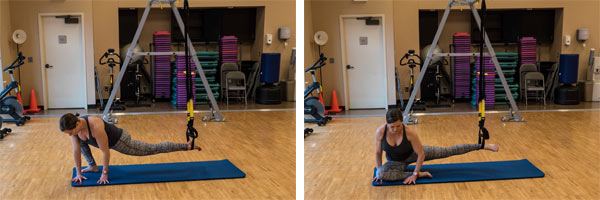
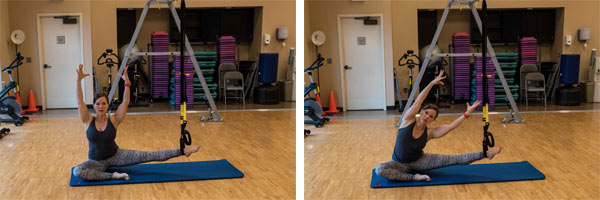
This sequence challenges flexibility, mobility and strength through hips, legs, ankles and thoracic spine. 
Adjust the TRX Suspension Trainer to mid-calf. Face away from the anchor and place the left foot in the foot cradle and assume a runner’s lunge position. Keep the chest lifted, spine tall and the left glute engaged. Hinge the hips back, keeping the right leg straight and the spine long. Using your right leg, pull forward and then press up to stand. Maintain tension on the straps by keeping the left leg weighted in the straps. As you come to stand, extend the arms out from the chest to about shoulder-width apart. Keep the shoulders down and the ribs in while maintaining strong arms and core. Keep the right arm straight as you begin to move the left arm toward the back wall, rotating toward the left and following your arm with your eyes. Your arms should be in a T formation. Bring the left arm back to the front and extend the left leg behind you. With the spine tall, lower the knee toward the floor. Once you reach 90 degrees, reach the arms toward the floor to extend the back. Keep the right heel in place as you continue pressing the body back until both legs are straight in a split. Pull the body forward, using fingertips, if needed. Lift the right foot and pivot the body, while bending the knee to face the left side of the anchor. Extend arms overhead and reach toward the anchor and bring the torso back to an upright position. Repeat on the other side.

Friday, 23 January 2015

4 Core Movements for Beginners

Are you just getting started with a fitness routine and aren’t sure how to train your core? Here are a few basic core movements for beginners, with advanced options that can be done once you’ve mastered the basic exercises.

Modified Plank
Modified plank

Lie on your stomach on an exercise mat or floor with your elbows close to your sides and directly under your shoulders, palms down and fingers facing forward. Engage your abdominal/core muscles. It should feel like you are tightening a corset around your ribs, waist and lower torso.
Once your core is engaged, slowly lift your torso and the upper part of your thighs off of the mat, while the knees remain on the floor. Do not allow the lower back to sag or the hips to lift up in the air. Your shoulders should remain away from the ears. If wrist pain is an issue, drop to your elbows. Try holding this position a couple of times while continuing to breathe and maintain good form.
Try this position before moving into a full plank so you understand the concept of how to engage your core. This will also give you a sense of how strong your arms are as you hold yourself up in a plank position.
Advanced: Begin in full plank position and place a small weightless ball under your rib cage. This will keep your body position accountable while you attempt to lift the opposite leg and arm simultaneously; repeat on the other side.

Modified Side Plank
Modified side plank

Lie on your side with your knees bent and stacked on each other; do your best to keep a straight line from the top of your head to your knees. Engage your core muscles (as discussed in the plank exercise) and slowly lift your torso, supporting yourself with your forearm directly under your shoulder.
Try this position before moving into a full side plank so you understand the concept of how to engage your core. This will also give you a sense of how strong your arms are as you hold yourself up in a plank position.
Advanced: Do a forearm plank with your legs on top of a stability ball. One leg at a time, drive your knee into the stability ball to make the surface unstable.

Reverse Crunch
reverse crunch

Lie on you back with your knees bent to 90 degrees and your core muscles engaged. Place your arms out to the side with palms facing down. Keep your knees directly above the hips at 90 degrees and slowly drop your legs toward the floor. Once you feel loss of core control and/or your back start to arch, bring the legs back to the starting position and repeat the exercise. Do not move your upper body or your head during this exercise. Depending on your level of core strength, this movement could be very small. The stronger your core becomes, the lower you will be able to drop your legs.
Advanced: Lie on your back with your legs at 90 degrees and place a small weightless ball on your shins. Do not hold the ball with your legs or let it sink down toward your ankles. Lift your torso up off the ground and twist to the right and the left.

Bird Dog
bird dog

Place a mat on the floor and come on to all fours with your hands and knees on the ground. Your hands should be directly under your shoulders (fingers facing forward) and your knees should be underneath your hips. Keep a straight line from the top of the head to the hips and engage your core as you extend the opposite arm and leg simultaneously. Place your hand and knee back on the ground and repeat the extension movement on the same side. To protect the lower back, don’t allow the arms and legs to extend up past hip height. Always keep your core engaged and your spine in a neutral position. Once you have completed one side, move to the other side, keeping your movements as controlled and fluid as possible.

Advanced: Continue with the same movement, but abduct the arm and leg (moving it away from the midline of the body) while trying to remain balanced.

Source

Saturday, 17 January 2015

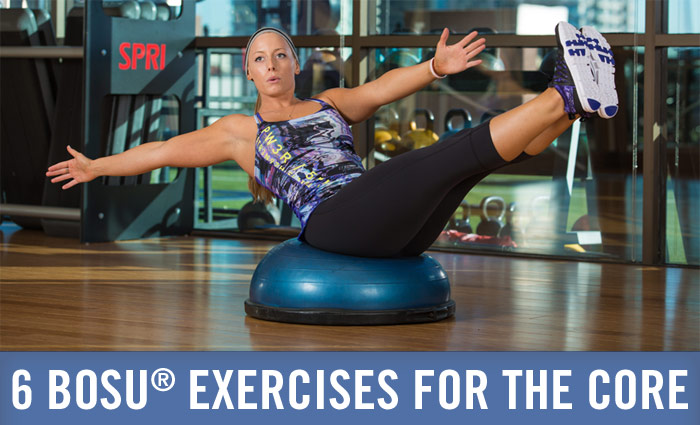
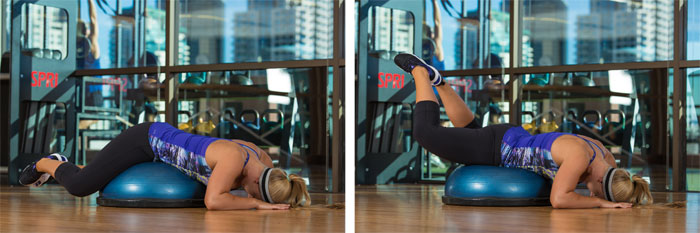
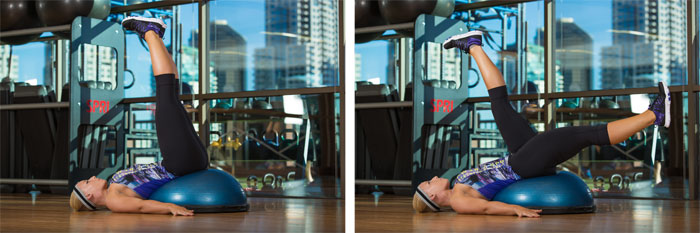
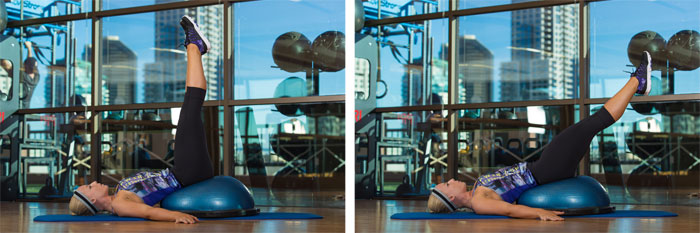
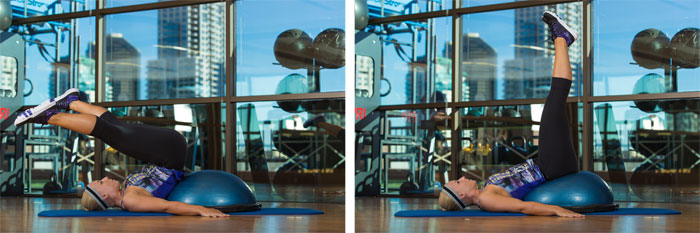
6 BOSU Exercises for the Core

BOSU Core exercises


The BOSU—which stands for both sides up—is a unique piece of fitness equipment that allows you to perform exercises on top of an unstable surface. Among its many benefits include the ability to make exercises easier or more challenging. Here are six great core exercises that will add variety to your current exercise routine. Perform each exercise for 10-12 repetitions.
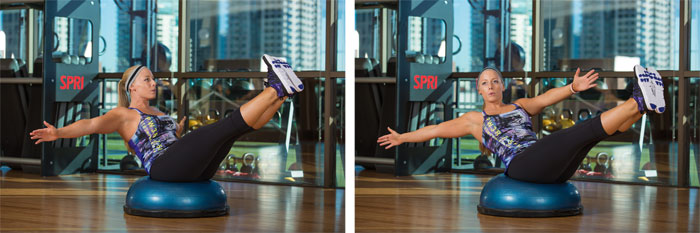
Saw
Saw
Place the flat side of the BOSU on the floor and sit on top of the dome side. Extend the legs, hip-distance apart, and flex the feet. Inhale and extend your arms out to the side, palms facing forward; draw in the abdominals. Exhale and rotate the spine toward the left leg, reaching the right hand toward the left foot. Inhale and slowly, with control, exhale and return to the starting position. Continue to alternate reaching toward the right and left leg.
Frogs
Frogs
Lie face down on the BOSU, with your hips toward the top’s center. Place your forearms on the floor at a diagonal; bring your fingertips together and rest your forehead on your hands. Contract your glutes and lift your legs upward, contracting the abdominals and bringing the heels and inner arches of your feet together. Inhale and lower the legs. Complete six repetitions.
Scissors
Scissors
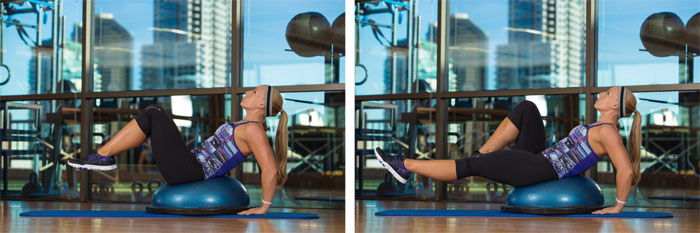
Sit on top of the dome and slowly lean back onto your forearms to rest your head, neck and shoulder blades on the floor. Your hips should be propped on top of the dome. Slowly lift your feet off the floor, extend your legs to the ceiling and point your toes. Inhale and externally rotate from the hips, reaching the right leg away and the left leg toward your torso. When your legs are fully extended, add a slight pulse. Inhale and return to center; exhale and repeat with the left leg moving away and the right leg coming toward your torso. Continue to repeat right and left.
Rollover
Rollover
Rollover
Sit on top of the dome and slowly lean back onto your forearms to rest your head, neck and shoulder blades on the floor. Your hips should be propped on top of the dome. Slowly lift your feet off the floor, extend your legs to the ceiling and point your toes. Exhale and lower your legs away from the body while maintaining core and inner thigh stabilization. Inhale and draw the legs back over your torso or head (your hips will lift off the dome). Exhale and, with control, flex your feet and slightly split the legs. Slowly lower the spine and hips back onto the dome. Once your legs are directly over the dome, bring the feet together and point the toes. Complete six to eight repetitions.
Single-leg Stretch
Single leg stretch
Sit with your hips slightly forward on the dome. Roll back so that your spine is on top of the dome and your body is in a neutral balanced position (your head and neck are not on the dome). Place one hand on the floor and the other hand behind the head. Lift and bend the knees to 90-degrees. Exhale and extend the right leg long; inhale and return to center. Exhale and extend the left leg long; inhale and return to center. Continue for six repetitions on each side.
Double BOSU Plank With Leg Pull
BOSU Plank
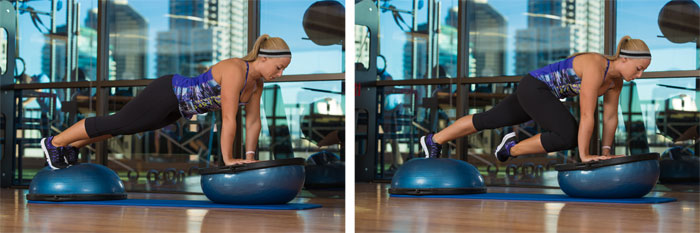
Position two BOSUs, dome side up, on the floor. Assume a plank position with your toes on one dome and your hands on the other.  If two domes are not available, place your hands on the floor. You can also place one BOSU with the dome side down and use this one for your hands. Inhale and contract the muscles of the core. Transfer your weight on to your right foot and bring your left knee in toward the dome. Return to center and repeat with the other leg. Alternate left and right for 12 total repetitions.

Source

Wednesday, 17 December 2014

8 Exercises Every Woman Should Be Doing

Strength training is an important part of improving your overall fitness, and for women, it can mean much more. In addition to numerous health benefits, adding weights to your routine can become a form of personal development that builds strength in all areas of life. The purpose of this campaign is to celebrate strength training and the strength of all women, no matter their size or life circumstance.

There are many reasons why women should regularly hit the weights, and the following exercises capitalize on those benefits. So get the girls together and try these female-friendly moves the next time you head to the gym.
LATERAL LUNGES
Why? Because women have wider hips than men, most of us have a wider “Q-Angle,” which puts us at increased risk for ACL injuries. Lateral lunges and other lateral movements help strengthen and stabilize the hips, thus decreasing the risk of injury to the knees.
How: Begin with feet in a narrow stance and then step to the right side, keeping the right foot pointing forward and the knee in alignment over the foot. Sink the right hip down and back while keeping the left leg straight. Squeeze through the hips for stability and bring the left leg in and step together.
Options: This move can be done traveling (i.e., moving across the room) or stationary (i.e., staying in the same spot while alternating sides). It can also be loaded with a medicine ball or unloaded with a TRX Suspension Trainer.
KETTLEBELL SINGLE-ARM SQUAT PUSH-PRESS
Why? Having strong shoulders and the strength and power to put a heavy object overhead is no longer just a man’s job. This functional move helps you gain upper-body strength and power so that you don’t have to ask for help.
How: Begin by holding a medium-weight kettlebell in your right hand next to your chest with the palm facing inward. Drop your hips down and back, then drive through your glutes and return to standing while thrusting the kettlebell into the air. Slowly return the kettlebell to your chest and repeat.

Options: This move can also be done with a dumbbell (with a modified starting position). Also, ensure you have proper squat form before adding a load and speed to it.
TRX LOW ROW

Why: Strengthening the muscles of the upper back helps improve posture, which leads to decreased risk of injury, better power transfer, and taller and more confident aesthetics.

How: Fully shorten your TRX Suspension Trainer and stand facing the anchor point. Keeping the body perfectly planked, walk under to an angle that is safe, yet challenging. Begin the row by retracting and depressing your shoulder blades and then follow through by pulling your body to your wrists, with wrists facing inward; don’t lose your plank.
Options: Can also be done under a Smith machine bar at varied heights.
PULL-UPS

Why: With higher levels of estrogen, women have the benefit of building shape through strength training without the extra bulk. Pull-ups strengthen and tone the back, which leads to a smaller-looking waist.
How: Begin your pull-ups in an assisted pull-up machine. Using an overhand and shoulder-width grip, contract your outer back muscles and lift your chin to your hands. Keep the body straight and tight as you lower down to the starting position with control.

Options: When enough strength has been established, try this movement on a pull-up bar with no assistance, but be careful not to swing or arch.
WALKING LUNGES


Why? Women make fantastic athletes and this functional exercise that targets the hip and knee extensors should be included in every athlete’s repertoire.
How: Step forward into your lunge stance, ensuring the front knee tracks just over the middle toes and both knees bend to 90 degrees. Keep the hips tight and shoulders down and back as you step together with the other leg.
Options: Perform standing body-weight lunges or unloaded lunges with a TRX Suspension Trainer.
BALL ROLLOUT

Why? This version of a plank helps realign and strengthen the spine, especially after giving birth. The instability of the ball leads to a full-body strengthening and stabilization from the shoulders all the way to the ankles.
How: Begin with your forearms on top of a Swiss Ball and knees on the ground. Keep the shoulders, hips and knees in a perfectly straight line and roll the elbows forward on the ball a few inches and return. As you progress, this movement can be done with your knees off of the ground, with your shoulders, hips and heels in alignment.
Option: If your hips are sagging during this movement, move your plank to the ground until you have gained enough strength to advance to an unstable environment.
RIP PUNCH

Why? Punching feels GREAT! And adding resistance helps improve posture, supports the back and helps us rotate safely for sport and life.
How? Hold the TRX Rip Trainer with both hands palm down in zones 1 (the end of the bar) and 4 (three-quarters of the way down the bar). Begin in the end range of motion with the punching arm fully extended and back leg pivoted. Slowly release the punching arm and then simultaneously pivot the back foot and push and pull with the upper body to punch with power!
Options: Before beginning this exercise, master proper punch mechanics off of the Rip Trainer. The grip on the bar can be varied to increase or decrease difficulty.
SQUATS

Why? Let’s face it. You want a better butt. The answer? Squats. And for those of you are quite satisfied with your hind quarters, squats, like lateral lunges, build strength to protect your knees and help you become the best athlete you can be!

How: With your feet slightly wider than hip-width apart, lower your hips down and back, keeping the back angle and shin angle parallel. Choose a depth that is safe for your knees and hips, yet still challenging (this will vary from person to person). Engage your glutes and drive up from the floor.
Options: Squats do not need to be loaded immediately. Begin mastering your squat form with just your body weight or even unloading your weight using a TRX Suspension Trainer.
Of course, all movement is important for women and exercises should be regressed or progressed as appropriate for the person. By adding any resistance training to our workout regimen, we will have stronger bones, feel better and move better for longer—leading to a much more fulfilling life. Now go add some estrogen to that weight room! 

Tuesday, 9 December 2014

Core-strengthening Stability Ball Workout

The stability ball was originally used as a physical therapy aid for postural re-education and orthopedic rehabilitation. Today, you can find these large, air-filled balls in a variety of sizes in just about any fitness setting. They are used by exercise professionals in personal training and group fitness as a way to add interest and fun to core and stability-based workouts. Although stability-ball exercises appear to activate about as much deep abdominal muscle as similar movements on the floor without a ball (Martuscello et al., 2013), they can add value to a training session when you’re looking for variety and whole-body integration while working the core.


The following workout circuit on a stability ball adds a new twist to your ab routine. Perform 10 to 15 repetitions of each exercise, and do the circuit more than once if you want more challenge. Choose a ball size that allows you to sit comfortably on top with your feet flat on the floor, thighs parallel to the floor, and both hips and knees bent at 90 degrees. Keep in mind that to work the entire mid-section, it’s important to challenge the torso from various directions. That is, there is more to a balanced core program than just performing crunches or sit-ups. The following routine features movements that address the entire functionality of the trunk muscles—flexion, extension, side bending and rotation.
Note: Only attempt this workout if you have had previous experience using a stability ball and feel confident moving on the ball in all of the positions shown.
1. Ab Crunch With Diagonal Press
ab crunch with diagonal press
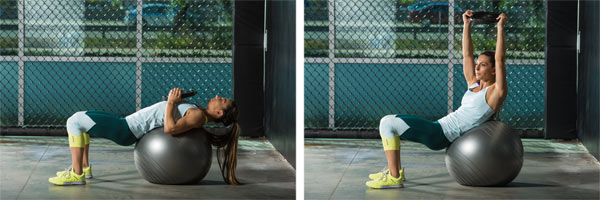
Grasp one, small weight (e.g., a 5-, 8- or 10-pound dumbbell, plate weight or medicine ball) with both hands. Sit on top of the ball and walk the feet forward until your back is supported by the ball. Start with the weight on the chest. As you come up into an ab crunch, straighten the elbows and push the weight at a diagonal away from you toward the ceiling. As you return to the start position, bend the elbows and bring the weight back down to the chest.
2. Back Extension Over Ball
back extension over ball


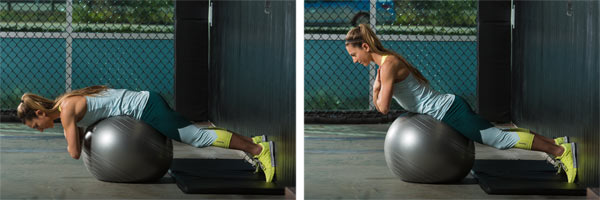
On an exercise mat, kneel with your back to a wall and position your feet against the wall. Lean over the ball and position it underneath your abdomen. Slowly straighten your knees as you lean over the ball, which will effectively put the ball under your hips. You should be leaning over the ball with the upper half of your body unsupported, while your hips and thighs are supported by the ball and your feet are support by the wall. Keep your abdominals contracted and your glutes tight and cross your arms over your chest. Slowly lower and lift your torso to work the trunk extensor muscles.
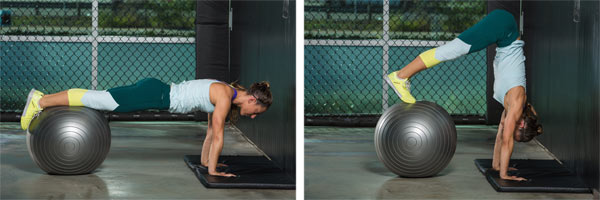
3. Pike on Ball
pike on ball

Adopt a plank position with your hands on the floor aligned underneath the shoulders and your thighs on top of the ball. Position yourself with your head toward a wall that is strong enough to hold your weight in case you lose your balance and need back support from the wall (this will prevent you from rolling forward into a summersault). Slowly roll the ball toward your body as you lift the hips upward into a pike position. If you feel comfortable in a handstand, align the hips above the head in the end position so that you are essentially upside down. However, if you are unsure of your ability, only bring the hips upward as high as you feel confident and stable. Slowly roll the ball back out to the start position.
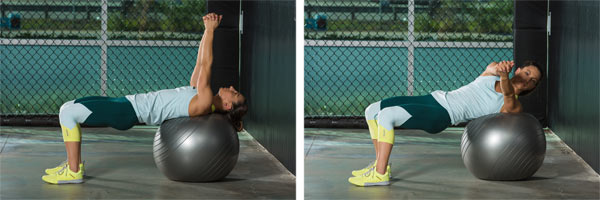
4. Supine Twist on Ball
supine twist on ball

Sit on top of the ball and walk the feet forward until your back and head are supported by the ball. Clasp your hands together and straighten your arms up toward the ceiling. Keep the feet hip-width apart and the head, neck and hips in a straight line from your head to your knees. Slowly rotate your upper trunk to one side and then the other while keeping the pelvis in place.
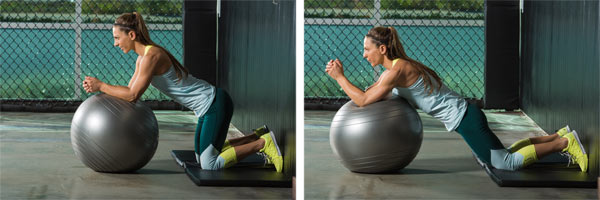
5. Kneeling Plank Roll-out
kneeling plank roll out

On an exercise mat, kneel in front of the ball with your knees about 12 inches from the ball and lean on your forearms so that your shoulders are directly above your elbows. Gently contract the abdominals and slowly straighten your arms as you push down into the ball to move it forward. Roll out the ball as far forward as you can, but stop if your hips start to sag. Return to the starting position, keeping the abdominals engaged throughout the exercise.
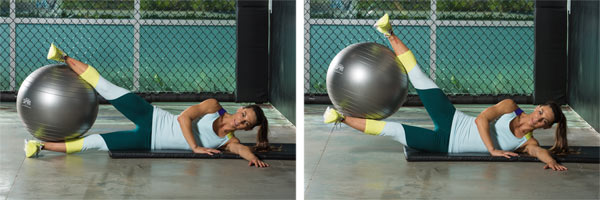
6. Side-lying Leg Lift
side-lying leg lift

On an exercise mat, lie on one side with your bottom arm outstretched in front of your chest and your palm facing the floor for support. Trap the ball between your feet and shins. Slowly lift the bottom leg off of the floor while keeping your torso stable and on the floor. Return to the start position with the leg on the floor. Complete all of the repetitions on one side before moving on to the next.

Source