Showing posts with label stability. Show all posts

Wednesday, 15 July 2015

6 Exercises for a Stronger Core

Your core consists of the muscles that stabilize the spine and hips, and includes all the muscles of the abdomen, back, glutes and upper legs. A strong core helps protect the entire midsection, and enhances both mobility and stability, which, in turn, improves movement efficiency and keeps the muscles functioning in coordination with one another. This, of course, helps improve balance, posture and strength.
A common misconception is that doing exercises while lying supine automatically increases core strength. While these exercises can help improve abdominal strength, the entire core must be challenged to help improve total-body function. A better approach is to use a variety of stances, such as single-leg, supine and prone, to incorporate a wide range of movements. Here are a few of the best exercises to challenge the entire core.

Glute Bridges
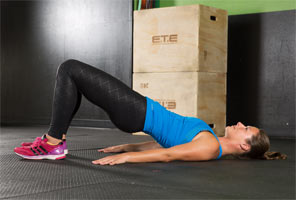

While many consider the abdominal muscles to be the most important for increasing stabilization, strong glutes are essential as well. Many injuries and faulty movement patterns are a result of underactive glutes and overactive quads and hip flexors. To combat this, activate and fire those glutes before workouts to make sure they are turned on and ready to work.
Lie supine on the floor with knees bent and both feet flat on the floor. Keep the head relaxed and slowly push through the heels to raise the hips as high as possible. The knees, hips and shoulders should be in one straight line. This exercise activates the glutes and hamstrings, and stretches the hip flexors, which are often overactive and tight. Hold the top position for three seconds and slowly lower. Do eight to 10 reps per side. To progress this exercise, try one leg at a time or place the feet on the round side of a BOSU.

Medicine Ball Single-leg Reach
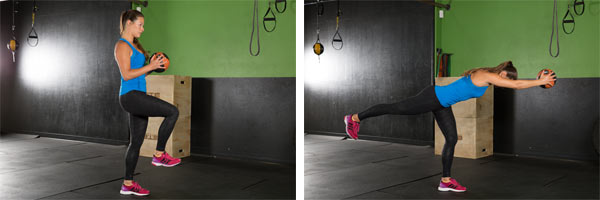

Disguised as a leg workout, this move is great for the glutes, hips, back and abs. Grab a 5- to 10-pound medicine ball and stand on the right leg. Slowly reach forward while hinging at the hips (not the back). Simultaneously lever the back leg out behind the body. Reach as far as possible—work toward bringing the arms, torso, and left leg horizontal to the floor. As the core gets stronger, increase the weight of the medicine ball. Perform two to three sets of eight to 10 repetitions per leg.

BOSU Plank Variations
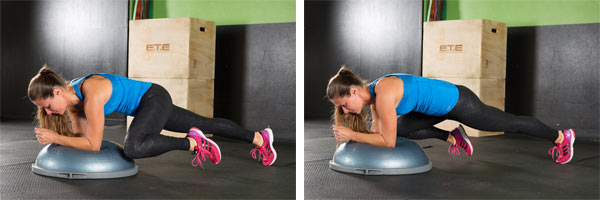

Before attempting planks on the BOSU, make sure your client has impeccable plank form and can hold it for at least 30 seconds on the floor before attempting advanced variations. Planks are meant to strengthen the core, so if your client’s form wavers too much (back sinks, arches or bends), have him or her practice a little longer before advancing.
Start with the elbows on the round top of the BOSU. This creates an element of instability that must be controlled throughout the exercise. Perform a plank for 30 seconds. Begin adding small, alternating single-leg lifts, focusing on lifting the leg with the glutes and not shifting the hips at all. Next, try bringing one leg out about 45 degrees to the side, tapping the toe to the ground and returning to plank position. Perform five repetitions on each leg. Finally, try bringing the left knee out to the side, and tapping it to the BOSU just outside the left elbow. Repeat five times per leg. To regress these variations, perform them on the floor or on a flat bench before moving to the BOSU

Medicine Ball Single-leg Woodchop
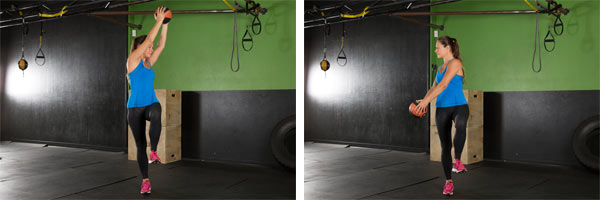

Grab a 5- to 10-pound medicine ball and stand on the right leg. Raise the medicine ball overhead, slightly over the left shoulder. Swing it down quickly, but with control, to the outside of the right leg. Try to keep the torso upright, with a constant slight bend in the right leg. Slowly bring it back up to starting position and repeat eight to 10 times. To regress this exercise, start on two legs and gradually progress to standing on one leg.

TRX Pike


Place the toes in the foot cradles and lie prone on the floor, ready to plank. Push up into a high plank on the hands, establishing perfect form. Keeping the legs straight, push the hips straight up into the air while simultaneously pulling the TRX toward the hands. Slowly lower back down to finish in plank position. Complete eight reps to start, gradually increasing to 15 reps as core strength improves. To regress this exercise, bend the knees to pull the TRX toward the hands.

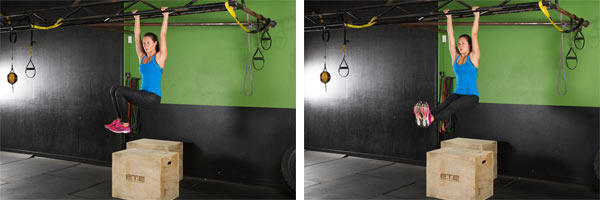
Hanging Leg Lowers
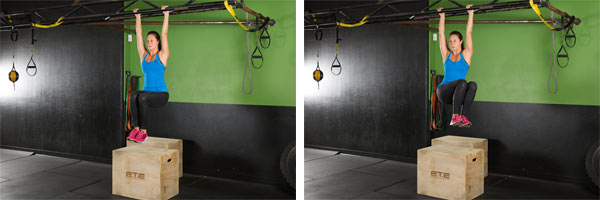


Exercises in which the legs are unsupported are a great way to work the deep abdominal muscles and the hip stabilizers. However, these exercises are not recommended for individuals with diagnosed lower-back pain.

If your client is a beginner, start this exercise using a Captain’s Chair. Once the client has developed a good strength base, progress to ab straps or hanging from the hands. Start with the knees bent, and lift them slowly as high possible, pulling the knees to the chest. Instead of focusing exclusively on the upward movement, think about the slow downward movement. Take about five seconds to slowly lower the legs back down to the starting position. This eccentrically works the deep abdominals, providing control and stabilization, while also preventing swinging. Repeat eight to 10 times. To progress this exercise, slightly twist the knees to the left and right to challenge the obliques. Additionally, try keeping the legs straight but only raise them as high as possible while maintaining straight knees. Again, focus on the slow lowering motion.

Source

Thursday, 25 June 2015

10 Things to Know About Muscle Fibers


Toning up, or improving muscle definition, is one of the most common goals of individuals starting an exercise program. The term tone comes from “tonus,” which is the technical term for a state of contraction of a muscle fiber. If all of the fibers within a muscle contract, it creates the shape commonly associated with a well-defined muscle.
The primary purpose of muscle fibers is to control physical forces moving through the body. Muscle-shortening actions can generate a force to move a resistance; for example, when moving from a seated to a standing position, the quadriceps and gluteus maximus shorten to help the body stand up against gravity. Muscle-lengthening actions can be applied to control and decelerate a force; for example, the quadriceps and glutes lengthen to control the motion of the body as it returns to a seated position. If you are interested in designing exercise programs that produce results, it is important to have a good understanding of how muscle fibers work and respond to exercise.
To more effectively help your clients achieve their fitness goals, keep in mind these important facts about muscle fibers and how they are affected by exercise:
1. Muscle fibers adapt to the specific type of exercise stimulus imposed during training. Mechanical stress refers to the physical stresses applied during resistance training, which cause microtrauma to muscle fibers. As fibers are damaged from exercise, they signal the biochemical reaction to produce new satellite cells responsible for repairing the mechanical structure of the muscle cell and for building new muscle proteins.
2. Muscle fibers are activated by a motor neuron, which is the connection between the central nervous system and the specific muscle required to perform a particular activity. A muscle motor unit is the motor neuron and the attached muscle fibers. Think of a motor unit as a light switch for the muscle—as a muscle is required to generate a force, the motor units will “light up” to stimulate the fibers to shorten in order to produce that force. There are a number of different muscle unit types, which are typically organized into three general categories: type I, type IIA and type IIB
3. According to the all-or-none theory, a motor unit is either active or inactive. When it is signaled to contract, it activates all of its attached muscle fibers. Slow-twitch motor units have a low threshold for activation and low conduction velocities, and are attached to type I muscle fibers. Fast-twitch motor units have a higher activation threshold, are attached to type II muscle fibers and are capable of conducting signals at higher velocities, resulting in greater amounts of muscle force.
4. Type I fibers are known as aerobic fibers. These fibers have a higher density of mitochondria, which are efficient at aerobic metabolism (the process of creating energy to fuel muscle activity with oxygen). The mitochondria give the cell a darker color, which is why these are known as red muscle fibers. Type I fibers use oxygen to create energy for lower-intensity, long-term, endurance-oriented activities like walking, running, swimming, cycling or standing for extended periods of time.
5. Type IIB fibers are known as anaerobic muscle fibers. Type IIB fibers store energy that is released for short, explosive, extremely high-intensity activities. Type IIB fibers do not have mitochondria and have a colorless appearance, which is why they are known as white fibers. Because they have a limited supply of stored energy, and thus fatigue quickly, Type IIB fibers are used for strength and power activities requiring a high amount of force in a short period of time.
6. Type IIA fibers have mitochondria, so they can be involved in aerobic activities; however, they can also be used to produce force rapidly during activities requiring a high amount of strength or power. Fast-twitch muscle fibers also have a greater diameter than type I fibers and play a more significant role in hypertrophy (the technical term for muscle growth). Recruiting and innervating type II muscle fibers requires creating enough mechanical overload to fatigue the involved muscle by the end of the set
7. Muscle fibers work according to the size principle. As a muscle requires force, it will start by activating the smaller type I motor units. When these type I motor units can’t provide the necessary force (or fatigue), the larger type II motor units and muscle fibers are recruited to perform the work. A muscle has a finite number of motor units and the higher-threshold type II motor units are not “turned on” unless a high level of force is needed. The most common way to increase motor unit activation is to lift heavier weights, because an increased load placed on a muscle will cause a greater number of motor units to activate more fibers to generate the force necessary to overcome the resistance. This is why your muscles shake when you try to lift a heavy weight for the first time—muscle motor units not previously used are being “woken up” and called into action.
8. Muscle fibers experience two specific types of hypertrophy. Myofibrillar hypertrophy refers to the increase in size or thickness of individual actin and myosin protein filaments, which can improve the force-production capacity of individual fibers. Myofibrillar hypertrophy does not lead to larger muscles; rather, it results in thicker muscle fibers capable of generating more force. Sarcoplasmic hypertrophy is an increase in the volume of the semifluid interfibrillar substance surrounding an individual muscle fiber. This fluid contains the proteins used to promote tissue repair and growth. The muscle “pump” that bodybuilders work to achieve is actually sarcoplasmic hypertrophy—the cross-section of muscle fibers will increase, but most of the enhanced muscle size is due to an increased volume of the sarcoplasm and non-contractile proteins not directly involved with force production.
9. One of the long-term adaptations of muscle to resistance training is an increase in muscle fiber cross-width. As the cross-sectional area increases in size, the fibers have more surface tension and become capable of generating higher amounts of force. Muscles with a larger cross-sectional area of individual muscle fibers are capable of producing greater amounts of force. In addition to being responsible for producing the force necessary for dynamic movements, type II muscle fibers have a greater diameter (cross-width) than type I fibers and are responsible for the hypertrophy, or increased size, of a particular muscle.
10. Type IIA and IIB muscle fibers are responsible for generating movement as well as muscle size and definition. Both classifications of type II muscle fibers create higher levels of force to produce human movement and are known as phasic muscles. Type I fibers are responsible for maintaining postural and joint stability, and can be categorized as tonic muscles.
If your client has a fitness goal related to improving muscle definition or building strength, the only way to achieve this is by activating the type II motor units and muscle fibers. There is a common misconception that developing muscle tone (“toning up”) is best achieved by using lighter weights for higher repetitions. While it is possible to achieve definition with lighter weights, it requires doing a high volume of repetitions. Using light weights for high repetitions can improve the aerobic efficiency of type I fibers, but unless the exercise is performed to fatigue which occurs only after recruiting the type II fibers, it will not result in the desired goal of definition. However, if time is an issue (as it is for many people), using a heavier weight for fewer repetitions is an effective technique for stimulating growth and definition from the type II fibers. It is important to note that exercising with higher repetition ranges will result in muscle growth from sarcoplasmic hypertrophy, while using heavier loads for fewer reps induces myofibrillar hypertrophy, which increases strength without necessarily inducing significant gains in muscle growth.

Source

Tuesday, 19 May 2015

Abdominal Weight Loss: Yoga can help you lose the gut

Whenever anyone says or gestures that they want to lose weight, most of the time, they point to their guts saying “I wanna lose all this!” Obviously, abdominal weight loss is a goal for many people.

However, what most people might not be aware of is that-of all exercises-Yoga actually can help immensely for weight loss in the abdominal region. There are specific poses, that target excess weight in the abdomen and coupled with a customized diet, those seeking abdominal weight loss would find success in using these yoga exercises.

Let’s go over them, shall we?

Abdominal Weight Loss: Yoga Poses to Use.

1. The Sun Salutations:
These are a combination of poses that serve as a warm up-routine for a Yoga session or class. They are very similar to the popular calisthenics exercise known as burpees. However, they differ in that they have a spiritual significance included as a result of executing them. Due to the forward and backward bending motions involved, after performing a few to several rounds on a daily basis, you are bound to notice a marked loss of weight in you abdominal area and the added bonus of muscular tone.

2. The Bow Pose:
This simple pose involves laying flat on your belly and grabbing your ankles with both arms while simultaneously lifting your head up high. When performed correctly, you should be resting on your abdomen. Needless to say, it is a pose commonly recommended for weight loss and the prevention and correction of chronic constipation.

3. The Peacock Pose:
This is slightly more challenging. The objective is to balance your abdomen on your conjoined elbows while simultaneously raising your legs and head of the floor. Naturally, merely attempting it speeds up abdominal weight loss and detoxification of the visceral organs and the preparatory stage could suffice as the actual execution of the pose till the mastery of it is achieved.

4. The Abdominal Lift:
This is not a pose, per-se but is a specific exercise that involves you exhaling your breath and pulling the diaphragm in while holding the breath out. This is a specific abdominal exercise for weight loss, spiritual rejuvenation and detoxification.

Now friends, there are other poses such as the shoulder-stand, the forward-bending pose, the spinal twist and the wheel pose that also target increase in muscular tone and weight loss in the abdominal regions, however from practice the 4 above will perhaps be the most effective.

Do note though that if you are female and pregnant or in your menstrual period, some of these poses might not be the best to execute.

Moreover, since these poses-besides helping with abdominal weight loss-aid tremendously with detoxifying, it is advised that one eats a proper and healthy diet to augment the actions of these poses.

Other fantastic exercises for abdominal weight loss include your intense Aerobics, the use of the ab-wheel, basic sit-ups, windmills etc.

So empower yourself with these tips and information to achieve your goal for weight loss. Lose that gut starting today.


Brigi G | Fitness Inspired Formula

Tuesday, 21 April 2015

10 Tips to Help You Choose the Best Running Shoes for Women

Sometimes it can be a challenge to discover what the best would be in any given situation. When you are looking at the best running shoes for women, several things comes to mind which includes its reliability, the level of comfort you can get and of course the price you have to pay for them. There are many different types to choose from which all offers a different type of functionality to enhance the users' experience.
There are plenty of different models that get top choice awards or the different functionalities it offer. Here are the top ten tips which can help you choose the best running shoes for women.

1. Stability
The stability of the running shoes is vitally important since you would be moving around in these shoes so this should be a very important factor to consider. The stability of the shoe would never be jeopardized. The best running shoes for women must come with a reliable and considerable stability so you would not be likely to wobble and fall just because the shoes gave way when you are running.
2. Cushioning
Everyone wants to wear a pair of shoes that is comfortable. The best running shoes for women must be exceptionally comfortable; which would hardly cause any form of pain on the feet. Shoes that are too tight can cause injury and severe discomfort and so are shoes which are too loose. You would want a snug fit which hugs your feet comfortably when you are running. Those with high arch should be careful about choosing the right shoe with extra padding for comfort.
3. Motion Control
Shoes which are excellent for running should have great motion control. A good shoe must give maximum support for the arch of the feet and at the front of the feet as well. The shoes should enable you to move about and pause at any time necessary without slipping.
4: Price
The pricing of the running shoes plays a very important role in choosing the right running shoes. Running shoes for women come at varying degrees of price level so you can always select the one that is best for you.
5. Durability
The durability of the shoe is another important factor in deciding on the running shoe. Take into account the durability of the shoe. A good pair of running shoes should be able to withstand the assaults and the tough environment it would be subjected to i.e. running across open terrains and planes with the shoes on. Naturally, these types of shoes often wear out faster than shoes used for other occasions.
6. Reliability
The reliability of the shoe is very important as well. The shoe should have the proper traction and be able to grip on many different surfaces without slipping or giving way.
7. Manufacturer
It is also important to choose a manufacturer that has a reliable track record of producing excellent quality shoes for running. Different manufacturers offer different types of running shoes that has its own positive qualities and negative points, and you would want to select those that would enhance your own strengths and augments your weaknesses.
8. Warranty
Check the warranty period when you purchased. A good pair of running shoe would have its own warranty period which protects it against all kinds of manufacturing defect If the shoes are found to suffer from manufacturing defaults during this period, you can return it and get a new pair of shoes or a full refund of your purchase price.
9. Reviews
Read reviews so you know which shoes are best for your specific condition and which are the ones that needs to be avoided. The experience of others can direct you in choosing the right shoe for your needs. There are many online stores and sites hat offer customer reviews and opinions you can read, s and share your own feedback as well. Make it a point to fully use these sites as much as you can.
10. Comparison Shopping
Before deciding on the best running shoes for women and settling on the best one as your own running shoes, do some comparison shopping to check for the pieces and deals offered. This can be done easily if you plan on getting one online. There are also some good fakes being sold out there as the genuine stuff. Be wary of such incidence so you can avoid getting scammed especially in the online world.


Tuesday, 17 March 2015

Pilates-inspired Moves That Sculpt, Strengthen and Tone

Pilates is a method of exercise to inspire graceful movements by enhancing core strength. Mat Pilates incorporates body-weight movements to develop core strength, flexibility, awareness and breath control. In addition, Pilates instructs awareness of spinal alignment as well as deep core muscle recruitment to execute efficiency, strength and stability.
The main six Pilates principles are: centering, concentration, control, precision, breath and flow. Therefore, Pilate exercises balance muscular contraction, movement and deep breathing. The Pilates breath is essential for movement execution and core contraction. The style of breathing varies among every Pilates philosophy, but typically the inhalation is taken through the nose and the exhalation is released through pursed lips. It is ideal to inflate the diaphragm, which shifts the breath into a “three dimensional” movement into the ribs. Thus, the ribs move up and down, laterally, and front and back, similar to expanding a balloon.  
This Pilates mat routine combines traditional and Pilates-inspired movements to strengthen and tone lower, upper and core musculature. Complete one to three sets of each exercise.    

Side Plank Rotation With Leg Lift

 This movement combines a traditional side plank and side leg lift exercise to increase shoulder blade stability, core strength, thoracic mobility and hip strength.
How to Perform: Lie on your side and assume a side plank on your forearm with your bottom knee bent at 90-degrees. (To increase the challenge, position the body into a full side plank.) Reach the top arm above the shoulder. Exhale, rotate the chest and sweep the top arm under the rib cage. Inhale and return to center. Exhale and lift the top leg off the floor to where the foot is level with the hip. Inhale and return the leg to center. Repeat for six to 10 reps and switch to the other side.

Plié Squat to Yoga Tree Pose

 This movement integrates a traditional plié squat that moves into the common yoga tree pose. The plié strengthens the lower body and the transition to tree pose challenges balance, while the inner and outer thigh of the stance leg helps stabilize the pelvis.
How to Perform: Stand tall with feet hip-distance apart and arms extended in front of the shoulders. Slightly externally rotate the hips to where the feet move away from facing forward approximately one inch. Step your right foot away and lower the legs into a plié squat while opening the arms wide away from the body’s center. Exhale and lift your body upward while lifting the arms overhead and placing the right foot on the left calf. Hold for one to three seconds and continue the squat to tree motion. Complete six to 10 repetitions on the right side and then switch to the left leg.  

Plank With Leg Lift
This pose increases upper-body strength, shoulder blade stability, hip mobility and core and gluteal strength.
How to Perform: Position the body into a full plank on the hands and with the feet together. Draw in the core and imagine the hands are pushing away from the floor. Point the right toe and lift the leg upward toward hip height, contracting the gluteals. Return the leg to center and repeat for six to eight repetitions. Repeat on the left leg.

Supine Crescent Moons
This movement increases hip mobility and core strength.
How to Perform: Lie on your back and lift the legs over the hips. Maintain a neutral spine as the core musculature is engaged and “drawn in.” Lower your right leg about one to two feet (this is your starting position). With each leg, draw a crescent moon shape (the right leg draws from the bottom up, and the left leg draws from the top down to start). Continue to draw the moon shape; thus, if imagining a clock around the legs, the right leg continues to glide from 6, 3 to 12 o’clock and then 12, 3 and 6 o’clock. The left draws from 12, 9 to 6 o’clock and then 6, 9 to 12 o’clock, respectively. Exhale the breath when drawing the curve of the moon.
Complete six to 10 crescent moon shapes. *Note the farther the legs are from the hips, the more challenging the pose, especially for core stabilization. Keeping the toes directly over the hips decreases the challenge.

Double Legged Helicopters

This core exercise increases core and hip strength while focusing on the simultaneous movement of the legs and hips.
How to Perform: Lie on your back and bring the legs straight above the hips with the feet together. Bring the toes to level with your head, or eyes, (to make the move more challenging, lift the pelvis off the ground as if you were doing a reverse hip curl). Start to split the legs apart to draw what seems like the curve of a capital D (roll the pelvis back on the floor here if you have lifted it). Bring the toes back together and continue drawing this “Capital D” movement with your feet. Exhale as you split the legs to draw the curved motion. Complete six to 10 repetitions. *Note the farther the legs meet away from the hips, the more challenging for the core, but the goal is to execute strength rather than try to make as big a range of motion as possible.

Moving Cobras
Moving cobras help tone the triceps while increasing the strength of the back extensor muscles.
How to Perform: Lie on your stomach and place both hands underneath (or several inches in front of) the shoulders. Keep the top of the feet flat on the ground and elbows tucked into the side body. Inhale and lift and extend the spine off the ground while pulling the shoulder blades down the spine. Keep your eye gaze forward. Exhale and lower the torso onto the ground. Continue to use the triceps to assist the lifting and lowering motion. Complete six to 10 repetitions.

Source