To experience these benefits, add one set of the following exercises at the beginning of your workouts, twice a week for at least six weeks (in other words, perform these balance exercises 12 times over the course of six weeks). To check your progress, take the single-leg balance test* (for both legs) during the first week. Retake the test again after the sixth week of training to see if there is a difference in your score.
*Single-leg Balance Test:
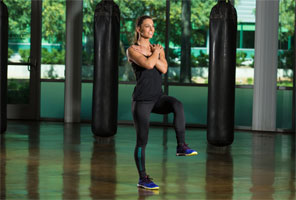
Grab a stopwatch and stand with your feet directly underneath the hips.
Cross your arms over the chest.
Lift one leg off the floor, making sure your legs do not touch each other.
Start the timer the instant your foot leaves the floor. Stop the timer when your foot touches back down, or if your body starts flailing to regain balance. The test should be performed with minimal bodily movement.
Record your score for each leg. The longer the time spent standing on one leg, the better your balance.
There are no norms for comparison, only your own score. The goal is to increase the time you are able to stand on one leg from pretest to post-test.
Note: It is up to you whether or not you wear shoes during this test. It makes sense that if you train in shoes, you should also test your balance wearing shoes. Clearly, this is not a scientific assessment, but making the pre- and post-tests factors the same, and the training variables the same as during testing (e.g., wearing shoes versus going barefoot), will give you a more realistic result.
1. Split Lunge
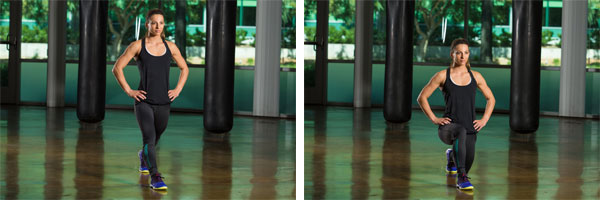
Adopt a split-stance position with one leg in front of the other and your feet hip-width apart (i.e., your feet should not be directly in line with each other). Your front foot should be far enough forward so that the front shin remains vertical upon descent. Keep your front foot flat on the floor, while balancing on the ball of the back foot. Lower and raise your body by bending both knees and keeping your back heel off the floor. Go as low as you comfortably can without compromising balance. Perform 10 repetitions on each side.
For more challenge, try adding a small jump on the way up. Be very careful that the front knee stays in line with the toes and does not cave inward.
For less challenge, try holding the position (without raising or lowering) for 30 seconds on each side.
2. Side Shift Into Single-leg Balance
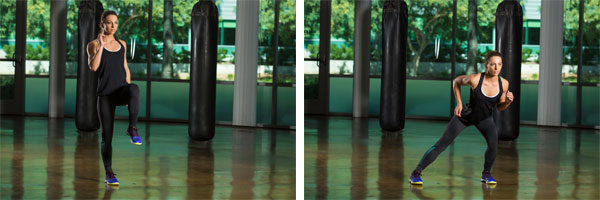
To start, stand with your feet together. Take a long step out to the side, as if you are performing a side lunge. Quickly push off the floor and return the leg, but instead of placing the foot beside the other one, raise your knee up toward the chest and hold for a count of 2. Essentially, you’re performing a quick side lunge directly into a single-leg balance without letting the foot touch the floor upon the return. Perform 10 repetitions on each side.
For more challenge, hold a dumbbell in the same-side hand as the lunge leg.
For less challenge, return the lunge foot to the starting position beside the other foot, instead of lifting the knee.
3. Standing Cross-body Rotation
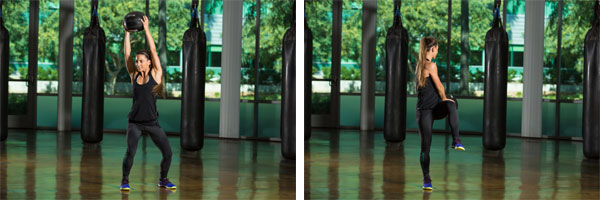
To start, stand in a wide squat. Pull one knee up toward the opposite shoulder, while driving the opposite elbow to the outside of the knee, essentially creating an across-the-body rotation with opposing limbs in a single-leg stance. Keep your torso as vertical as possible as you rotate through the trunk. Perform 10 repetitions on each side.
For more challenge, hold a dumbbell or small medicine ball with both hands. Lift the weight up on a diagonal and then drive the weight to the outside of the knee that is lifted.
For less challenge, bring the foot in to tap the floor beside the other foot, instead of lifting the knee.
4. Elbow Plank Leg Raise
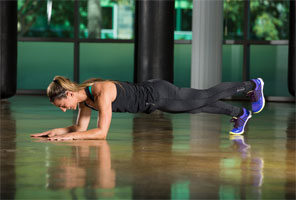
Adopt a plank position on your elbows and toes. Be sure to engage the abdominals to prevent the hips from rocking side to side. Squeeze the same-side glutes to lift up one leg at a time. As you lift the leg, the movement should be controlled by the glutes. Keeping the knee very straight while you lift will help prevent the hamstrings from contributing more than they should. Perform 20 repetitions (10 on each side).
For more challenge, place your elbows on a BOSU trainer or other unstable surface.
For less challenge, tap one knee to the floor at a time, instead of lifting the leg.
Putting It All Together
As noted earlier, perform your balance work early in your exercise session. This will help you avoid the risk of neuromuscular fatigue, which could occur if you wait until the end of your workout. Interestingly, available research shows that a multicomponent exercise program that consists of strength, endurance and balance training appears to be the best strategy for improving balance (Cadore et al., 2013; Zech et al., 2010). Hence, for the most benefit, balance exercises should be included as part of a comprehensive training program.
Source

No comments:
Post a Comment